
If you’ve ever struggled to land reef fish like snapper and grunts or wanted a finesse setup for bass in heavy cover, the chicken rig could be exactly what you need. This guide breaks down both versions of this popular rig: the saltwater dropper loop rig and the freshwater Neko-style rig. You’ll learn exactly which materials to use, how to tie each knot, proper spacing between hooks, and when to choose each version for the best results.
By the end, you’ll be able to build both rigs from scratch, store them properly to avoid tangles, and fish them with confidence whether you’re dropping lines 200 feet deep or working a soft plastic through lily pads.
Saltwater vs Freshwater: What Is a Chicken Rig
The term chicken rig causes confusion because it refers to two completely different setups depending on where you fish. In saltwater, it’s a multi-hook dropper loop rig designed to present bait at different heights above the seafloor. In freshwater, it’s a finesse Neko-style rig used for presenting soft plastics to bass in heavy cover.
The saltwater version targets species like vermilion snapper, triggerfish, grunts, and sea bass that feed at varying depths off the bottom. The freshwater version excels at catching largemouth and smallmouth bass in weedy areas, rocky zones, and pressured lakes where fish are wary of bulky presentations.
Understanding which rig you need is the first step toward building it correctly and fishing it effectively.
Build a Saltwater Chicken Rig: Step-by-Step
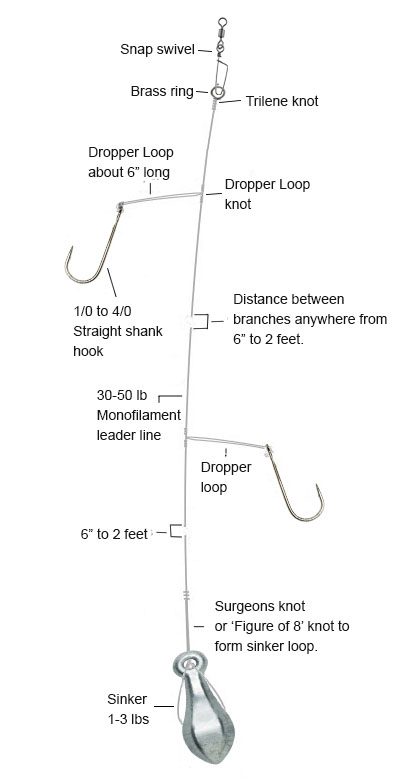
The saltwater chicken rig uses dropper loops to suspend two hooks at different levels above a sinker. This setup increases your chances of success by offering fish multiple bait positions.
Choose Your Leader and Main Line
Use 30 to 50 pound fluorocarbon leader for best results. Fluorocarbon sinks faster than monofilament, stays invisible in clear water, and resists abrasion from rocks and reef structure. Your main line can be braid in the 20 to 30 pound test range, but always connect it to the leader via a swivel to prevent line twist.
Avoid wire leaders unless targeting toothy species, as most charter operations prohibit them due to tangle risks.
Tie Two Dropper Loops with Proper Spacing
Start with a 6 foot section of leader material. You’ll tie two dropper loops along its length.
For the bottom loop, measure about 6 inches from where the sinker will attach. Form an upside-down V with the line and twist the two top strands together 5 to 8 times. Spread the twist open and pass the bottom strand through the gap. Pull both ends to tighten, moistening the knot first. This creates a perpendicular loop positioned 4 to 5 inches above the sinker.
For the top loop, measure 12 to 36 inches higher depending on your depth. In shallow water from 20 to 60 feet, 12 to 18 inches provides adequate separation. In deep water over 100 feet, use up to 3 feet between loops to prevent tangles during descent.
Attach the Sinker with a Breakaway Knot
To save your rig when snagged, tie the sinker on with an intentional weak point. The figure-of-eight knot works perfectly for this purpose.
Make a 4-inch loop at the end of the leader. Cross the tag end over the standing line to form an eight shape. Pass the tag through the bottom loop and tighten firmly after moistening. This knot breaks at approximately 50 percent of line strength, letting you retrieve the rest of the rig if it gets stuck on reef.
For deep drop rigs using heavy weights of 1 to 3 pounds, use a surgeon’s knot quick-release loop instead. It holds under pressure but releases fast when needed.
Connect to Main Line with a Strong Swivel
Use a barrel swivel or snap swivel to link your leader to the main line. The Trilene knot provides the strongest connection, maintaining 90 to 100 percent of line strength.
Pass the line through the swivel eye, then double back and wrap around the standing line 5 times. Pass the tag end through the first loop near the eye, then through the large loop. Moisten and pull tight before trimming the tag.
An alternative is to tie a perfection loop at the top of your leader and connect it to a snap swivel on the main line. This allows quick rig changes without retying.
Add Hooks and Bait
Slide octopus or circle hooks in sizes 1/0 to 5/0 onto each dropper loop. You can pass the loop through the hook eye once for standard attachment, or pass through twice for extra security. Some anglers prefer to tie a 6 to 12 inch fluorocarbon tag to the dropper loop using a clinch knot, then attach the hook to that tag.
Use cut bait like squid strips, cigar minnows, or shrimp. For added attraction, clip a feather teaser or glow bead above the lower hook. Orient teasers so they fan out like a parachute in current to mimic live prey movement.
Build a Freshwater Chicken Rig: Step-by-Step
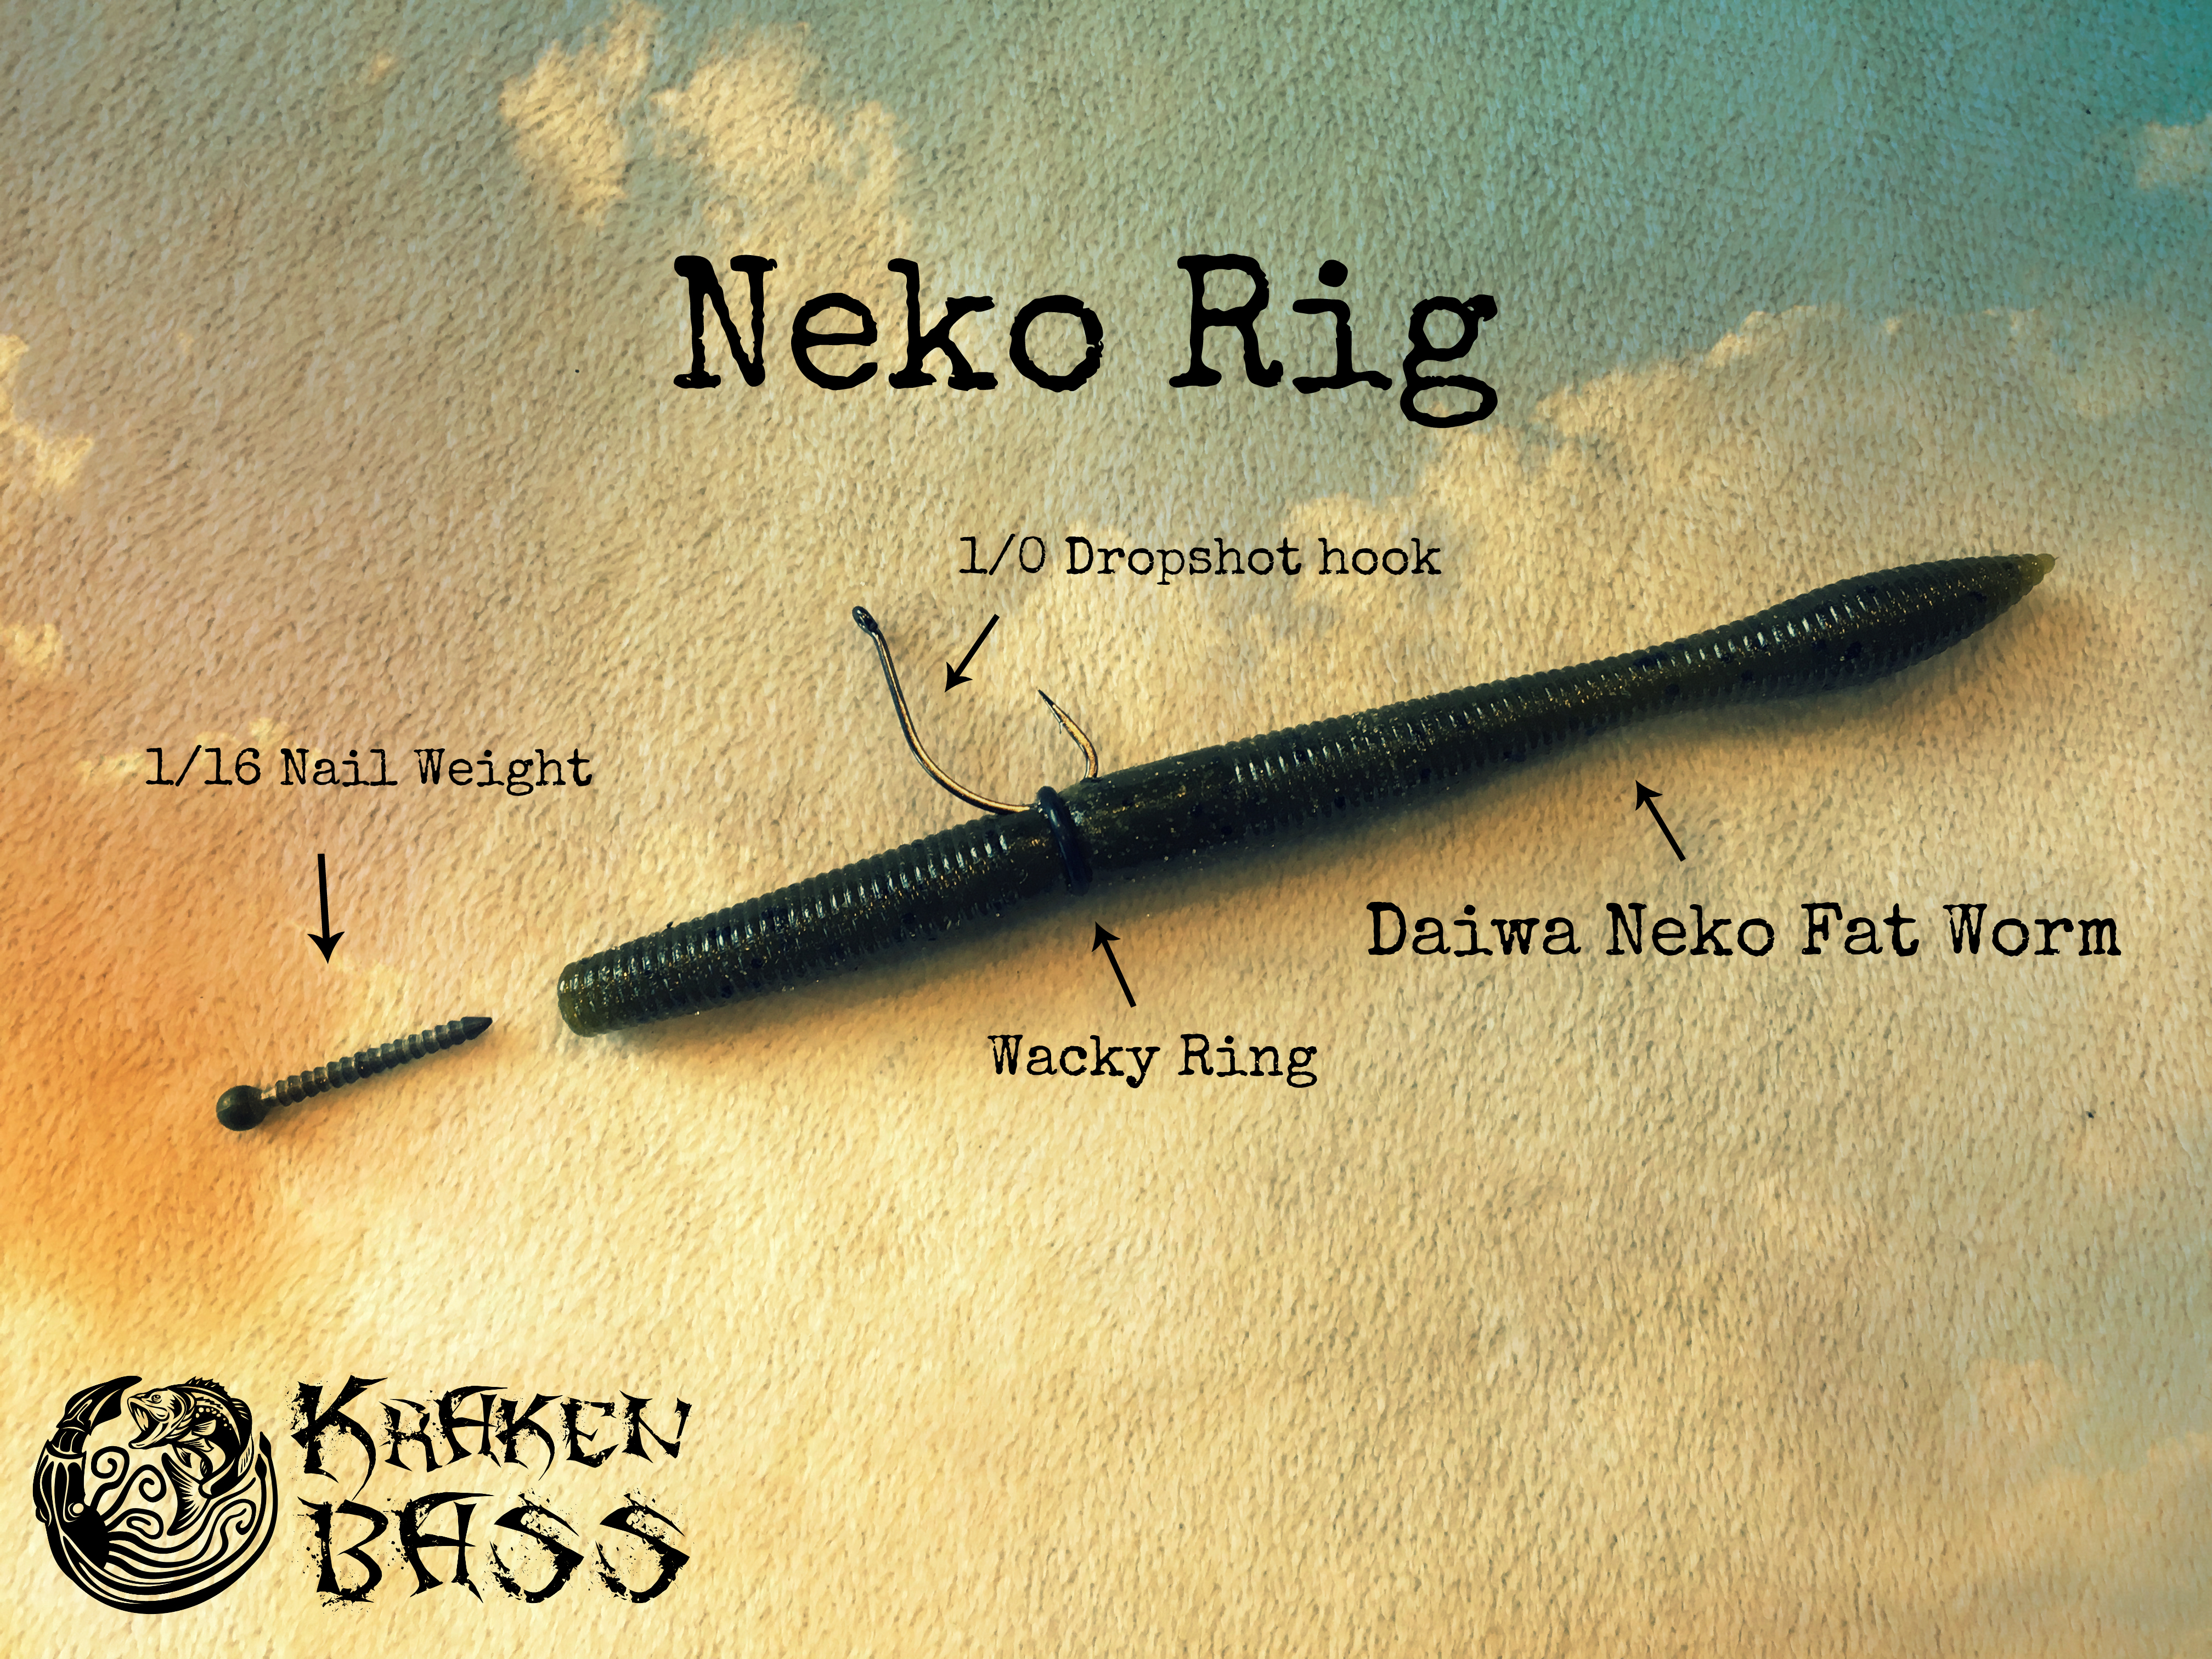
The freshwater chicken rig is a finesse variation of the Neko rig, popularized by pro angler Ike. It uses a soft plastic worm with a nail weight inserted into the head, rigged Texas-style so the hook runs straight through the body. The result is a vertically-standing lure that wiggles enticingly with the slightest twitch.
Select the Right Bait and Components
Use a Berkley Powerbait Flute Worm in 5.7 to 7 inch lengths. One end is fat and ribbed while the other is thin and straight. The three ribs help align the hook and weight for perfect balance.
Pair the worm with a VMC Finesse Neko Hook in size No. 1 or 1/0 and VMC Half Moon Wacky Weight. Use 1/16 ounce for shallow water under 15 feet, or 3/16 ounce for deeper water over 15 feet.
Use 6 to 10 pound fluorocarbon or fluorocarbon-coated braid on a light or ultralight spinning rod for maximum sensitivity.
Insert the Weight into the Worm Head
Take the Half Moon weight which has a flat side and a pointed nub. Push the nub into the fat head of the worm, aiming for the center dimple between the ribs. Insert until the weight sits flush and flat against the head.
The flat side keeps the worm balanced so it stands upright on the bottom. Using the wrong weight depth causes the head to sink and ruins the vertical posture.
Texas-Rig the Hook for Straight Alignment
Thread the VMC Finesse Neko Hook through the body about two-thirds of the way down from the head. Use the ribs as a guide, inserting the hook just behind the third rib. Run the hook straight through with the point embedded in the body. Ensure the hook shank is in-line with the worm with no twisting.
Twist the worm slightly around the shank to lock it in place, but leave the tail free to wiggle. Any angle in the hook ruins the fall and causes line twist.
Fish with Subtle Twitches
Cast near cover like rocks, stumps, or weed edges and let the rig sink. The worm descends at a slight angle, and no two falls are identical which increases attraction. Once on the bottom, it stands vertically with the tail poised to move.
A tiny rod shake makes the tail vibrate like live prey. Don’t set the hook immediately on a tick because you may just be feeling the weight settle. Wait for a definite pull or slack line, then set softly.
Master Key Knots for Strength and Reliability
Your rig is only as strong as its weakest knot. Using the right knots ensures reliability and prevents losing your setup.
Trilene Knot for Swivel Connections
The Trilene knot is ideal for connecting braid or monofilament to swivels. It holds 90 to 100 percent of line strength because it distributes stress evenly.
Pass the line through the swivel eye, double back and wrap 5 times around the standing line, pass the tag through the first loop near the eye then through the large loop, moisten, and pull tight.
Dropper Loop for Fixed Side Loops
The twist method creates reliable dropper loops. Form an upside-down V, twist the top strands 5 to 8 times, pass the bottom strand through the twist gap, and pull the standing line to seat the knot. Avoid over-tightening which can crush the loop closed.
Figure-of-Eight for Intentional Weak Points
The figure-of-eight breaks at approximately 50 percent strength. Use it only at the sinker end to create a breakaway point that saves your rig when snagged.
Surgeon’s Knot for Quick-Release
Tie a double overhand loop, thread the sinker on, and connect to the main line. This knot holds under load but releases fast when needed, making it perfect for heavy weights over 1 pound.
Optimize Hook Spacing and Rig Balance
Poor spacing leads to tangles and ineffective presentations. Getting it right makes the difference between a productive day and a frustrating one.
For saltwater rigs, position the bottom loop 4 to 5 inches above the sinker. Keep a minimum of 12 inches between loop bases, increasing to 24 to 36 inches in deep water. The total leader length should be 3 to 6 feet depending on your depth and number of hooks.
For freshwater rigs, the weight must sit flat in the head. The hook should be inserted two-thirds down and aligned straight. The tail must swing freely, so never bury the tip in the worm body.
Test your freshwater rig in a glass of water before fishing. It should stand upright and fall slowly at an angle.
Store and Transport Without Tangles
A messy rig means wasted time on the water. Proper storage prevents tangles and keeps hooks sharp.
Saltwater Rig Storage
Connect the two hooks bend-to-bend. Slide the sinker loop over your reel handle and tighten the line to secure everything. This keeps hooks contained and allows instant deployment. The swivel should remain outside the rod tip for quick access.
Freshwater Rig Prep
Pre-rig several worms and store them in a soft tackle box. Keep weights separate to avoid deforming the soft plastics. Use rig protectors or foam inserts to prevent hook damage.
Avoid Common Chicken Rig Mistakes
Even small errors reduce effectiveness and cost you fish.
Saltwater Pitfalls to Avoid
Using more than two hooks is unethical and often illegal. Stick to the two-hook maximum for responsible reef fishing. Using a strong knot like the Palomar at the sinker means losing the whole rig when snagged. Never use a strong knot where you need a breakaway point.
Crowded droppers with less than 12 inches between loops cause constant tangles. In strong current, use pyramid sinkers and increase hook spacing to compensate.
Freshwater Errors to Prevent
A hook that isn’t straight causes unnatural fall and line twist. Make sure the shank aligns perfectly with the worm body. Inserting the weight too deep sinks the head and ruins the vertical posture.
Using the wrong weight size matters. Too light produces slow action while too heavy creates an unnatural fall. Skipping scent reduces strikes in clear water, so add attractant to boost effectiveness.
Practice Conservation with Responsible Rigging
More hooks don’t mean better fishing. They hurt fish populations and reduce future catches.
The two-hook maximum is standard for ethical reef fishing. High-hook-count rigs increase bycatch and create floaters, which are fish that swallow multiple hooks and cannot be released alive. Use circle hooks when possible because they reduce gut-hooking.
Captain Cody Baker advises that rigs with 5 or more hooks are terrible for reef fish conservation. Keep your setup simple, effective, and sustainable.
When to Use Each Chicken Rig
Choose the right rig for your environment and target species for the best results.
Use the saltwater chicken rig when fishing reefs, wrecks, or jetties. It’s ideal for targeting snapper, grunts, or triggerfish. Use it while drifting or anchoring in 20 to 500 plus feet of water. This rig works best with cut bait or live shrimp and provides a multi-bait presentation.
Use the freshwater chicken rig when fishing lakes or rivers with weeds or wood. It’s designed for targeting bass in clear or pressured water. This setup provides a weedless, finesse presentation with soft plastics like Flute Worms and delivers maximum sensitivity with natural action.
Frequently Asked Questions About Chicken Rigs
What is a chicken rig used for?
A chicken rig is used to present bait at multiple levels in the water column. The saltwater version targets reef fish while the freshwater version targets bass in heavy cover.
How many hooks should a chicken rig have?
Use a maximum of two hooks for ethical and effective fishing. More hooks increase bycatch and are often illegal on charter boats.
What is the best line strength for a saltwater chicken rig?
Use 30 to 50 pound fluorocarbon leader for saltwater chicken rigs. This provides the right balance of strength, abrasion resistance, and invisibility.
Can I use a chicken rig in freshwater?
Yes, the freshwater version is a finesse Neko-style rig designed specifically for bass fishing in cover. It uses soft plastics instead of cut bait.
Why does my chicken rig tangle?
Tangles usually result from insufficient spacing between hooks or improper storage. Ensure at least 12 inches between dropper loops and store hooks connected bend-to-bend.
Final Thoughts on Building Chicken Rigs
The chicken rig isn’t one trick but two powerful techniques under one name. The saltwater version dominates on the bottom with dual bait presentations, while the freshwater finesse rig wins in cover with subtle, lifelike action.
Build both rigs correctly by using the right materials, spacing hooks properly, and tying strong knots suited to each purpose. Respect conservation limits by keeping hook counts low, and store your rigs to prevent tangles between trips.
Master both versions and you’ll be ready for anything from reef panfish to trophy bass, no matter where you cast.





