

You’ve probably stared at a tackle box full of store-bought soft plastics and wondered: can I make my own rubber fishing lures? The answer is yes, and doing so gives you total control over color, texture, buoyancy, and scent. Whether you’re targeting bass in murky lakes or redfish in brackish marshes, homemade rubber fishing lures let you match local forage down to the finest detail. Using liquid plastisol, a blend of PVC and plasticizers, you can pour custom baits that outperform off-the-shelf options, all for about $0.15 per lure after the initial setup.
This guide walks you through every step of making rubber fishing lures at home, from selecting the right durometer and mixing colors to injecting molds and recycling scraps. You’ll learn how to avoid sticky baits, prevent bubbles, and create professional-level laminated patterns. No prior experience is needed. Just a dedicated microwave, heat-safe container, and a mold.
Choose the Right Plastisol Formula
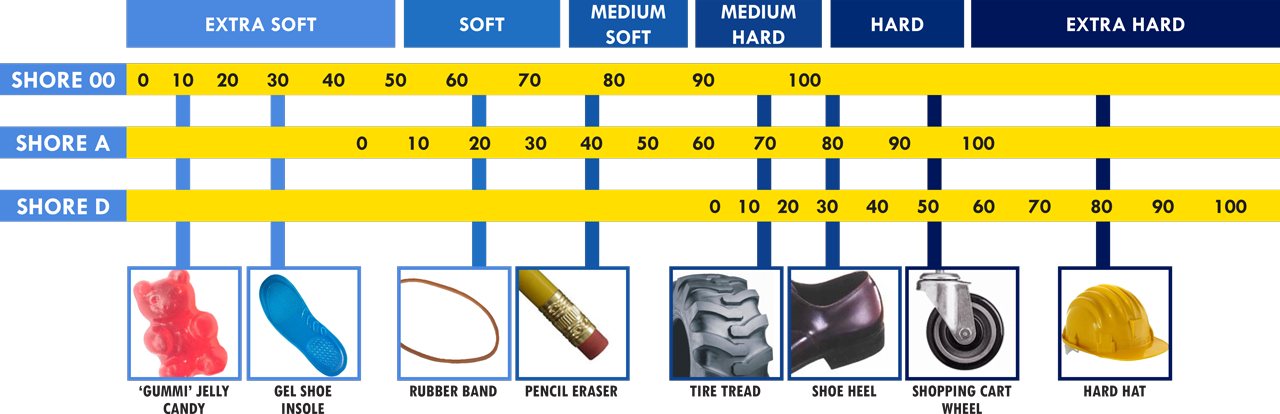
The foundation of any rubber fishing lure is plastisol, a liquid polymer that transforms into flexible rubber when heated and cooled. Selecting the correct formula directly affects your bait’s action, durability, and sink rate.
Understand Durometer Levels
Plastisol comes in soft, medium, and hard durometers, each suited to different fishing techniques.
Soft plastisol provides maximum tail wiggle and lifelike action. It works best for finesse rigs, drop shots, and cold-water fishing when fish are lethargic. The trade-off is lower durability. Soft baits tear easily on heavy cover or toothy fish.
Medium plastisol offers balanced flexibility and toughness. This is the best choice for Texas rigs, wacky rigs, and general-purpose use. Most beginners should start here.
Hard plastisol delivers rigid, abrasion-resistant baits. It’s perfect for saltwater species, pike, musky, or jig trailers in thick weeds. This formula withstands significant abuse.
You can blend formulas to create custom firmness. For example, mixing 70% medium with 30% soft gives you a custom action. You can also add plastic softeners or hardeners to fine-tune any batch.
Control Buoyancy With Additives
How your lure behaves in the water matters enormously. Floating plastisol slows descent, which keeps baits above grass and mimics injured prey hovering near the surface. Sinking plastisol dives quickly, ideal for deep structure or vertical jigging. Neutral or suspending baits hover mid-water, achieved by mixing floating and sinking batches or adding precise amounts of salt or sinking additive.
Note that even floating plastisol may not lift a heavy hook. Always test your final rigged bait in a bucket before hitting the water.
Set Up Your Lure-Making Station

A functional workspace ensures safety, consistency, and clean pours every time.
Heat With a Dedicated Microwave
Use an old microwave reserved exclusively for lure making. Never use one for food. Plastisol fumes contaminate interiors and leave residue that makes the microwave unsafe for kitchen use.
Heat plastisol in 1.5 to 2 minute bursts, stirring thoroughly between cycles. Your goal is reaching 320°F to 350°F, which is the clear gel state. Overheating above 380°F scorches the plastic, turning it yellow and releasing toxic fumes.
Alternative heat sources like hot plates or pour pots work well for large-scale production.
Use Heat-Resistant Containers
Only Pyrex or borosilicate glass can handle 350°F without cracking or melting. Avoid plastic cups entirely because they melt on contact with hot plastisol. Avoid thin glass because it shatters under thermal stress.
Choose container sizes based on your batch. Six-ounce to one-quart containers work well for most hobbyist projects.
Stir With Metal Tools Only
Wood contains moisture that turns to steam at high heat, creating bubbles in your lure. Always use metal spoons, butter knives, or a drill-mounted paint stirrer.
Stir gently to minimize air incorporation. If bubbles form, let the mix sit for 30 seconds or pass a heat gun over the surface to pop them before pouring.
Monitor Temperature Accurately
Guessing leads to sticky baits or scorching. An infrared thermometer provides the best non-contact temperature check. Alternatively, use a dedicated meat thermometer inserted into the mix during early batches to verify internal heat.
Calibrate your microwave timing based on wattage. A 1000W microwave heats faster than a 700W model, so adjust accordingly.
Wear Proper Safety Gear
Working with molten plastisol demands strict safety protocols. The temperatures involved and chemical vapors released require proper protection.
Protect Your Lungs
Plastisol emits organic vapors when heated. A NIOSH-approved respirator with organic vapor cartridges is essential. Standard dust masks offer zero protection against these fumes.
Shield Your Eyes and Skin
Molten plastisol at 350°F causes severe burns and sticks to skin like napalm. Safety goggles prevent splashes from reaching your eyes. Heavy-duty gloves, such as leather, welding, or thick wool varieties, protect your hands. Wear long sleeves, long pants, and closed-toe shoes. Prefer natural fibers like cotton and wool because melted plastic adheres to synthetics.
Ventilate the Area
Work outdoors, in a garage with open doors, or use exhaust fans. Fumes are irritating and potentially harmful with prolonged exposure. Never make lures in living spaces or near children and pets.
Select and Prepare Your Mold

Mold type determines detail, durability, and the method you will use.
Compare Mold Materials
Aluminum molds, both CNC-machined and cast, offer the best durability and detail. CNC molds cost $300 or more and require an injector. Cast aluminum molds cost around $100 and also require an injector. Both produce shiny, professional finishes.
Silicone molds capture intricate shapes and work with open pour methods. They cost $40 to $80 but can tear over time.
Plaster of Paris molds are the most budget-friendly option, costing under $20. They’re ideal for DIY and learning, but they must be sealed to prevent sticking.
Make a DIY Plaster Mold
You can replicate any existing bait affordably using plaster.
Build a mold box one inch larger than the bait using foam board or plastic. Secure the master bait flat-side down using double-sided tape. Mix plaster to pancake-batter thickness and pour slowly, tapping the box to release air bubbles. Cure for 24 hours, then remove the bait.
Dry the mold completely before use. Air drying takes one week. Oven drying requires 200°F for two hours. Do not exceed this temperature or the plaster may crumble.
Seal the mold to prevent sticking. High-temperature epoxy provides the smoothest finish and best durability. Mod Podge works as a budget option but is less heat-resistant.
Understand Mold Design Types
Single port molds have one injection point per cavity. Runner systems use one sprue to feed multiple cavities, which speeds production significantly.
Open pour methods work with silicone and plaster molds where no pressure is needed. Injection methods are required for aluminum molds and use a syringe-style tool to force plastisol into the cavity.
Customize Color, Glitter, and Scent
Turn basic plastisol into fish-attracting lures with additives that match local forage and water conditions.
Mix Effective Colors
Start with liquid pigments, adding two to three drops per cup of plastisol. Pigment bases create opaque colors like black and red. Dye bases create translucent tints like watermelon seed.
The X2 series offers thick, intense colors. Use them sparingly. The Essential series is thinner and more beginner-friendly.
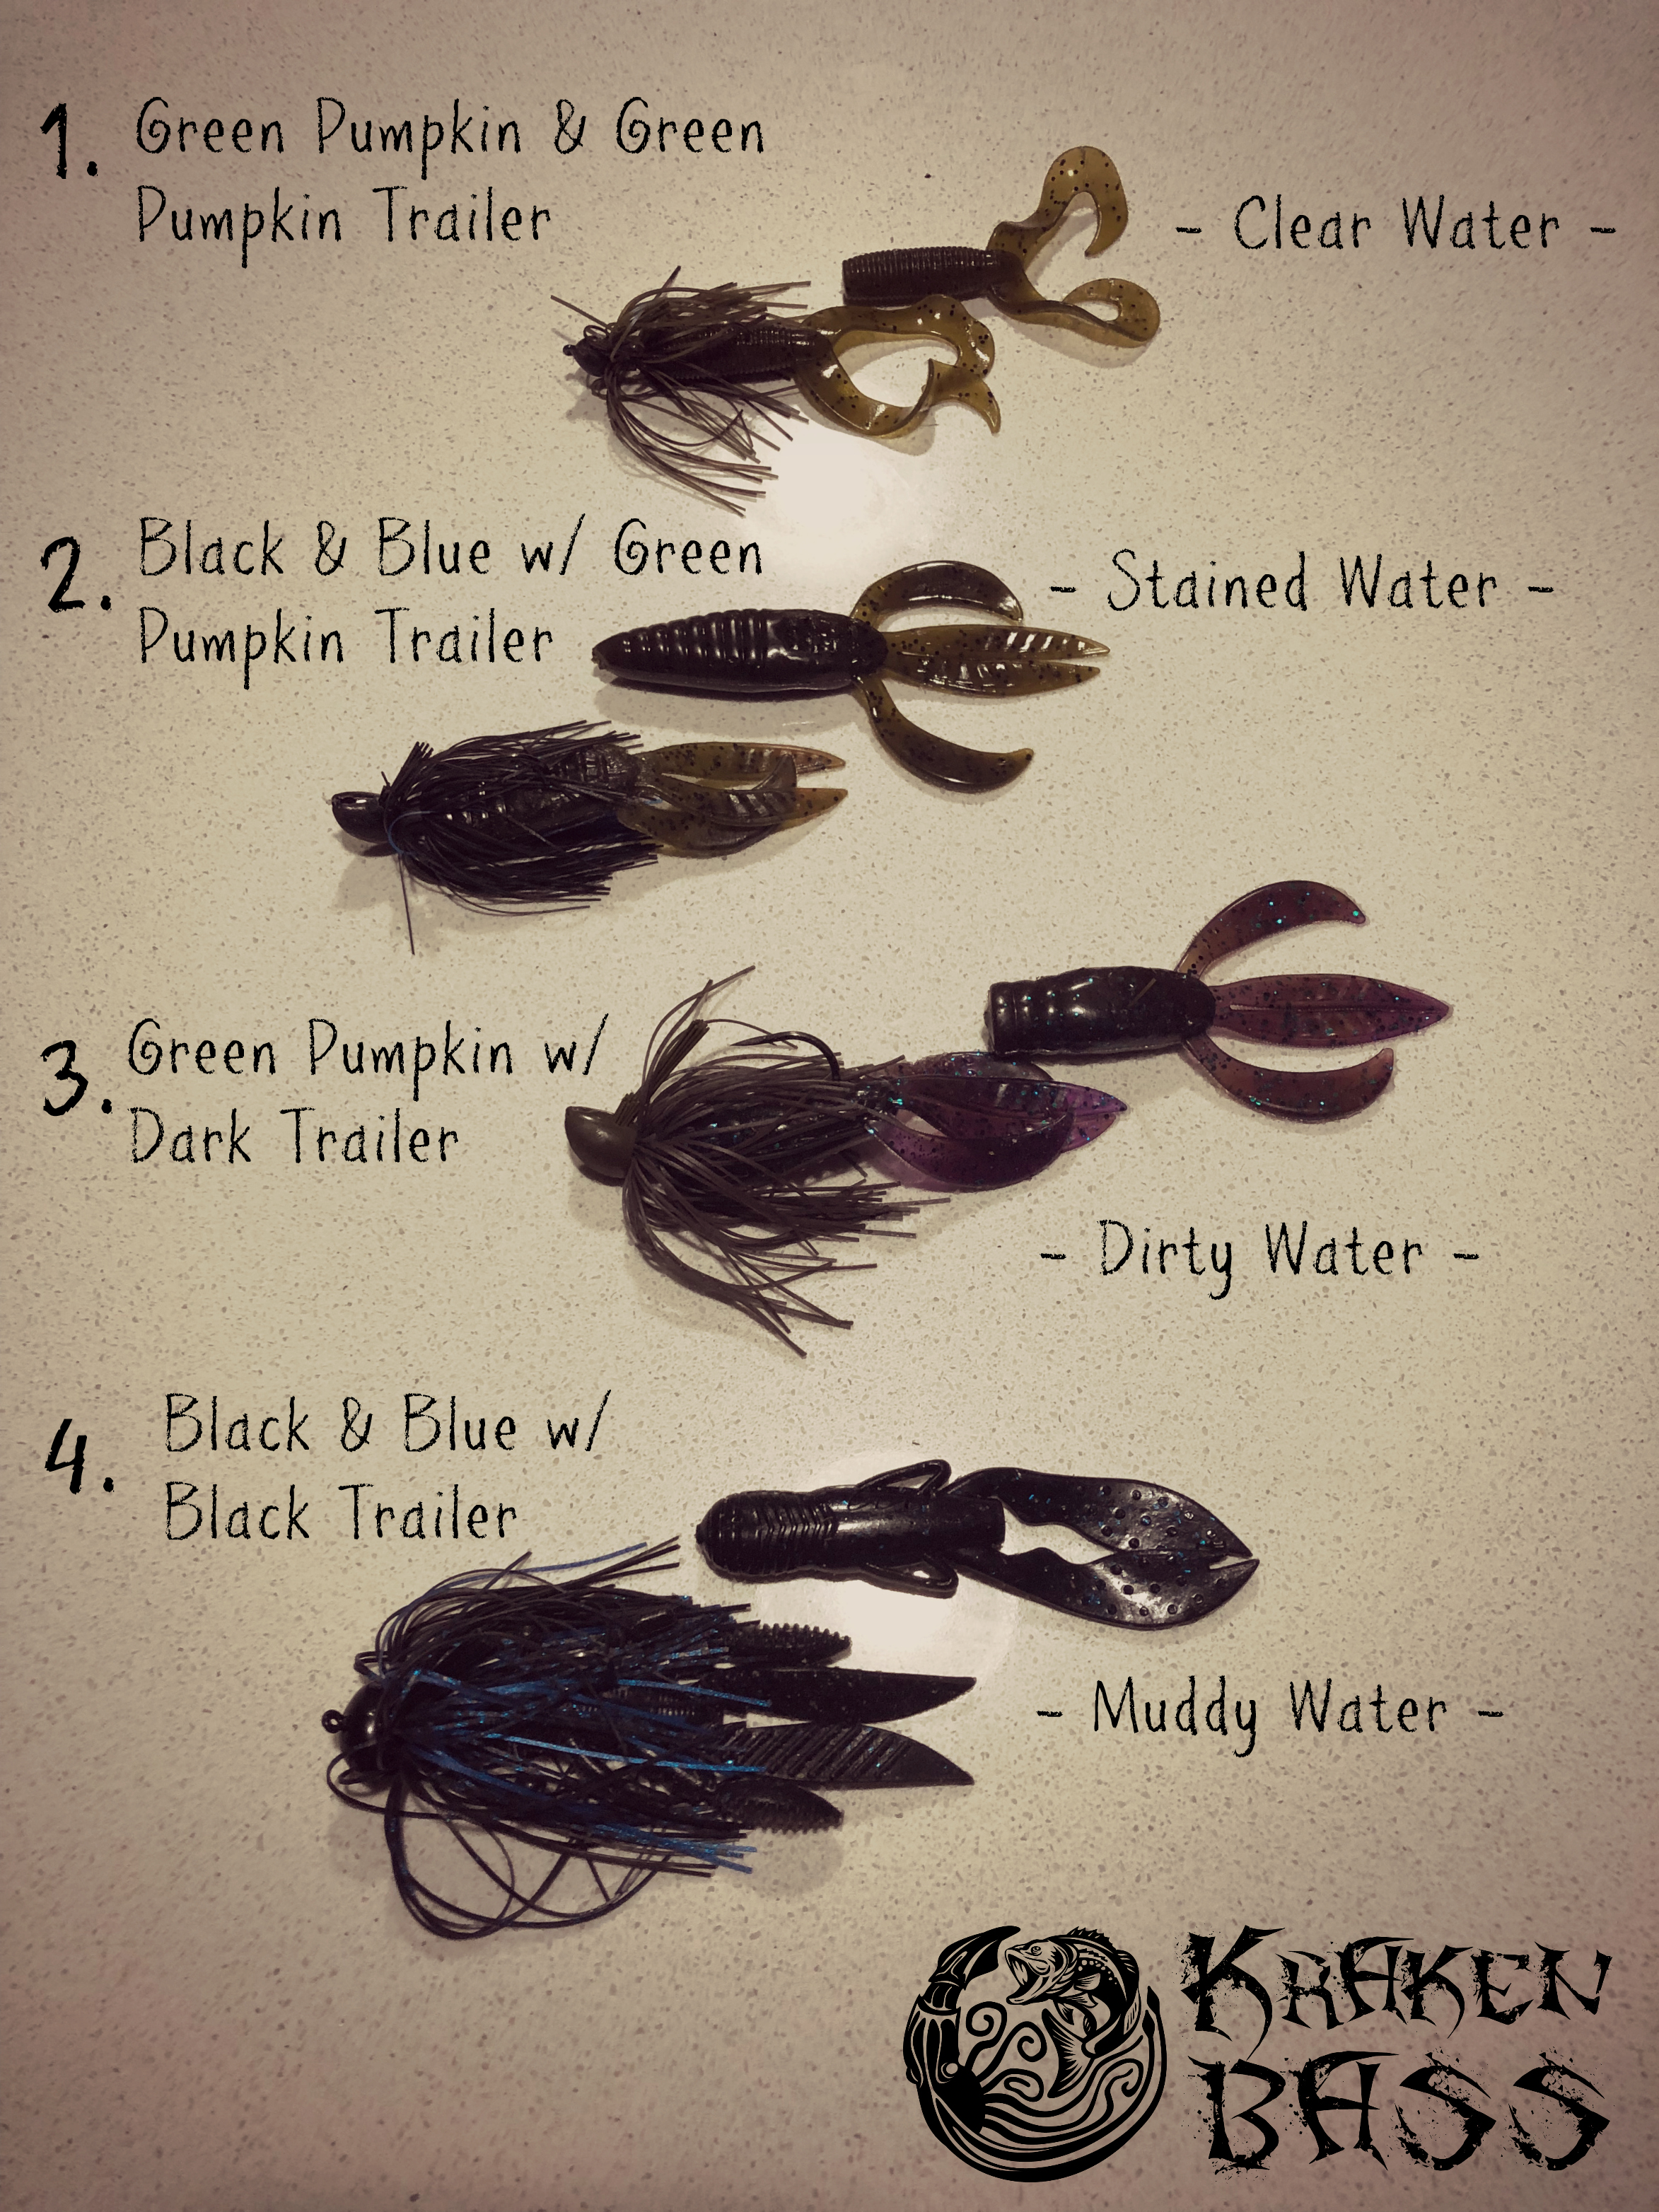
Match colors to water clarity. In clear water, use green pumpkin, brown, and natural hues. In stained water, use black, blue, red, and high-contrast patterns. Florida-style colors like June bug and motor oil work well in muddy conditions.
Add Glitter for Flash
Use high-heat glitter only. Craft glitter melts and ruins your batch.
Glitter sizes range from .08 for fine shimmer to .60 for large flash. Common sizes are .15, .35, and .40.
Square and hexagon glitters provide subtle shimmer. Whisker and strand glitters offer long, flashy strands that trigger strikes. Flake glitters work well in green pumpkin with black flake or shad patterns with silver.
Fold glitter into the plastisol after coloring, before pouring.
Boost Attraction With Additives
Salt increases sink rate and adds texture. Use fine ground only.
Sinking additive provides precise density control, more consistent than salt.
Softener makes hard plastisol more flexible, extending action in cold water.
Hardener reinforces soft plastic, ideal for toothy fish.
Heat stabilizer prevents yellowing, which is great for beginners.
Worm oil serves as both a mold release and a scent carrier. Brush it into the mold before pouring.
Oil-based scents like shad, crawfish, or garlic can be added to the mix or used to soak finished baits.
Pour or Inject Your Lure
Two main methods exist: open pour for plaster and silicone molds, and injection for aluminum molds.
Open Pour Method
This method works best for beginners and creates layered colors.
Brush worm oil into mold cavities for easy release. Pour a thin stream from head to tail to avoid trapping air. Overfill slightly because plastic shrinks as it cools. Cool for three to five minutes until solid, then peel carefully from silicone or pop from plaster.
Create Two-Tone Baits
Laminating creates realistic baitfish or craw patterns.
Pour your first color, such as white for the belly. Wait 30 to 60 seconds for a skin to form. Pour your second color, such as green for the back.
Timing matters. Pour too soon and colors swirl together. Pour too late and layers separate completely.
Injection Method
Injection produces high-volume, bubble-free baits for aluminum molds.
Load the injector with hot plastisol. Insert the nozzle into the mold port. Push the plunger slowly and feel for resistance. Stop when plastic appears at the vent holes. Never force the plunger because this causes flashing or mold damage.
Cycle the injector to clear the nozzle, saving the plug for recycling. Cool for three to five minutes. Open the mold and remove the bait.
Use clamps to keep mold halves sealed during injection.
Cure and Finish Your Baits
Proper post-processing ensures durability and shape retention.
Trim flashing with scissors or a hobby knife after demolding but before final cure.
Allow full cure time. Initial set happens in five to ten minutes when the bait is handleable. Final cure takes 24 to 48 hours laid flat. The chemical structure stabilizes during this time. Storing too early causes warping or sticking.
Add scent by soaking cured baits in scented worm oil for one to two hours. Alternatively, store baits in ziplock bags with scent beads. Recharge scent after heavy use.
Store baits in a cool, dry place away from heat and sunlight. Heat causes oil to bleed out. UV degrades plastic over time.
Recycle Every Scrap
One of the biggest advantages of making your own lures is zero waste.
Reclaim the Puck
Leftover plastisol in the cup or injector is called a puck, and it’s completely reusable.
Chop the puck into small pieces. Place in a clean Pyrex cup. Heat in 30-second bursts, stirring between each. Stir until fully liquid. Reuse immediately.
Note that mixed colors usually turn Junebug, brown, or black after recycling. These colors remain highly effective for fishing.
Remelt Failed Baits
Sticky, bubbled, or mispoured lures can be chopped and remelted. Plastisol allows infinite recyclability without chemical degradation.
Troubleshoot Common Problems
Avoid these frequent issues with proven fixes.
Sticky or Gummy Baits
Incomplete mixing or underheating causes sticky baits. Remix the main container with a drill stirrer. Heat to 350°F using a thermometer. Never skip remixing because separation is normal during storage.
Bubbles in the Lure
Moisture from wood tools, vigorous stirring, or a wet mold creates bubbles. Use metal tools only. Stir gently. Dry molds completely. Let hot plastisol sit 30 seconds before pouring to let bubbles rise.
Yellow or Burnt Plastic
Overheating above 380°F scorches plastisol. Reduce microwave time. Use an infrared thermometer. Discard any scorched batch because burnt plastic is toxic.
Flashing
Too much injection pressure or a loose mold causes flashing. Inject slowly. Use clamps on aluminum molds. Check mold alignment.
Bait Tears Easily
The formula may be too soft for your application. Switch to medium or hard formula. Add hardener to soft batches.
Mold Sticking
Unsealed plaster or premature demolding causes sticking. Seal plaster molds with high-temp epoxy. Wait the full five minutes before opening.
Start Smart: Beginner Tips
Jump in confidently with these proven strategies.
Begin With Simple Projects
Use a single-cavity mold. Start with medium plastisol and one color. Master temperature control before attempting laminates.
Invest in Safety First
A respirator and dedicated microwave are non-negotiable. Don’t skip goggles or gloves.
Keep a Recipe Log
Track every batch including color drops, glitter type and amount, heating time, and additives. Reproduce winners and avoid repeating failures.
Embrace Imperfect Baits
Early pours may have bubbles or slight warps. Fish don’t care. They strike based on action and profile. Focus on process, not perfection.
Recycle Relentlessly
Save every scrap. Remelting cuts long-term costs and eliminates waste.
Key Takeaways for Making Rubber Fishing Lures
Making rubber fishing lures at home blends science, creativity, and angling instinct. With a $90 starter kit, you can produce hundreds of custom soft plastics tailored to your local waters. The key is mastering plastisol behavior, which means heating to the correct temperature, using metal tools, and ensuring thorough mixing every time.
Your choice of durometer determines action and durability. Soft formulas wiggle more but tear easily. Medium offers the best balance for most freshwater fishing. Hard formulas withstand toothy fish and saltwater abuse.
The ability to remix and reuse every scrap makes this hobby remarkably cost-effective. A single gallon of plastisol produces approximately 415 five-inch stick baits that would cost over $300 retail. Even failed pours become raw material for your next attempt.
Start small, stay safe, and keep pouring. Your custom baits will outperform store-bought versions while matching exactly what the fish in your waters are eating.
Frequently Asked Questions About Making Rubber Fishing Lures
What is the best plastisol hardness for beginners?
Medium durometer is best for beginners. It offers balanced flexibility and durability, making it forgiving for learning temperature control and pouring technique. Soft formulas tear easily when you’re still developing your process, while hard formulas don’t offer the action that makes soft plastics effective.
How long do homemade soft plastic lures last?
Properly cured and stored lures last for several years. Store them in a cool, dry place away from UV light. Heat causes oil to bleed out and degrade the plastic. With proper care, your homemade lures will last just as long as commercial options.
Can I make lures without a mold?
Yes, you can hand-roll or shape plastisol by hand for simple forms like worms and tadpoles. However, molds provide consistent shapes and detail that fish recognize. For anything beyond simple cylinders, a mold is highly recommended.
Why are my lures sticky after curing?
Sticky lures result from incomplete mixing or underheating. The resin and plasticizer separate during storage, so thorough mixing is essential every time. Additionally, plastisol must reach 350°F to cure properly. Underheated plastic remains gummy.
How much does it cost to make your own lures?
After initial equipment investment, lures cost approximately $0.10 to $0.20 each. A starter kit costs around $90 and includes plastisol, basic colors, glitter, and a small injector. One gallon of plastisol produces roughly 415 five-inch stick baits.
Is it safe to make lures indoors?
Only with proper ventilation and dedicated equipment. You must use a separate microwave not used for food, work in a well-ventilated area, and wear a respirator with organic vapor cartridges. Never attempt lure-making in living spaces without exhaust ventilation.





