

Building your own fishing kayak puts a custom angling platform in your hands without the premium price tag. Whether you dream of a lightweight wooden kayak gliding through morning mist on your favorite lake, or you want to transform a budget recreational kayak into a tech-loaded fishing machine, the path is more accessible than you might think. This guide walks you through every viable method, from scratch construction to smart modifications, with real costs, proven techniques, and expert layouts you can use today.
You’ll learn exactly how to build a fishing kayak using affordable materials, which modifications deliver the biggest payoff, and how to rig your setup like competitive anglers who rely on their kayaks for serious fishing. Every section pulls from verified builder experiences and field-tested approaches, so you can start your project with confidence.
Choose Your Build Path Before Starting
The first decision shapes everything else: build from raw materials or modify what you already own. Each approach offers distinct advantages depending on your budget, skills, and timeline.
Build From Scratch vs. Modify Existing
| Factor | Build From Scratch | Modify Existing Kayak |
|---|---|---|
| Cost | $100–$500 in materials | $0–$150 in accessories |
| Time | Weeks to months | Hours to days |
| Skill Level | Intermediate (epoxy, framing) | Beginner (drilling, mounting) |
| Customization | Full control over hull and layout | Limited to accessory placement |
| Weight | As low as 40 lbs (wooden) | 50–80 lbs (stock models) |
| Warranty | None (no manufacturer) | Voids if hull is drilled |
Choose DIY construction if you want lightweight performance, total design control, and the satisfaction of handcrafting your fishing platform. Choose kayak modification if you already own a kayak and want fast, low-risk upgrades without the build time.
Build a Wooden Strip-Built Kayak

For anglers who value beauty, light weight, and total customization, a wood-fiberglass-epoxy kayak delivers unmatched performance and personal satisfaction.
Why Wood-Fiberglass Works for Fishing
This composite method combines cedar strips or marine plywood with fiberglass cloth and epoxy resin, creating a boat that weighs under 40 pounds dry and under 60 pounds loaded. The finished kayak paddles efficiently through rivers, lakes, and moderate open water while offering full customization of cockpit size, rod holder placement, and storage layout. One builder reported paddling a 12-foot strip-built kayak for years with no leaks or structural issues, even surviving a fall from a moving truck with only minor scratches.
Select Proven Plans
Skip guesswork by using tested designs like the Auk Series from Guillemot Sea Kayaks (by Nick Schade). These plans offer high initial stability, efficient tracking, and spacious decks ideal for fishing gear. They’re beginner-friendly and require minimal shop tools.
Gather Your Materials
You don’t need exotic supplies to build a wooden fishing kayak. The core materials include:
- Cedar strips or marine-grade plywood for the hull
- Fiberglass cloth (6 oz for interior, 10 oz for exterior)
- Epoxy resin for waterproof, structural bonding
- Foam seat pads, rod holders, and deck fittings
Total cost runs approximately $400–$500 with plans, but the result is a handcrafted kayak tailored to your height, reach, and fishing habits.
Apply Composite Protection
After shaping the hull, lay fiberglass cloth inside and out, saturate with epoxy, then sand and re-coat for a waterproof seal. This creates a rigid, impact-resistant shell that lasts decades with basic care.
Build a PVC Pontoon Kayak Under $100

Want maximum stability on a tight budget? A twin-pontoon PVC kayak costs less than $100 and supports two anglers for calm-water fishing.
Source Low-Cost Materials
Look for used parts online or at salvage yards. You’ll need:
- Two 9-foot sections of 6-inch PVC pipe (around $30 total)
- Shorter 4-inch PVC pipe for added buoyancy
- Expanding spray foam to fill the 4-inch tube
- Silicone sealant for waterproof end caps
- 2×4 lumber for the frame
- Heavy-duty zip ties, screws, and carry handles
Construct the Frame
Cut 2x4s into a rectangular base approximately 9 feet long and 3–4 feet wide. This frame holds pontoons, seat, footrests, and all accessories. Add decking planks fore, mid, and aft for standing and storage areas.
Prepare and Attach Pontoons
Seal both ends of each PVC tube with end caps. Fill the 4-inch tube with spray foam before capping to prevent water ingress. Use silicone sealant under caps for a watertight but potentially removable seal. Drill holes through the frame sides every 2 feet, insert screws, and loop heavy-duty zip ties around the PVC to secure. This creates a vibration-dampening, adjustable connection that’s easy to repair.
Add Fishing Features
Install a sliding seat on rails for fore and aft balance. Build footboards directly into the frame. Add paddle holders at the stern and a trolling motor mount at the rear. Create rod holders from bent PVC pipe. Always test in calm, shallow water before attempting open water use.
Modify a Stock Kayak for Fishing
Already own a kayak? Turn it into a fishing rig without building from scratch.
Avoid Voiding Your Warranty
Drilling into the hull voids the warranty in affected areas. Work around this limitation by using factory eyelets, bungee tracks, or SlideTrax rails (found on Wilderness Systems models). Mount accessories without permanent holes whenever possible.
Optimize Storage Layout
Bungee cords secure tackle boxes, water bottles, and radios. Mesh deck covers keep gear from rolling off while maximizing usable storage. Accessory eyelets provide factory points for clip-on gear. Ask yourself with every addition: does this help me catch fish?
Install Electronics: Fish Finder and Transducer
A fish finder turns guesswork into strategy, showing you where fish are hiding beneath your kayak.
Choose the Right Unit
The Garmin Striker Plus 4 offers a compact display perfect for kayak mounting. It provides real-time fish detection, depth measurement, GPS mapping, and generates underwater terrain charts. This unit represents the sweet spot between capability and kayak-friendly size.
Mount Using the Scotty Rail System
Install a Scotty rail along the deck (drilled or adhesive mount), then slide on a universal fish finder mount and secure with bolts. The entire process takes under 2 minutes once the rail is in place. Position the display for clear visibility while seated without blocking your casting area.
Install the Transducer Properly
Use a Scotty transducer arm that fits the same rail system. Add 6 to 8 silicone washers between the transducer and hull to prevent pressure damage and allow tilt adjustment for the best sonar angle. Route the cable under cockpit straps and connect directly to the fish finder. No extra drilling is needed if you’re using the rail system.
Set Up Power That Stays Put
Electronics need reliable power, and securing a battery on a curved kayak hull presents unique challenges.
Use a 12V Jet Ski Battery
Reuse an existing jet ski battery if you have one. These batteries include built-in fuses for safety and provide sufficient power for fish finders and small trolling motors. Place the battery at the rear of the kayak with terminals facing outward for easy access.
Secure With the Microphone Stand Hack
Tape, Velcro, and adhesive strips fail on curved, non-porous hulls. The solution involves repurposing an old microphone stand. Insert it into the rear storage well, add a scrap wood block as an extension, and tighten until the stand presses firmly against the battery. This method keeps the battery rock-solid throughout full days on the water.
Rig Like a Pro Angler
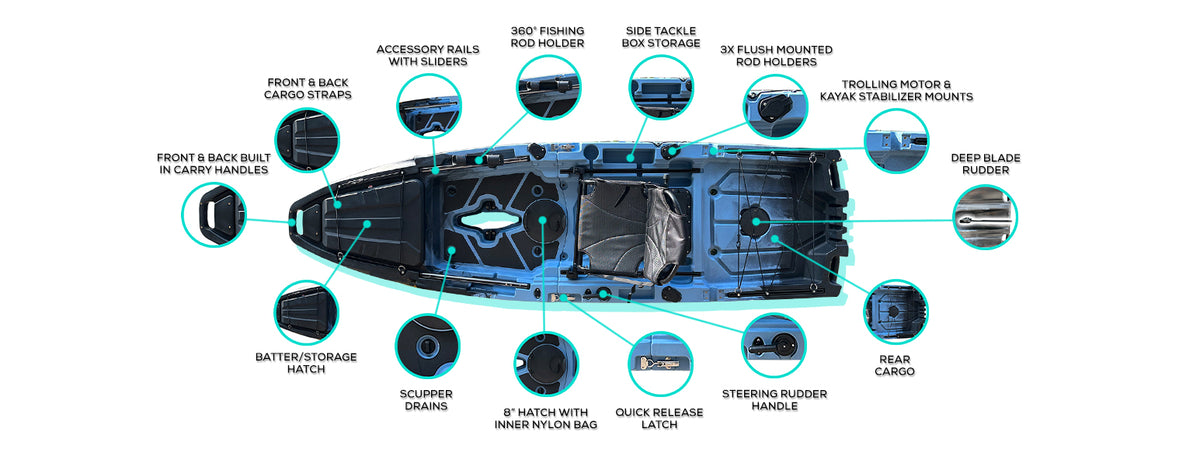
Competitive angler Joshua Evans uses a function-first layout that maximizes efficiency. His approach prioritizes practical placement over visual symmetry.
Follow This Proven Layout
| Item | Placement | Why |
|---|---|---|
| Paddle | Left side | Keeps dominant hand free |
| Paddle Holder | YakAttack Doubleheader | Secures paddle during motor use |
| Net | Front, angled right | Easy scoop for right-handed anglers |
| Fish Finder | Center front, low | Visible without blocking casts |
| Rod Holders | All six on left (behind user) | Prevents snags, easy access |
| Motor Throttle | Left hand | Dominant hand free for rod |
| Motor Lift Cord | Right hand | Stronger hand operates lift |
| Anchor System | Left hand | Operate while fighting fish |
Install Gradually
Start by launching with only your PFD and paddle. Take notes on a waterproof notepad about where gear naturally falls within reach. Consult experts like Marty Zoffinger or Joshua Evans before drilling any holes. Install accessories one at a time, testing each placement on the water before moving to the next.
Safety First, Always
Never head out without the essentials. A Coast Guard-approved PFD is mandatory, not optional. Attach a whistle to your PFD for emergency signaling. Tournament fishing requires a light pole and flag. Wear high-visibility clothing, especially in low light conditions. Check weather, tides, and local regulations before every launch.
Cost Comparison: Build vs. Buy

| Option | Cost | Outcome |
|---|---|---|
| DIY Wooden Kayak | $400–$500 | Lightweight, custom, durable |
| PVC Pontoon Kayak | Under $100 | Ultra-budget, stable, simple |
| Retrofit Existing Kayak | ~$75 (excl. fish finder) | Fast, functional, expandable |
| Buy Factory Fishing Kayak | $800–$3,000+ | Premium features, no work |
You can build or upgrade for one-tenth the price of high-end models while creating a platform perfectly matched to your fishing style.
Frequently Asked Questions About Making a Fishing Kayak
How much does it cost to build a fishing kayak?
Building a PVC pontoon kayak costs under $100. A wooden strip-built kayak runs $400–$500 including plans. Modifying an existing kayak with electronics and accessories costs approximately $75 excluding the fish finder. These prices represent a fraction of commercial fishing kayaks that start at $800.
Can I build a fishing kayak without advanced skills?
Yes. PVC pontoon builds require only basic tools and no specialized skills. Wooden builds need intermediate woodworking and epoxy work but remain achievable for hobbyists. Kayak modification is beginner-friendly, involving simple drilling and mounting tasks.
How long does it take to build a fishing kayak?
PVC pontoon kayaks take a single weekend. Wooden strip-built kayaks require weeks to months depending on available time and experience. Modifying an existing kayak with accessories takes hours to days.
What tools do I need to build a PVC pontoon kayak?
Basic tools include a saw for cutting PVC and lumber, a drill for holes and screws, a screwdriver, and measuring tape. No welding or advanced equipment is required. Heavy-duty zip ties handle most connections.
Is building a wooden kayak worth the effort?
For anglers who value lightweight performance, full customization, and handcrafted aesthetics, wooden kayaks offer unmatched benefits. The finished kayak weighs under 40 pounds, paddles efficiently, and can be modified throughout construction to fit your specific needs.
Do modifications void my kayak warranty?
Yes, drilling into the hull voids the warranty in the affected area. Use factory mounting points like tracks, eyelets, and bungee systems whenever possible to avoid permanent modifications.
Key Takeaways for Building Your Fishing Kayak
Building a fishing kayak opens two distinct paths. The DIY route gives you total control over weight, dimensions, and features, while modification lets you upgrade an existing kayak quickly and affordably. PVC pontoon builds demonstrate that you don’t need expensive materials to achieve stability on the water, and wooden builds prove that handcrafted craftsmanship remains within reach of dedicated hobbyists.
Regardless of which path you choose, prioritize watertight sealing on any PVC construction, respect warranty limitations when modifying commercial kayaks, and test every component on calm water before venturing into challenging conditions. Your fishing kayak should serve your specific needs, whether that means lightweight paddling for river fishing or a stable electronics platform for lake exploration. Start with a clear plan, gather your materials, and get building.





