
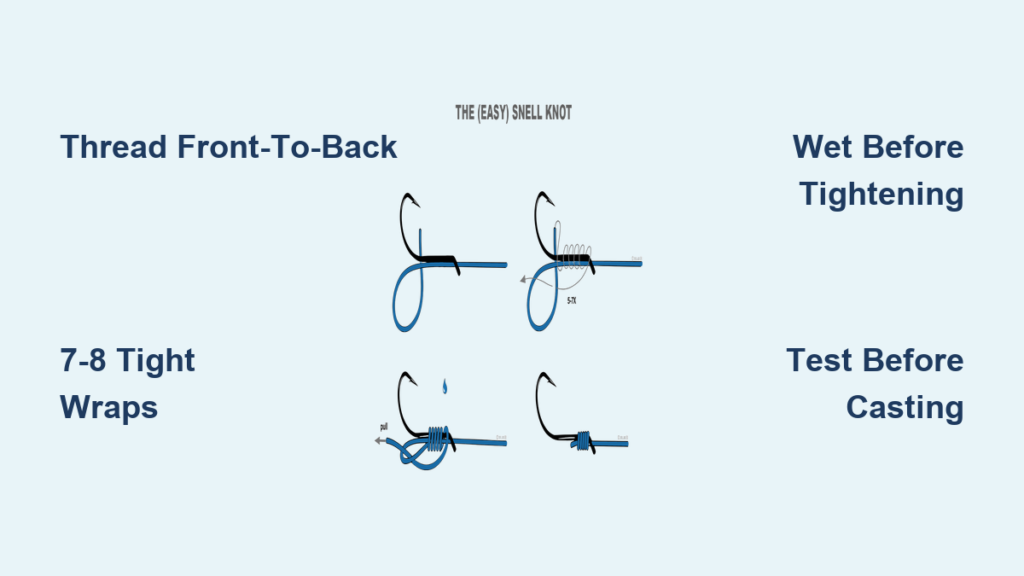
If your hook pulls straight and true every time you set the hook, you’re likely using one of the most reliable connections in fishing: the Snell fishing knot. This powerful knot aligns the fishing line directly with the hook shank, eliminating weak points and maximizing hook-up rates, especially with circle hooks and heavy-cover rigs. Whether you’re targeting catfish, carp, or punching thick bass mats, learning how to tie a Snell fishing knot correctly can be the difference between landing a trophy and losing it to a failed connection.
Unlike standard knots that rely solely on tension at the hook eye, the Snell distributes force along the entire shank through tight, secure wraps. It is strong, streamlined, and when tied right, nearly bulletproof. In this guide, you will learn multiple proven methods, including the fast Knotless Snell, the secure Uni Snell, and the bass-optimized Punch Rig Snell, so you can choose the best version for your setup and conditions.
Choose the Right Snell Method for Your Fishing Style
Not all Snell knots are tied the same way. The best method depends on your line type, hook style, and fishing application. Here is how to pick the right one for your situation.
Match the Knot to Your Application
Different Snell variations excel in different scenarios. The Knotless Snell works best for catfish, carp, and general use with monofilament or fluorocarbon. The Uni Snell handles heavy lines and circle hooks with bent eyes more effectively. The Easy Snell serves beginners well but lacks reliability under dynamic stress. The Punch Rig Snell is designed specifically for bass flipping and punching through thick cover.
Know Your Hook Type
Hook design affects how the Snell performs. Circle hooks require precise front-to-back threading to ensure proper rotation. Straight shank hooks work perfectly for punch rigs, and snelling enhances the kick angle. Bent-eye hooks perform best with the Uni Snell method for secure seating.
Knotless Snell: The Fastest and Most Reliable Method
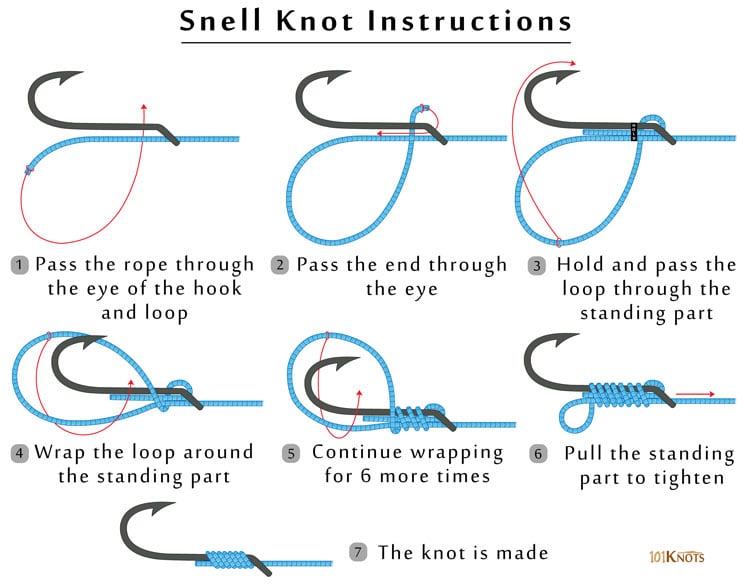
The Knotless Snell is the fastest, most reliable method for most anglers. It creates a clean, friction-free connection without a bulky knot at the end.
Step-by-Step: Tie in Under 10 Seconds
-
Thread Line Through Eye
Pass the tag end of your leader through the hook eye from the front to the back. -
Lay Tag End Along Shank
Position the tag end tightly against the hook shank. Pinch it in place with your thumb. -
Wrap Standing Line 7 to 8 Times
Use the main standing line to wrap tightly around both the shank and the pinned tag end. Make 7 to 8 neat, parallel wraps with no gaps or overlaps. -
Pass Through Eye Again
After wrapping, feed the standing line back through the hook eye from the back to the front. -
Pull and Tighten
Hold the hook and pull the standing line firmly. The wraps will cinch down, locking the tag end in place. -
Trim Excess
Cut the tag end close to the knot with sharp clippers.
Pro Tip: Wet the knot before tightening to reduce friction and prevent line damage.
Uni Snell Knot: Maximum Security for Heavy Lines
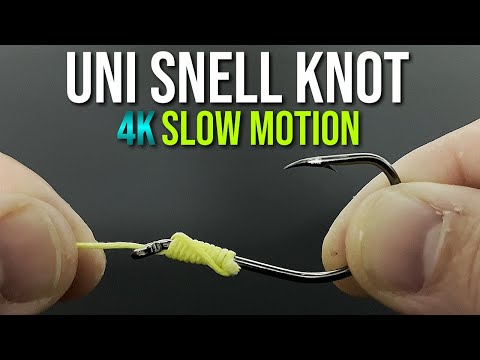
For heavy lines or critical situations, the Uni Snell adds extra grip by incorporating a Uni Knot-style wrap around the shank.
Why Use the Uni Snell
The Uni Snell delivers superior hold on bent-eye hooks. It performs excellently with fluorocarbon and braid. It resists slippage under extreme pressure, making it ideal for heavy-duty applications.
How to Tie the Uni Snell
-
Thread Line Front-to-Back
Run the line through the hook eye from the point side. -
Form a Loop
Pull several inches of tag end through and pinch it against the standing line. -
Wrap Tag End 4 to 7 Times
Wrap the tag end around both the standing line and hook shank. Use 5 to 7 wraps for heavy line and 4 to 5 for light. -
Pull to Cinch
Hold the tag end and pull the standing line to tighten the wraps toward the eye. -
Seat and Trim
Keep tension on the tag end as you pull the standing line to fully seat the knot. Trim excess.
Warning: Do not rush the cinching process. Uneven wraps create weak points that can fail under pressure.
Easy Snell Knot: Beginner-Friendly Option
The Easy Snell is simple to learn but has limitations. Use it only for light to medium fishing where line stress is predictable.
Steps for Quick Tying
-
Enter from Point Side
Thread line through the eye from front to back. -
Align Line with Shank
Lay the tag end straight down the hook shank. -
Wrap 4 to 6 Times
Wrap the tag end around the shank and standing line. Keep wraps tight and parallel. -
Exit Back Through Eye
Pass the tag end back through the eye from the back side. -
Pull Both Ends
Gently pull both ends to tighten. Then pull hard on the standing line to seat. -
Trim Tag End
Caution: This knot can loosen if the line is pushed forward during a cast. Always test before use.
Bass Punch Rig Snell: Beat Heavy Cover
When punching through lily pads or matted weeds, the Punch Rig Snell gives your hook the aggressive angle it needs to set in thick vegetation.
Why It Works for Bass Fishing
This knot creates a kick effect when pegged against a weight. It forces the hook point upward for better penetration through vegetation. It is optimized for straight shank flipping hooks.
How to Tie for Bass
-
Hold Hook Point Up
Position the hook vertically with the point facing skyward. -
Thread Front-to-Back
Pass line through the eye from the same side as the hook point. -
Form a Loop Down the Shank
Run the line down the shank and loop it back toward the eye. -
Wrap Inside the Loop
Use the tag end to wrap 5 to 7 times around the shank and standing line inside the loop. -
Cinch Slowly and Guide
Pull both ends gently while guiding the wraps up toward the eye. Avoid crossed or pinched wraps. -
Seat Above Keeper
If the hook has a bait keeper, seat the wraps just above it.
Pro Tip: Pair with a ¾-ounce punch weight and rubber stopper to maximize the kick effect.
Common Mistakes to Avoid When Tying a Snell

Even small errors can ruin a Snell knot. Watch for these frequent issues that cost anglers fish.
Wrong Threading Direction
Threading back-to-front instead of front-to-back causes the hook to pull backward. This reduces hook-ups by 20% to 25%. Always enter from the point side for circle and punch rigs to ensure proper rotation.
Poor Wrap Quality
Overlapping wraps cause uneven tension and create weak points. Too few wraps, less than 5, may slip especially with slick braid or fluorocarbon. Crossed wraps happen when cinching too fast. Guide wraps with your finger to prevent this.
Tag End Too Long
If the tag end is too long after wrapping, it may not fit back through the eye. Leave just enough for 7 to 8 wraps, which is approximately 6 inches of tag end.
Test and Verify Your Knot

Never assume your knot is secure. Always test before casting to ensure it will hold when it matters most.
How to Check a Snell Knot
-
Wet Before Tightening
Dampen the knot with saliva or water to reduce heat and friction. -
Apply Steady Pressure
Pull hard on the line to simulate a hookset. Watch for any movement or slippage. -
Inspect Wraps Visually
Wraps should be tight, parallel, and seated snugly against the shank. -
Look for Gaps
Any space between wraps or movement means you should re-tie the knot.
Best Practice: Test every knot, even pre-tied ones, before hitting the water.
Line and Hook Compatibility
The Snell works with almost any line and hook, but some pairings perform better than others.
Best Line Types for Snell Knots
Monofilament works excellently with the Snell because it is easy to wrap and holds well. Fluorocarbon performs well, but use 7 to 8 wraps for proper grip. Braided line is fair but slippery. It requires more wraps and careful cinching to prevent slippage.
Recommended Hooks by Application
Circle hooks must be snelled front-to-back for proper rotation. Straight shank hooks work ideally for punch rigs and flipping. Bent-eye hooks require the Uni Snell for better alignment with the shank.
Making Pre-Tied Leaders and Swivel Attachments
Many anglers pre-tie snelled hooks for quick rig changes during a day on the water.
How to Make a Pre-Tied Leader
-
Tie the Snell First
Use the Knotless or Uni method on the hook end. -
Create a Loop on the Other End
Tie a Double Surgeons Loop by folding the line to form a loop, tying a double overhand knot with the doubled section, pulling tight, and trimming. -
Connect to Swivel
Use a Cow Hitch to attach the loop to a snap or swivel.
Note: The Knotless Snell requires a free line end. It cannot be tied if the line is already connected to another object.
Maintenance and When to Re-Tie
A Snell knot is not permanent. Inspect and replace it as needed to maintain maximum strength.
When to Re-Tie Your Snell
Re-tie after a hard fight or snag. Re-tie if wraps appear loose or damaged. Re-tie every few uses in abrasive conditions to ensure the knot has not weakened.
Storage Tips for Pre-Tied Leaders
Store pre-tied leaders in a rig box with soft compartments. Avoid coiling tightly because this creates memory that can affect knot seating.
Frequently Asked Questions About Tying a Snell Fishing Knot
What is the strongest Snell knot variation?
The Knotless Snell is widely considered the strongest and most reliable variation. It has a near-zero failure rate when tied with 7 to 8 wraps and proper tension. This makes it the go-to choice for serious anglers targeting big fish.
Can I use fluorocarbon with a Snell knot?
Yes, fluorocarbon works well with the Snell knot. Use 7 to 8 wraps instead of the minimum 5, because fluorocarbon is more slippery than monofilament. Always wet the knot before final tightening to prevent heat damage.
Why does my Snell knot keep slipping?
Slipping usually results from too few wraps, overlapping wraps, or insufficient tension. Ensure you use at least 5 to 7 tight, parallel wraps. Wet the knot before tightening to reduce friction and allow even seating.
Does the direction I thread the line matter?
Yes, absolutely. Threading from front-to-back ensures the hook pulls correctly. If threaded backward, the hook pulls backward instead of rotating, reducing hook-up rates by 20% to 25%. This is critical for circle hooks.
How many wraps should I use for a Snell knot?
Use 7 to 8 wraps for the Knotless Snell, 4 to 7 for the Uni Snell, 4 to 6 for the Easy Snell, and 5 to 7 for the Punch Rig Snell. More wraps increase strength but take longer to tie.
Can I tie a Snell knot with braided line?
Yes, but braided line requires more wraps and careful cinching because it is slippery. Use 7 to 8 tight wraps and ensure the knot seats properly before use. The Uni Snell variation provides extra grip for braided applications.
Key Takeaways for Tying a Snell Fishing Knot

Mastering how to tie a Snell fishing knot gives you a serious edge on the water. Whether you are chasing catfish with a circle hook or punching through bass cover, the Snell delivers strength, alignment, and reliability that few knots can match. The Knotless Snell is your go-to for speed and security, taking under 10 seconds to tie. The Punch Rig Snell unlocks the power needed for heavy cover by creating the kick effect when paired with a pegged weight. Avoid directional errors by always threading front-to-back, use 7 to 8 tight parallel wraps, and always test your knot before casting. In fishing, the strongest link is only as good as the knot that holds it. Tie it right, and you will feel every strike with confidence.





