
Imagine being stranded by a riverbank with no gear. A handmade fishing net could mean the difference between hunger and survival. Whether you’re a survivalist, angler, or craft enthusiast, how to make a fishing net is a timeless skill blending practicality, tradition, and craftsmanship. This guide covers every method from beginner knotting to advanced woodworking using proven techniques and accessible materials.
You’ll learn how to choose the right cord, tie secure knots, build frames, and finish a net that actually works. No fluff, no guesswork. Just clear, actionable steps to create a net that catches fish, not mistakes.
Choose Your Net Type First
Before cutting any string or wood, decide what kind of net you need. The build method depends entirely on your goal.
Match Net to Purpose
• Macramé-style craft net: Great for kids, classrooms, or cultural displays. Not functional in water.
• Rectangular dip net: Simple hand-knotted design for scooping small fish or survival use.
• Round or purse net: Expands from a central ring. Ideal for trapping or casting.
• Wooden-frame landing net: Durable, professional-grade tool for anglers. Especially good for fly fishers.
Pro Tip: Beginners should start with a rectangular dip net using hemp cord and a net card. It teaches core skills without needing power tools.
Each type uses different tools and time. A macramé net takes under two hours. A laminated wooden hoop can take 30-plus hours. Pick based on your skill, tools, and intended use.
Gather Essential Tools
You do not need a full workshop to start, but certain tools are non-negotiable for quality results.
Netting Needle and Net Card
• Netting needle: 20 cm long, tapered to slide twine through loops. Buy one or carve from hardwood like hazel.
• Net card (gauge): A rigid template that sets mesh size. Use a 13 cm × 5.5 cm piece of credit card, wood, or aluminum.
Why it matters: Without a consistent gauge, your mesh will vary. Some holes too big, others too small. Uniformity ensures the net works.
Keep the same card throughout. Flip it, rotate it, does not matter. As long as every knot spans the same distance.
Optional but Useful: Stainless Steel Ring
For round or purse nets, a seamless stainless steel ring acts as the starting point. It holds initial knots evenly spaced, preventing warping. If unavailable, a strong cord loop works. But metal lasts longer and handles tension better.
Select the Right Cord Material
The cord is the backbone of your net. Choose wrong, and it fails in water.
Best Cord Types
| Material | Best For | Notes |
|---|---|---|
| Hemp cord | Beginners, traditional nets | Strong, biodegradable, easy to knot |
| Natural twine | Practice nets | Less slippery than synthetic |
| Tarred line | Saltwater use | Waterproof, dark color hides in water |
| Paracord | Heavy-duty nets | Extremely strong. But knots get bulky |
| Synthetic yarn | Lightweight nets | Pick low-stretch, high-friction types |
Critical: Whatever you use must resist water, UV light, and abrasion. Test by soaking and pulling. Knots should not slip.
Avoid thin thread or elastic cords. They stretch, weaken, or break under load.
Start with a Rectangular Net (Beginner Method)

This is the most practical entry point. It is functional, fast, and teaches all core knotting skills.
Attach First Row with Lark’s Head Knot
- Cut a main support line 10 to 15 percent longer than your desired net width. For example, 5 feet for a 4.5-foot net.
- Cut multiple cords double the desired mesh length. For example, 20 cm for 10 cm mesh.
- Fold each cord in half. Place loop behind the main line.
- Pull both ends through the loop and tighten. This is the lark’s head knot.
- Space knots evenly along the line using your net card.
Visual cue: After tying, all loops should hang straight down, same length.
Build Rows Downward with Double Knots
Work row by row, moving down.
- Take two adjacent strings from the current row.
- Tie them together using a double knot. This means two half-hitches.
- Shift one string over and repeat. Each string, except outer ones, is used in two knots per row.
- Use the net card to maintain spacing before tightening.
Why double knots? They are slower but prevent errors. Single knots risk becoming slip knots. Dangerous under load.
Continue until the net reaches desired depth. Typically 12 to 24 inches.
Finish All Edges Securely
A poorly finished edge unravels fast.
• Bottom edge: Weave a horizontal cord through the last row of knots. Tie off at both ends.
• Side edges: Tie side strings together at intervals, just like interior knots. Add extra half-hitches at corners.
• Top edge: Reinforce attachment points. Trim excess only after all knots are tight.
Warning: Never trim loose ends too short. Leave about half an inch in case you need to re-tighten later.
Try Macramé-Style Craft Net (For Learning)
No needles? No problem. This method uses simple overhand knots. Perfect for classrooms or survival demos.
Set Up with Dowel or Stick
- Cut 5 to 10 strings, about 2 feet each.
- Fold each in half. Use lark’s head knot to attach to a dowel or stick.
- Tape dowel to table so strings hang freely.
Result: 10 or more hanging strands, organized and untangled.
Knot in Rows with Overhand Loops
• First row: Tie overhand knots about 1 inch below the dowel. Reuse the right strand from one knot as the left for the next.
• Second row: Take the left strand from each knot above and tie a new overhand knot below.
• Third row: Repeat first-row pattern.
• Sides: Leave one outer strand free per side to create a clean edge.
Stop when strands are too short to knot.
Design note: This mimics real netting geometry. In practice, you could add cork to the top and stones to the bottom.
Build a Round or Purse Net (Advanced Knotting)

These nets expand outward from a center. Great for trapping or decorative sacks.
Start from a Central Ring
Use a stainless steel ring, 3 to 6 inches diameter.
- Cast loops onto the ring using cow hitch or clove hitch.
- Evenly space 12 to 24 initial loops around the ring.
- Tie first row by connecting adjacent loops with double knots.
Increase Rows to Expand Diameter
To keep the net flat and circular, add one new knot every few stitches per row. Follow a pattern: knot, knot, increase, repeat. Count carefully. Miss one, and the net warps.
Challenge: Maintaining symmetry. Use a marker to track starting points.
For a purse net, add a drawstring through the bottom row. Pull to close. Like a hammock or trap.
Construct a Wooden Landing Net (Advanced Build)
This is for woodworkers who want a professional, heirloom-quality net.
Buy Net Basket First
You must know the hoop size before building. Buy a pre-made basket from jannsnetcraft.com or cumingsnets.com. Choose rubber mesh for catch-and-release fishing. It protects fish slime and scales.
Build a Mold from Plywood
- Trace the basket hoop shape onto 1-inch plywood.
- Cut with jigsaw. Drill 1 and 1/8-inch holes for clamps.
- Seal with varnish and wax. Prevents glue from sticking.
This mold shapes your laminated wood hoop.
Laminate Five Wood Strips
Use hardwood: cherry, walnut, ash, or maple.
- Cut five strips: 1/8 inch thick, 7/8 inch wide, 5-plus feet long.
- Soak in boiling water for 30 minutes. Use a sealed PVC tube.
- Wrap around the mold while hot and flexible.
- Clamp with segmented blocks. Let set 24 hours.
Why soak? Moisture and heat make wood pliable. Dry strips will crack.
After drying, unclamp, apply wood glue, reassemble, and re-clamp. Cure 24-plus hours.
Shape and Finish the Hoop
- Remove from mold using a flat chisel.
- Sand from 80-grit to 220-grit.
- Use a router with 3/32-inch grooving bit to cut a lashing groove at mid-thickness.
- Drill 1/16-inch holes inside the groove. Match the net mesh count.
Finish with tung oil, 3 to 5 coats, for water resistance and beauty.
Lash the Net to the Hoop
- Hold net in place with tape or zip ties.
- Use a long needle and 1/16-inch nylon cord.
- Start near handle. In through hole, out through mesh. Repeat.
- Keep cord seated in groove. Maintain even tension.
Pro Tip: Tie a stopper knot at the end. Large enough to stay in groove, small enough to pass through holes.
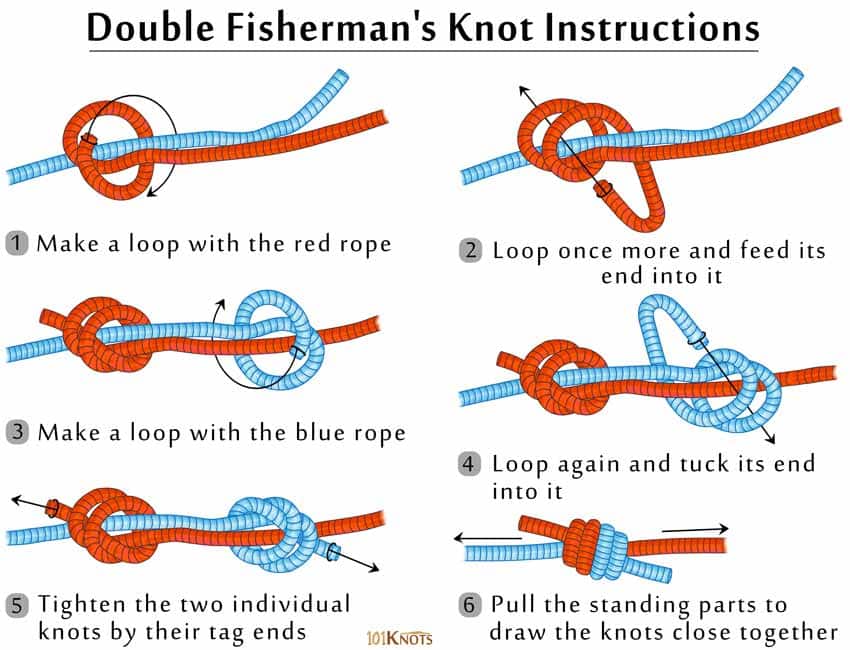
Join New Twine Without Weak Points
Running out of cord? Do not just tie and hope.
Use a Weaver’s Knot for Most Cords
- Overlap old and new ends.
- Form a bight in the new cord.
- Pass the old cord end through the bight.
- Wrap it around both parts and back through.
- Pull tight.
Works great for hemp, twine, and yarn.
Switch to Surgeon’s Knot for Slippery Cord
If using paracord or synthetic line.
- Tie an overhand knot with both cords together.
- Add a second twist before pulling tight.
- Moisten and pull hard to seat the knot.
More bulk, but far more secure.
Test every joint: Push, pull, and wiggle. If it slips, retie with Surgeon’s Knot.
Optimize Mesh Size and Strength
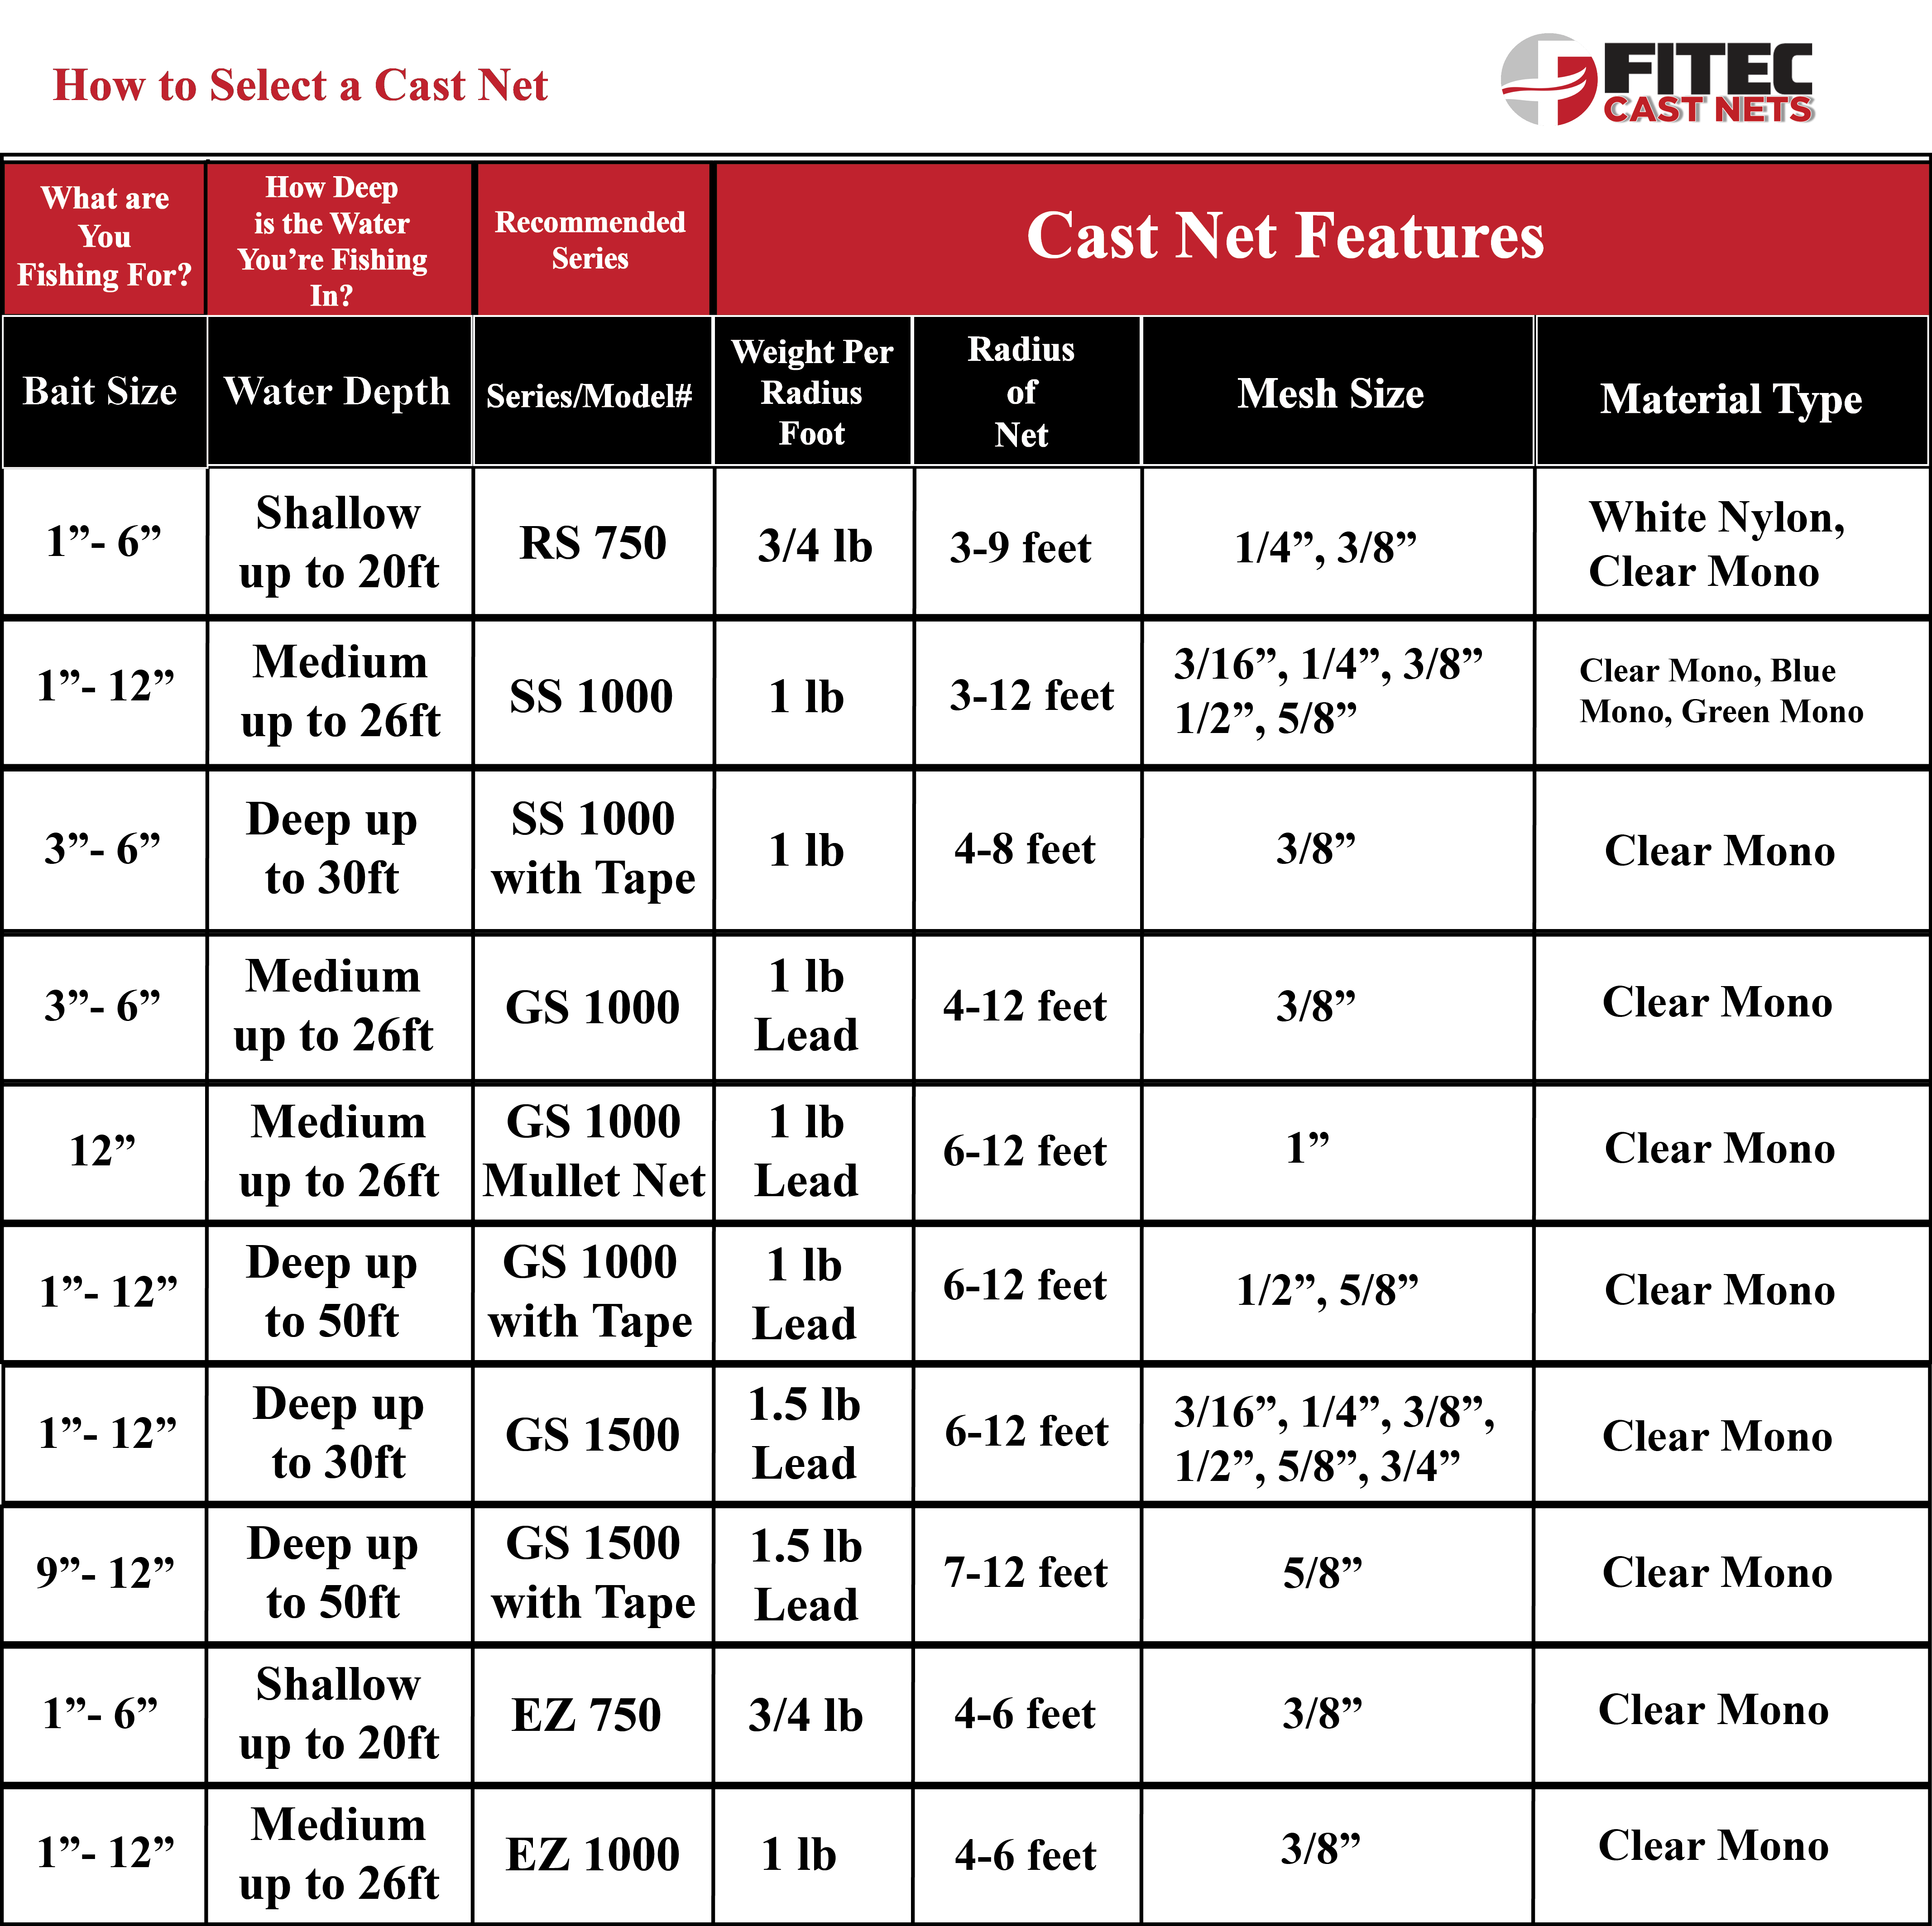
Your net only works if the holes are right.
Match Mesh to Target Species
• Minnows or shrimp: 0.5 to 1 inch mesh
• Trout or panfish: 1.5 to 2 inches
• Crabs: Less than 0.5 inch
Control size with your net card. Bigger card equals bigger holes.
Balance Strength and Drag
• Thicker cord equals stronger net but more water resistance.
• Natural fibers like hemp absorb water and sink. Good for dip nets.
• Synthetics like nylon float. Better for drifting.
Rule of thumb: Use the smallest mesh that will not clog with debris.
Reinforce and Maintain Your Net
Even the best net fails without care.
Prevent Fraying at Edges
• Whip edges with tight wrapping.
• Add double knots at corners.
• Wrap perimeter with extra cord.
Dry and Store Properly
• Rinse with fresh water after saltwater use.
• Hang to dry. Never fold when damp.
• Store in a cool, dark place to avoid UV damage.
Repair Damaged Mesh
• Re-knot broken sections using the same method.
• Use Surgeon’s Knot for high-stress repairs.
• Inspect before each use.
Follow Safety and Ethical Guidelines
A net is a tool. Use it responsibly.
Check Local Laws
Many areas restrict net size, mesh, or use in certain waters. Always verify regulations before fishing.
Protect Fish and Habitat
• Use rubber nets for catch-and-release.
• Avoid snagging or dragging on rocks.
• Never leave nets unattended.
Ethical tip: A handmade net should respect both fish and environment.
Frequently Asked Questions About Making Fishing Nets
What is the easiest fishing net to make for beginners?
The rectangular dip net using hemp cord and the lark’s head knot method is the easiest. It requires only basic tools and teaches core knotting skills. Most beginners complete their first net in 3 to 6 hours.
What materials do I need to make a functional fishing net?
You need a netting needle, net card for consistent mesh size, and cord. Hemp cord works best for beginners. Natural twine or tarred line are good alternatives. For wooden frame nets, you will need hardwood strips, wood glue, and basic woodworking tools.
How do I choose the right mesh size for my fishing net?
Mesh size depends on what you want to catch. For minnows or shrimp, use 0.5 to 1 inch mesh. For trout or panfish, use 1.5 to 2 inches. For crabs, use less than 0.5 inch. Control mesh size by using a larger or smaller net card.
Can I make a fishing net without a netting needle?
Yes. You can use the macramé method with simple overhand knots. This uses no needles and is great for learning. However, the resulting net is decorative only and not suitable for actual fishing.
How long does it take to make a wooden landing net?
A laminated wooden landing net takes 20 to 30-plus hours. This includes building the mold, laminating the hoop, shaping, finishing, and attaching the net basket. The time investment is worth it for a durable, heirloom-quality tool.
What is the strongest knot for joining fishing net cord?
The Surgeon’s Knot is the strongest for joining cord. It is a double overhand knot with an extra twist. Use it for slippery materials like paracord or for high-stress areas. Test every joint by pushing, pulling, and wiggling before continuing.
Key Takeaways for Making Your Own Fishing Net
Making a fishing net is more than survival. It is a connection to ancient skills, craftsmanship, and self-reliance. Whether you are knotting hemp on a card or laminating cherry wood, the principles are the same: precision, patience, and purpose.
Start with a simple rectangular dip net to master the core knots. Choose hemp cord for its balance of strength and ease. Use a net card to maintain consistent mesh throughout. Always test knot security before moving to the next section.
With this guide, you now have everything needed to make a net that works on the first try. Pick your method, gather your materials, and start building.





