

Imagine being stranded by a quiet lakeshore with nothing but a length of rope and the need to catch dinner. Knowing how to make a fishing net out of rope could turn that moment from desperation into survival. This age-old skill blends practicality, patience, and precision using nothing more than cordage and knots to create a tool that has fed generations. Whether you are a survivalist, outdoor enthusiast, or craft lover, building your own net is both empowering and functional.
This guide walks you step by step through two proven methods: the traditional hand-knotted mesh technique using a netting needle and gauge, and the modern paracord grid method ideal for multi-use nets. You will learn essential knots, material choices, and shaping techniques, plus how to avoid common mistakes.
Gather Your Net-Making Tools
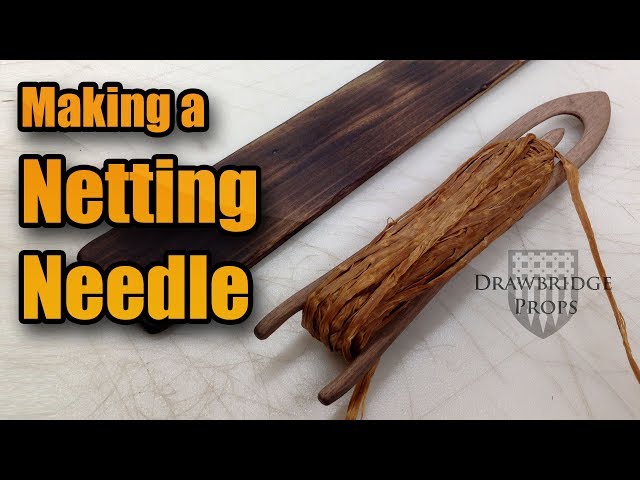
Netting Needle and Gauge
A netting needle simplifies knotting by guiding rope through loops without hand strain. Use a 20 cm long by 2.3 cm wide wooden or metal needle large enough to pass through your desired mesh. For thick paracord, bend a sturdy wire into a custom needle.
Pair the needle with a net gauge (or net card), a flat piece that sets mesh size. A 13 cm wide card creates medium-sized holes perfect for small to medium fish. Cut one from wood, plastic, or even a credit card. The width determines the diagonal of each square mesh, so consistency is key.
Anchor Point or Frame
Start your net on a stake, nail, or hook to hold tension. For paracord nets, stretch two horizontal cords between wall hooks or a wooden frame, with the top at eye level and bottom about 4 feet down. This frame keeps your grid aligned and tangle-free.
Select the Right Rope for Your Net
Best Cordage Options
Not all rope works equally well for fishing nets. Your choice affects strength, durability, and ease of knotting.
• Paracord (550 cord): Strong, UV-resistant, and widely available. Ideal for survival nets. Stiffness makes knotting slower but more secure.
• Tarred twine: Water-resistant and traditional. Great for freshwater use and resists rot.
• Nylon rope: Durable and stretch-resistant. Holds knots well and survives saltwater exposure.
• Natural fibers (hemp, cotton): Easy to knot but degrade in water unless treated.
Avoid slick or overly thick ropes unless you are experienced. Beginners should start with medium-diameter, slightly grippy cord like tarred twine.
How Much Rope Do You Need
For a medium-sized rectangular net about 2 feet wide, you will need 50 to 75 feet of rope using the single strand method. For the paracord grid method, gather eight 8-foot lengths (folded) plus two 6-foot support lines. Longer rope means fewer joins and fewer weak points in your net.
Learn Essential Netting Knots
Single Knot vs Double Knot Method
Two main knotting styles shape hand-tied fishing nets. The single knot (weaver’s knot) is fast and efficient, based on a modified sheet bend. It works best for thin, flexible twine but can slip if not tightened properly. The double knot (two half-hitches) is more secure and durable. It is slightly slower but less error-prone, recommended for paracord or heavy-use fishing nets.
How to Tie a Weaver’s Knot
- Pass the rope through the previous loop.
- Wrap it around the base strand.
- Feed the end back through the new loop.
- Pull tight to form a stopper knot that locks the mesh.
Repeat this sequence for each loop across the row.
Joining New Rope: Surgeon’s Knot
When you run out of line, overlap the old and new rope ends, then tie a surgeon’s knot (double overhand knot with both strands). Pull tight and test by tugging hard. Trim excess and melt ends for synthetic rope. This knot resists slipping better than a square knot, which is critical under load.
Build a Rectangular Fishing Net Step by Step

Begin with a Loop
Tie a large overhand knot at the rope’s end, big enough for your needle to fit through. Slip this loop over a stake or nail. Slide your net gauge (card) under the loop, pushing it up until the knot rests at the top edge. Hold the card in place with your thumb to set your first mesh size.
Create the First Row
Pass the needle up through the loop, pulling the rope snug around the card. Bring the needle under the base, then up through the new loop, and pull to form a second loop. Wrap the rope around the base, thread the needle through the loop again, and tighten to lock the stitch. Remove the card. You now have two loops as your foundation row.
Expand into a Triangle
To make the net flare outward, add an extra loop at the start of the second row. Work each loop individually: lift it, wrap the rope around the base, and tie a stopper knot. Repeat across all loops. Each row increases the number of loops, forming a widening triangle.
Pro Tip: The extra starting loop forces natural expansion. Without it, your net may narrow instead of widen.
Shape the Net: Widen Then Taper
Keep adding loops row by row until the net reaches your target width, such as 24 inches. Once wide enough, skip one loop at the end of each row to reduce the number of knots per row. This causes the net to narrow, forming a trapezoid or rectangle. Continue until only one loop remains.
Finish Strong
With the final loop, wrap the rope around the base and tie a last stopper knot. Pass the needle through the inner strand only. Tie off securely with a surgeon s or double overhand knot. Trim and melt the end if using synthetic rope. This clean closure prevents unraveling.
Create a Paracord Grid Net Without Needles
Set Up the Frame
Cut two 6-foot ropes for top and bottom supports. Stretch them horizontally between hooks or a frame, 4 feet apart. Secure tightly. This frame is your net’s skeleton.
Attach Vertical Cords
Cut eight 8-foot paracord lengths and fold each in half. Attach the bight (folded end) to the top rope using a lark’s head knot: loop the bight over the support rope, pull the ends through the loop, and tighten. Space attachments 6 inches apart. You now have 16 hanging strands.
Weave the Diamond Mesh
Find the center space between cords two and three. Take the right strand of the left cord and the left strand of the right cord. Cross them to form a V shape. Tie an overhand knot at the intersection. Repeat across the row, creating seven knots total. Each knot creates a diamond-shaped mesh.
Continue to the next rows using the same pairing: adjacent strands from the row above. Tie overhand knots at the same height to keep alignment. Knots should stack vertically like a grid. After 5 to 6 rows, a tight square-like pattern emerges.
Visual Cue: If diamonds look uneven, adjust strand tension before tying the next knot.
Secure the Bottom and Finish
When you are about 6 inches from the bottom rope, tie each loose end to the lower support line with an overhand knot. Keep spacing even and match the top layout. Trim excess cord to 1/4 inch and melt the ends with a lighter to prevent fraying. Remove from the frame. Your net is now ready for fishing, gear storage, bear bags, or emergency shelter reinforcement.
Choose Mesh Size and Net Shape

Pick the Right Mesh Size
Small mesh (5 to 8 cm) catches minnows, fry, or shrimp. Medium mesh (10 to 13 cm) is ideal for panfish, trout, or perch. Large mesh (15+ cm) lets small fish escape and targets bigger species. Use your net gauge width to control size: wider card equals larger holes.
Choose the Best Shape
Rectangular nets work best for dip nets, shore fishing, and easy carrying. Round nets suit circular casting and purse seining (more advanced). Purse-style nets trap or store items with a drawstring closure. Grid nets (paracord) serve multiple purposes: cargo, shelter, or survival fishing. Beginners should start with rectangular or grid nets as they are simpler and more forgiving.
Avoid Common Net-Making Mistakes

Skipping the Extra Starting Loop
Without it, your net may narrow instead of widen. Always add one extra loop early to ensure expansion.
Inconsistent Tension
Loose knots create weak spots. Pull each knot snug but not crushing. Uniform tension keeps the mesh even throughout.
Using Slick Rope Without Testing
Paracord and fishing line can slip. Test every knot by tugging hard before continuing to the next row.
Ignoring the Finish
An unsecured end unravels fast. Always tie off, trim, and melt synthetic ends to secure your work.
Test and Maintain Your Fishing Net
Check for Strength
Pull test each knot during and after construction. Apply sideways and downward force to mimic catching fish. Replace frayed or loose strands immediately before use.
After Use: Rinse and Dry
Rinse with fresh water after saltwater use. Hang to dry in shade because UV light weakens rope over time. Store coiled in a dry place. Inspect before each use, especially in survival situations.
Frequently Asked Questions About Making a Fishing Net Out of Rope
What is the easiest rope to use for making a fishing net?
Tarred twine or medium-grip natural cord is easiest for beginners. It holds knots well and is not too slippery. Paracord works well for survival applications but requires more effort to knot tightly.
How long does it take to make a fishing net by hand?
A simple rectangular net takes 2 to 4 hours for beginners. The paracord grid method is faster, often completed in 1 to 2 hours. Practice improves speed significantly.
Can I use a fishing net made from rope for real fishing?
Yes, hand-tied nets work effectively for catching small to medium fish in shallow waters. They are functional tools, not just practice projects. Ensure knots are secure and mesh size matches your target catch.
What is the best knot for joining rope while making a net?
The surgeon’s knot is strongest for joining new rope sections. It resists slipping better than the weaver’s knot when under load. Always test the join by pulling hard before continuing.
Do I need special tools to make a fishing net?
You need a netting needle and gauge for traditional method nets. The paracord grid method requires only a frame and scissors. Both approaches are achievable with basic materials.
How do I choose the right mesh size for fishing?
Match mesh size to your target fish. Small mesh (5 to 8 cm) catches minnows, medium (10 to 13 cm) works for trout and panfish, large (15+ cm) targets bigger species. Use a wider net gauge for larger holes.
Key Takeaways for Making a Fishing Net Out of Rope
Select your method first: hand-knotted with a needle and gauge for traditional fishing nets, or the paracord grid method for multi-purpose cargo and storage nets. Gather the right tools: a 20 cm netting needle, 13 cm net gauge, and a sturdy stake or frame. Start correctly using an overhand loop on a stake or lark’s head knot on a frame. Knot consistently with double knots for strength, maintaining even tension throughout. Shape smart by expanding with extra loops at the start and tapering by skipping one loop per row at the end. Finish secure by tying off, trimming, and melting synthetic ends. Test and maintain by pull-testing every knot, rinsing after saltwater use, and storing dry.
Final Note: Making a fishing net from rope is not just about catching fish. It is about self-reliance. With patience and practice, you can craft a tool that is as functional as it is symbolic. Whether you are on a weekend hike or preparing for the unexpected, knowing how to make a fishing net out of rope puts real power in your hands. Start small, master the knots, and soon you will weave more than a net. You will weave confidence.





