

There’s something deeply satisfying about casting a line with a fishing rod you built yourself, especially when it’s crafted from natural bamboo. Unlike mass-produced graphite or fiberglass rods, a bamboo fishing rod offers a unique blend of strength, sensitivity, and soul. Whether you’re a weekend DIYer or an aspiring artisan, learning how to make a bamboo fishing rod opens the door to a timeless craft rooted in tradition, precision, and connection to nature.
This guide breaks down every step, from selecting the right bamboo to final assembly, across three build levels. You’ll learn which materials matter most, how to treat and straighten bamboo properly, and where to avoid costly mistakes. Whether you want a functional pole for pond fishing or a handcrafted heirloom, this is your complete roadmap.
Choose Your Bamboo Rod Type
Before picking up tools, decide what kind of rod you want to build. Each type varies in complexity, cost, and performance.
Cane Pole: Simple and Effective
A one-piece pole with no reel or guides. Ideal for still water and beginners. This type requires minimal tools and can be completed in an afternoon plus drying time.
Micro-Fishing Rod: Lightweight and Guided
A short, sensitive rod with a reel seat and small guides. Perfect for tight spaces and light tackle. This option balances simplicity with functionality.
Split-Cane Fly Rod: Precision Craftsmanship
A hexagonal blank made from six strips of Tonkin bamboo. High-performance, heirloom-quality build. This advanced project requires significant time and precision tools.
Your choice determines the tools, time, and skill needed.
Select the Right Bamboo
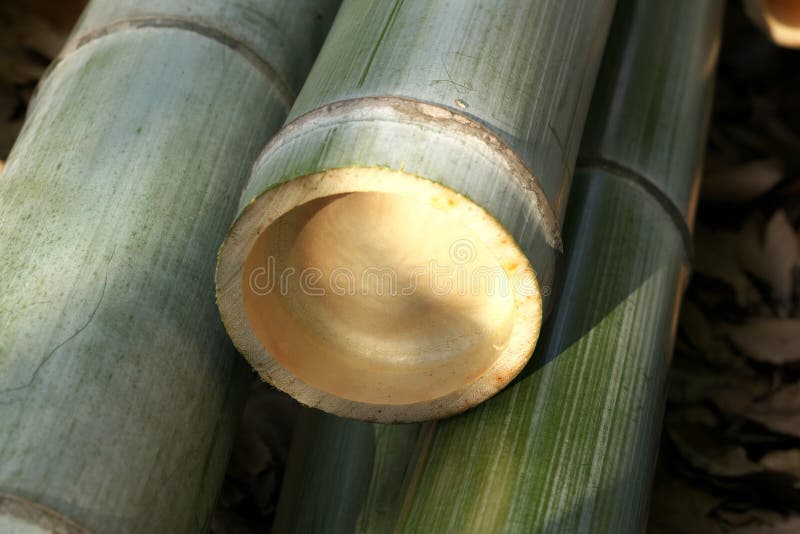
Use Tonkin Bamboo for Quality Rods
For split-cane rods, Tonkin bamboo (Arundinaria amabilis) is unmatched. Grown only in a 30-square-mile region in China, it has high power fiber density, superior strength-to-weight ratio, and a natural golden hue with straight grain. It’s the gold standard for fly rod blanks.
Alternative Bamboos for Pole Rods
If building a simple pole, local species like light bamboo, water bamboo, or purple bamboo work. Ensure they are 2 to 3 years old, straight with tight nodes, and free of cracks or insect damage. Avoid green, freshly cut culms because they must be fully dried before use.
Prepare and Dry the Bamboo
Cut Above a Node
Always cut the base above a node to seal the chamber. Use a fine-toothed saw to prevent splitting during the cut.
Air-Dry for 2 to 6 Weeks
Hang vertically by the tip in a dry, shaded, ventilated area. The color will shift from green to tan or golden brown when fully dry.
Straighten During Drying
Attach a light weight like a brick to the tip while drying to help correct bends naturally. This simple step prevents warping and creates a straighter final rod.
Pro Tip: Never rush drying because uneven moisture causes warping and weak spots in the finished rod.
Treat Bamboo for Durability
Soak in Timbor Solution
To prevent rot and insect damage, soak the cane in Timbor (boric acid solution). Mix 1.5 pounds of boric acid per gallon of water and submerge the bamboo for 7 days. The internal wax reacts with the solution, turning it fluorescent green.
Bore Out Nodes for Full Penetration
Use a 3/8-inch drill bit or twisted wire auger to open internal chambers. This ensures the preservative reaches every layer of the bamboo.
Dry Again After Treatment
Air-dry vertically for another week. The result is a lightweight, fungus-resistant blank ready for shaping.
Build a Simple Cane Pole Rod
Attach Line with Arbor Knot
Tie 20-pound Dacron backing 6 to 12 inches above the handhold using an arbor knot. Run the line along the pole’s length.
Secure Line at Key Points
Use whip finishes (thread or old fly line) to anchor the line at two mid-pole points (3 to 5 feet apart) and at the tip. This prevents total line loss if the tip breaks.
Add Terminal Tackle
Tie on a 2-foot monofilament leader, a slip bobber, split shot weights, and a long-shank Aberdeen hook (easy to remove). No reel is needed because you control the line by hand.
Best For: Kids, survival kits, or quiet pond fishing.
Construct a Micro-Fishing Bamboo Rod
Locate the Spine
Rest one end on the floor at a 45-degree angle. Rotate slowly. The side that bends downward is the spine. Mark it with a pencil.
Why It Matters: Guides go on the inner side of the spine (compression side) to prevent breakage during use.
Install Small Guides
Use 3 micro guides and one tip top. Slide silicone bands (from spinnerbait skirts) over guide feet, roll down from the tip, and apply UV-resistant epoxy under the band. Cure for 24 hours. Silicone bands offer better grip and durability than thread alone.
Reinforce Between Guides
Wrap bare sections with thread or additional silicone bands for added strength along the rod blank.
Add a Reel to Your Micro Rod
Option 1: Homemade Reel
Build a simple spool system using a straightened coat hanger wire wrapped around the rod as an axle. Slide a sewing-thread spool onto the axle and wind 4-pound test monofilament by hand. Cut a knob from a plastic bottle cap for grip and bite detection.
Option 2: Commercial Reel Seat
Epoxy a micro-reel seat near the balance point. Use epoxy putty or fiberglass tape for extra strength.
Cost: Under $20 per rod with shared materials.
Craft a Split-Cane Fly Rod (Advanced)
Split Culm into Six Strips
Use chisels or screwdrivers with rounded tips to split the culm from the end grain. Aim for parallel grain alignment, which is critical for strength in the finished rod.
Remove Nodes and Straighten
Heat nodes with a heat gun (about 350 degrees Fahrenheit) until pliable. Clamp between vise jaws, flatten node bumps (hold 10 seconds), and straighten bends by clamping edges. Sand residual bumps with 240-grit paper.
Rip Strips to Width
Use a table saw with featherboards for the modern method or a planer jig with 60-degree grooves for the traditional approach. Groove depth tapers from 3/8 inch at the butt to 1/16 inch at the tip.
Taper the Strips Precisely

Use a Planing Form (Tapering Jig)
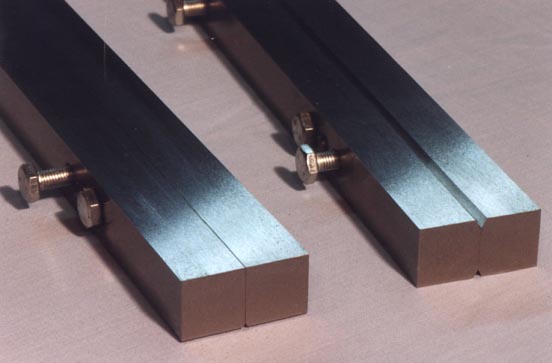
A Bellinger-style planing form consists of two steel bars forming a V-groove. Adjustable bolts every 5 inches control the taper precisely.
Measure with Dial Calipers
Accuracy to 0.001 inch is essential. Use a dial caliper for thickness and a depth indicator with a 60-degree tip for groove depth.
Pro Tip: Set the form 0.003 inch wider than target, plane a test strip, measure, then adjust accordingly.
Plane with Rind Facing Out
Keep the outer bark (rind) against the form because this side has the strongest fibers. Alternate planing sides to maintain symmetry across all six strips.
Glue the Hexagonal Blank
Choose Industrial Epoxy
Avoid polyurethane because its 20 to 30 minute working time is too short. Use slow-cure industrial epoxy for longer open time (hours), better gap-filling, and stronger, more durable bond.
Apply Glue and Align Strips
Brush epoxy onto all six triangular strips. Align on masking tape, then roll into a hexagon shape.
Use a Garrison Binder
This spiral-wrapping jig holds strips in perfect alignment during cure. The drive wheel with crank moves a kite-string belt that wraps upholstery thread tightly around the rod. Cure for 24 or more hours.
Finish and Assemble the Rod
Sand and Apply Finish
After removing thread, lightly sand with 400-grit paper. Apply marine-grade spar urethane or epoxy finish in 5 to 7 thin coats for protection.
Install Hardware
Add components in this order: cork grip (shaped to fit hand), reel seat (epoxy or screw-mounted), guides (soldered or epoxy-mounted), and tip top (glued and aligned with spine).
Guide Spacing: Calculate this for smooth line flow. Don’t guess it.
Test and Maintain Your Rod
Perform a Flex Test
Gently bend the rod to check for weak spots or misalignment. A good bamboo rod should flex smoothly from tip to butt with no binding or hot spots.
Store Properly
Keep in a dry, temperature-stable place. Use a rod sock to prevent scratches during storage.
Re-Wrap and Re-Treat
Re-epoxy guide wraps every 2 to 3 years if exposed to UV. Re-soak in Timbor every 5 to 10 years for outdoor-stored rods. Revarnish every few years if finish wears.
Avoid prolonged moisture, extreme heat or cold, and dropping on hard surfaces.
Time, Cost, and Skill Comparison

| Rod Type | Skill Level | Build Time | Material Cost | Best Use |
|---|---|---|---|---|
| Cane Pole | Beginner | 1 to 2 hours (plus drying) | $0 to $10 | Pond fishing, kids |
| Micro-Rod | Intermediate | 1 to 2 days | Under $20 | Urban streams, travel |
| Split-Cane | Advanced | 40 to 100+ hours | $50 to $150 | Fly fishing, heirloom |
First-Time Builders: Expect 80 or more hours for your first split-cane rod. Experts like Steve Pennington complete rods in about 10 hours with practice.
Why Build Your Own Bamboo Rod?
Feel the Difference
Bamboo rods offer a smoother cast and superior bite detection compared to stiff synthetics. Anglers say they feel alive in your hands, transmitting every subtle movement.
Connect to Tradition
Fewer than 30 U.S. makers still craft split-cane rods. You’re joining a rare, respected lineage of artisans.
Create a Heirloom
A well-built bamboo rod can last decades. Passed down like a family recipe, it carries stories with every cast.
Final Tips for Success
Start simple by mastering the cane pole before attempting split-cane construction. Invest in calipers because precision is non-negotiable in tapering. Use Timbor because it’s cheap insurance against rot and insects. Join a course because Bill Oyster’s UK workshop sells out fast. Embrace imperfection because your first rod may not be perfect, but it’ll be yours.
Frequently Asked Questions About Making a Bamboo Fishing Rod
What type of bamboo is best for making a fishing rod?
Tonkin bamboo (Arundinaria amabilis) is the best choice for quality rods. It grows only in a 30-square-mile region in China and offers the highest power fiber density, superior strength-to-weight ratio, and natural straight grain. For simple pole rods, local species like light bamboo or water bamboo work fine.
How long does it take to make a bamboo fishing rod?
Build time varies significantly by rod type. A simple cane pole takes 1 to 2 hours (plus 2 to 6 weeks drying time). A micro-fishing rod takes 1 to 2 days. An advanced split-cane fly rod requires 40 to 100 or more hours for first-time builders, dropping to about 10 hours with experience.
Do I need special tools to make a bamboo fishing rod?
Basic projects require minimal tools (saw, sandpaper, heat source). Split-cane construction demands precision tools including dial calipers (0.001-inch accuracy), a planing form (tapering jig), and a Garrison binder for glue-up. You can start with simple projects and acquire tools as you advance.
How do I treat bamboo to prevent rot?
Soak bamboo in Timbor solution (1.5 pounds boric acid per gallon of water) for 7 days. Bore out internal nodes with a 3/8-inch drill bit so the preservative reaches all layers. Air-dry vertically for another week after soaking. This treatment prevents fungus and insect damage for years.
Can bamboo fishing rods catch big fish?
Yes, properly built bamboo rods are remarkably strong. Field tests have landed fish around 10 pounds without blank failure. The hexagonal construction of split-cane rods provides exceptional strength-to-weight ratio. The key is proper construction, including correct spine alignment and quality epoxy.
Key Takeaways for Making a Bamboo Fishing Rod
Learning how to make a bamboo fishing rod is more than a DIY project. It connects you to a centuries-old craft practiced by fewer than 30 U.S. makers today. Start with a simple cane pole to learn bamboo selection, drying, and basic treatment. Progress to micro-fishing rods to practice guide installation and reel attachment. Attempt split-cane construction only after mastering fundamentals.
Whatever level you choose, the process rewards patience with a rod that feels alive in your hands, detects subtle bites that modern rods miss, and lasts decades as a family heirloom. Gather your tools, select your bamboo, and start building. The water is waiting.





