
Changing fishing line is one of the most essential maintenance tasks for any angler. Whether you’re a weekend warrior or a seasoned pro, knowing how to change fishing line properly ensures stronger casts, fewer tangles, and a lower chance of losing a trophy fish to line failure. Over time, exposure to UV rays, abrasion, and water weakens your line, even if it looks fine on the surface. Most experts recommend replacing your line at least once per season, or more often if you fish heavily. This guide walks you through every step, from removing old line and choosing the right replacement to spooling, knot tying, and testing your setup. By the end, you’ll know exactly how to change fishing line on a spinning reel and adapt the process for baitcasters, avoiding common mistakes while keeping your gear performing at its peak.
Remove Old Line Completely

Before attaching new line, you must clear the spool of all old, worn material. Leftover line creates uneven layers that lead to tangles and poor casting performance. Taking time to remove everything properly saves headaches later.
Cut Off Terminal Tackle First
Start by cutting and removing all hooks, lures, sinkers, and swivels from your line. This prevents snagging during removal and protects your gear. Leave about 6 inches of line on the reel so you have something to grip while unwinding.
Unwind and Discard Old Line
Open the bail arm and manually spin the handle to release the line. If your reel allows, remove the spool entirely for easier access. Pull the line off in one continuous motion without yanking, as this can damage internal components.
Clean the Spool and Reel Surface
Wipe down the spool and reel frame with a damp cloth. Remove sand, salt, or grime that could interfere with smooth spooling. A clean surface ensures better line adhesion and even winding.
Choose the Right Line Type

Matching your line to your reel, rod, and fishing conditions improves performance and reduces issues like backlash or breakage. The right choice depends on your specific fishing situation.
Match Line to Reel and Rod
Check your rod’s line weight rating, typically printed near the handle. Use line within that range. Overly heavy line strains the rod, while too light risks snapping under the weight of a fish.
Monofilament vs Braided Line
Monofilament offers moderate stretch, making it good for shock absorption and beginner-friendly. It has a thicker diameter for the same strength and degrades faster under UV exposure. Braided line provides minimal stretch for precise hook sets, a thinner diameter for more line per spool, and longer lifespan. Braided line requires special knots or tape for secure attachment.
• Spinning reels work best with 4–10 lb mono or braid
• Baitcasters often use 10–20 lb braid or heavier
Use Backing for Deep Spools
If using braid on a large-capacity reel, spool a layer of monofilament backing first. Braid alone may not fill the spool enough, causing slippage. Fill to within 1/4 inch of the rim, then tie on braid with a Uni Knot.
Secure Line to Spool Properly
A weak connection between line and spool leads to slippage and lost fish. Use the right knot and technique based on your line type to ensure a solid connection.
Tie an Arbor Knot for Mono
The Arbor Knot is ideal for monofilament and fluorocarbon. Wrap line around the spool hub and tie an overhand knot near the tag end. Create a second loop with the tag and pass it over the first knot. Pull both ends to tighten, allowing the knot to lock against the spool. Always leave 6–8 inches of tag end to ensure the knot seats properly.
Use Tape for Braided Line
Braided line is slick and can slip, even with a secure knot. Apply 2–3 wraps of electrical tape around the spool before tying. This gives the knot something to grip during initial winding.
Try the Slip Knot for Speed
The Slip Knot works with all line types. Form a loop and place it over the spool hub. Twist the standing line and pass the tag end through the gap between the spool and line. Pull tight to form a locking knot, then slide it to the top or bottom of the spool for even distribution.
Spool Line with Correct Tension
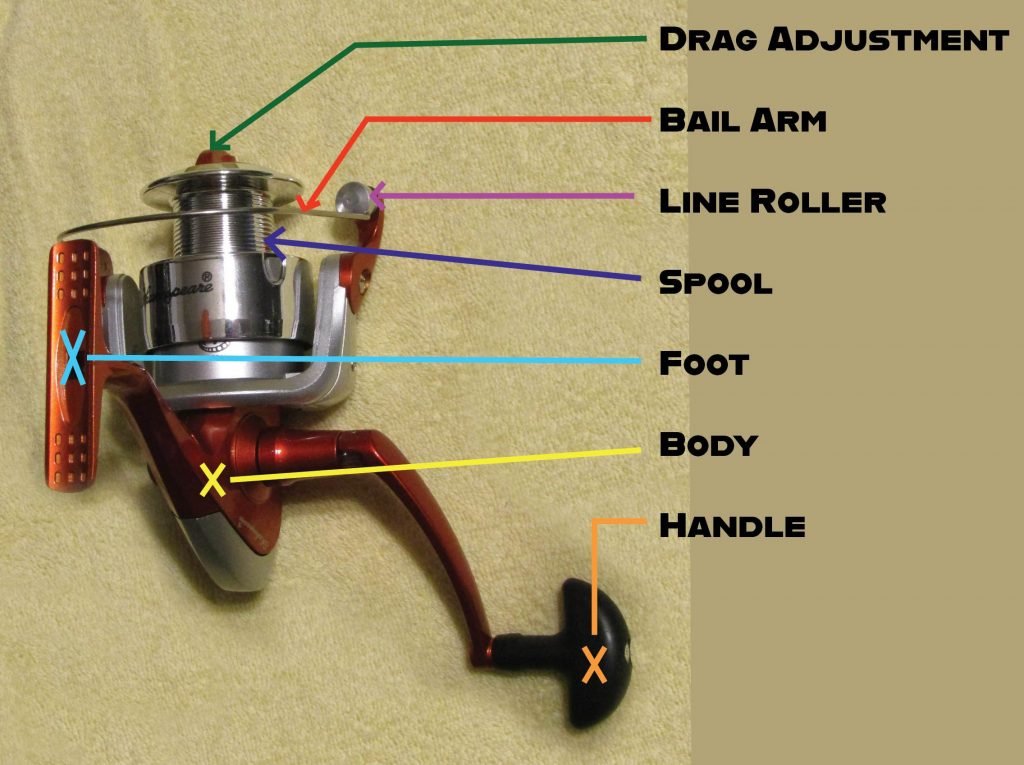
Improper tension causes line twist, coiling, or uneven layers, leading to tangles and poor casts. Getting this right makes a massive difference in performance.
Align Filler Spool Rotation
Most spinning reels load counterclockwise. To prevent twist, the filler spool must unwind in the same direction. If the filler spool rotates clockwise when pulled, flip it over to reverse the direction.
Apply Light, Consistent Pressure
Hold the line between your thumb and forefinger about 12 inches above the spool. Apply gentle tension enough to keep coils tight, but not so much that it flattens or weakens the line.
Reel Slowly and Watch the Lay
Turn the handle at a steady pace. After 10–15 turns, pause and check whether the line is building evenly from side to side. Adjust your hand pressure or spool angle if you notice gaps or overlapping coils.
Fill to the Right Level

Overfilling or underfilling the spool impacts casting distance and tangle risk. Getting the fill level right is crucial for trouble-free fishing.
Stop 1/16 to 1/8 Inch from Edge
Fill until the line sits just below the spool’s outer rim. Many spools have a color change or beveled edge indicating the fill line. Stopping at the right level prevents line from jumping off when the bail opens.
Avoid the Slinky Effect
Too much line increases friction and causes coils to spring off in the air, known as the slinky effect. This leads to wind knots and tangles, especially in windy conditions.
Don’t Underfill Either
Too little line increases friction during casting, reducing distance. It also exposes the spool edge, which can nick or weaken the line over time.
Finish and Test the Setup
Final steps ensure your reel is ready for action and performs reliably on the water. Taking time to test now prevents frustration later.
Cut and Release the Line
Once full, cut the line above your hand. Loosen the drag knob to return to normal fishing tension, typically 1/4 to 1/3 of the line’s breaking strength.
Thread Through Rod Guides
Start at the tip-top guide and work backward toward the reel. Pass line through each guide in order. Pull out about 5 feet past the reel for tying on tackle.
Tie On a Lure and Test Cast
Use the Improved Clinch Knot for mono or fluorocarbon, and the Palomar Knot for braid. Attach a lure and make 3–5 test casts to verify smooth bail closure, line release without hesitation, and no tangles or twist.
Prevent Line Twist and Tangles
Even with perfect spooling, line twist can develop over time from lure rotation and retrieval. Taking preventive measures keeps your line running smoothly.
Use a Swivel for Twisting Lures
Lures like spinnerbaits or inline spinners add twist with each cast. Add a small barrel swivel to break the rotation and keep your line straight.
Rotate Your Reel Occasionally
If you notice consistent twist, remove the lure and let the spool spin freely while holding the line. This releases built-up tension.
Store Rods Properly
Keep rods in a cool, dark place. UV light degrades monofilament and fluorocarbon. Store with the bail open to relieve line pressure.
Adapt for Baitcasting Reels
While this guide focuses on spinning reels, the core principles apply to baitcasters with key adjustments for their unique mechanics.
Set Spool Tension and Brakes
Baitcasters are prone to backlash if not adjusted properly. Set the spool tension knob so the lure slowly sinks when held. Set centrifugal or magnetic brakes to medium for starters, then fine-tune based on your casts.
Spool Braid Directly or Use Backing
When spooling braid, apply electrical tape first for grip. Alternatively, fill with 50–100 yards of 20 lb monofilament backing, then tie braid to backing with a Uni Knot or Albright Knot.
Wind Under Light Drag
Tighten the drag slightly during spooling to prevent slippage, but loosen before fishing.
Maximize Line Life and Performance
Small habits extend line life and keep your reel running smoothly season after season. Regular maintenance prevents unexpected failures on the water.
Rinse After Saltwater Use
Salt crystals accelerate wear on fishing line. Rinse the reel with fresh water and dry thoroughly after each saltwater trip.
Inspect Line Monthly
Pull out 10–15 feet and check for fraying, discoloration, or soft spots. Soft spots indicate water absorption in monofilament, which reduces strength. Replace the line if any issues are found.
Rotate Line on Spare Spools
If you own multiple rods, rotate line usage across them. This spreads wear evenly and keeps backup setups ready for action.
Frequently Asked Questions About Changing Fishing Line
How often should I change my fishing line?
Replace your fishing line at least once per season, or more frequently if you fish heavily. Inspect monthly for signs of wear like fraying, cracks, or discoloration. Lines used in saltwater or intense sunlight degrade faster and may need replacement every few months.
Can I spool a different type of line over old line?
No, always remove old line completely before adding new line. Layering different types creates uneven spooling that leads to tangles and poor casting. Clean the spool first, then spool fresh line directly against the bare spool surface.
Why does my line keep slipping on the spool?
Line slips when not secured properly. For monofilament, ensure you’re using an Arbor Knot with 6–8 inches of tag end. For braided line, apply 2–3 wraps of electrical tape around the spool before tying. Without this preparation, even secure knots can slip during initial winding.
What’s the best knot for attaching line to the spool?
The Arbor Knot is best for monofilament and fluorocarbon. For braided line, use electrical tape plus an Arbor Knot or slip knot. The key is leaving enough tag end and ensuring the knot locks against the spool hub rather than sliding along it.
How do I know when my spool is filled correctly?
Stop spooling when the line reaches 1/16 to 1/8 inch below the spool’s outer rim. Overfilled spools cause line to jump off when the bail opens, creating bird’s nests. Underfilled spools reduce casting distance and expose the spool edge, which can damage the line.
Key Takeaways for Changing Fishing Line Successfully
Knowing how to change fishing line properly transforms your fishing experience. The most critical steps are removing all old line and cleaning the spool first, choosing the right line type for your reel and fishing conditions, and securing the line with appropriate knots. Applying light, consistent tension while spooling and filling to the proper level prevents tangles and ensures smooth casts. Finally, test your setup with several practice casts before heading out. By making line changes a seasonal habit and following these proven techniques, your reel will perform like new every time you hit the water.





