

If you have ever watched a fish ignore your expensive store-bought lure and wondered why your grandfather’s handcrafted spinner always seemed to catch more, the answer lies in customization. Making fishing spinners at home lets you design lures that match exactly what fish in your local waters are feeding on, and at roughly $1 per lure compared to $8 for premium brands, the savings add up fast. This guide walks you through every component, tool, and technique you need to build high-performing spinners that outfish mass-produced options.
You will learn which parts are essential, how to assemble them in the correct sequence, and how to match your lure to specific fish and water conditions. By the end, you will be able to build a complete spinner in under five minutes.
Essential Components Every Spinner Needs
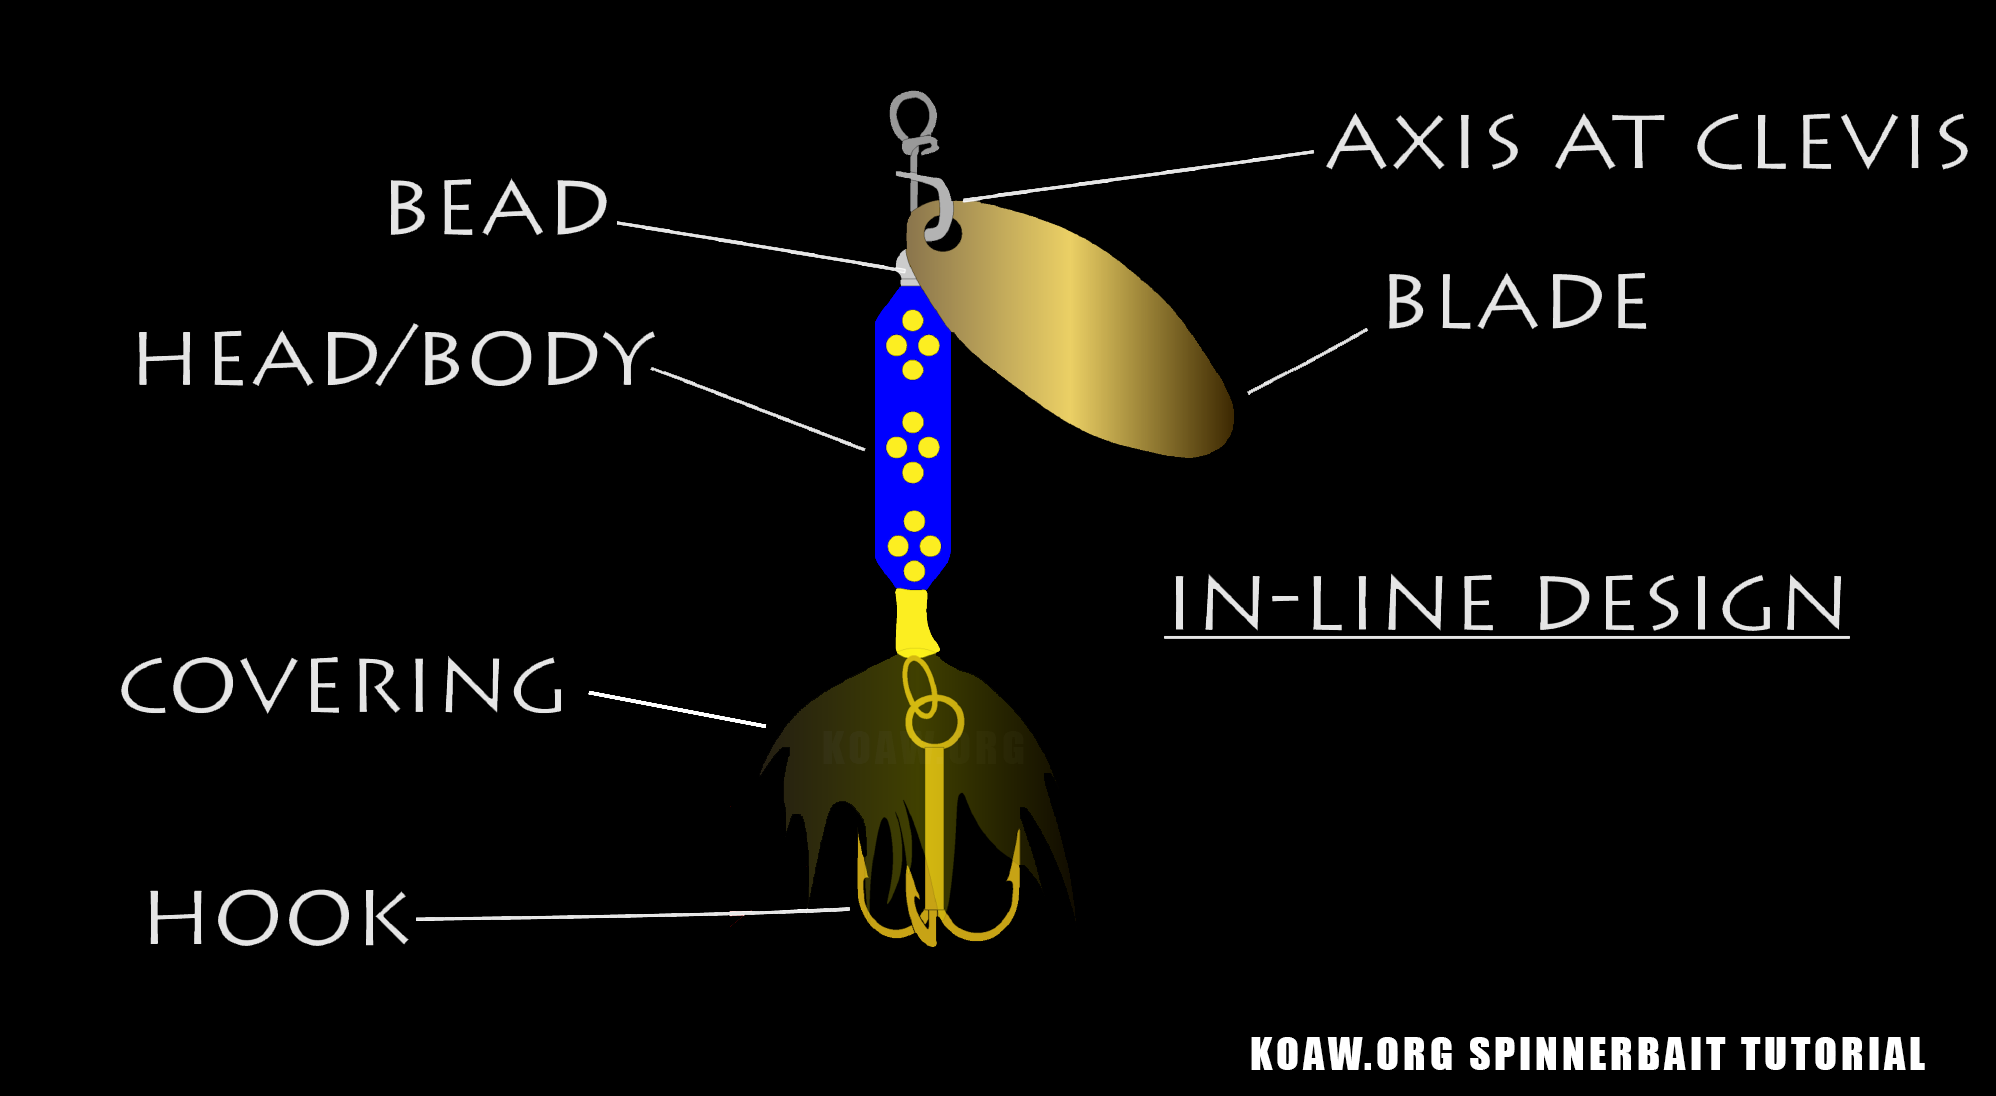
Every effective fishing spinner relies on precise parts that work together to create flash, vibration, and lifelike action. Skipping even one small component like a bead can render your lure useless.
Wire Shaft: The Backbone of Your Lure
The wire shaft forms the structural core of your spinner. It must be rigid enough to stay straight during casting but malleable enough to bend with pliers. Most builders use stainless steel or music wire in 16 to 20 gauge depending on lure size. Pre-looped wires save time, but you can easily form loops at both ends using round-nose pliers. Ensure the wire is clean and straight before assembly because any bend compromises balance and casting performance.
Hook Types: Treble vs Single
Hooks determine hook-up rate and snag resistance. Treble hooks in sizes #2 to #10 offer superior hooking power and are standard on most spinners. Owner size #3 trebles are popular for bass and trout. However, in weedy or rocky areas, single hooks prevent snags and allow weedless rigging. You can dress the hook shank with vinyl tubing or soft plastic skirts to add color and mimic baitfish.
Spinner Blades: Flash and Vibration
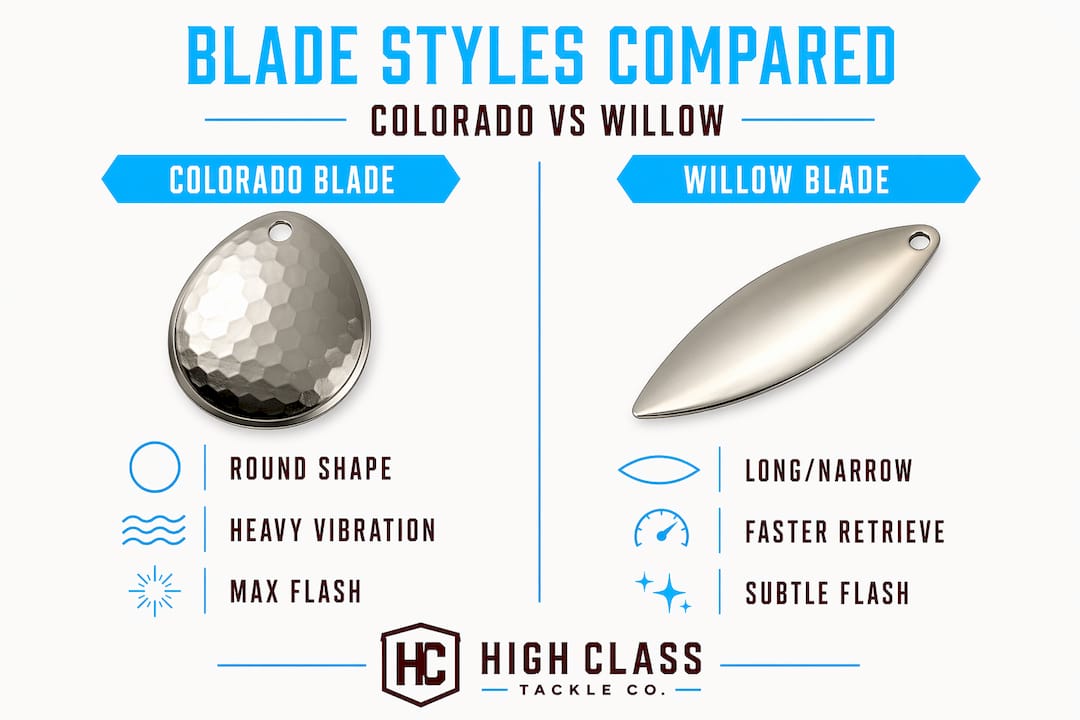
Blades generate the key attractants that draw predatory fish. Three main types dominate spinner design:
• Colorado blades are deep and rounded, creating strong vibration and slow spin. They work best in murky water or for cold, sluggish fish.
• Willow blades are narrow and fast-spinning, perfect for clear water and aggressive species like bass.
• French blades offer a hybrid shape with balanced flash and lift, making them excellent for trout and steelhead.
Always install the blade with the cupped or concave side facing downward, toward the hook. This orientation creates upward lift and keeps the lure swimming true.
Clevis and Beads: The Rotation System
The clevis is a U-shaped connector that holds the blade to the wire. It must match both the blade hole diameter and wire gauge to rotate freely. Paired with two hollow beads, the clevis ensures smooth, low-friction blade spin. One bead goes above the clevis, one below. Skipping beads is a common beginner mistake because without them, metal-on-metal contact causes binding and kills rotation.
Weighted Bodies: Depth and Castability
Weight determines how deep your spinner runs and how far it casts. Common options include:
• 1/16 oz works best for panfish and shallow streams.
• 1/8 oz is versatile for trout, bass, and average depths.
• 3/8 oz to 1/2 oz is for deep water, strong current, or large predators like pike.
While pre-molded brass or tungsten bodies look professional, steel or lead bullet weights work just as well and dramatically cut costs.
Swivels and Line Protection
A large ant swivel or ball-bearing swivel at the top prevents line twist from the spinning blade. Attach it directly to the top loop or via a split ring.
Tools You Need to Build Spinners
You do not need a full workshop. Most tools are found in tackle boxes or garages.
Basic Hand Tools
• Round-nose pliers form precise loops at the top and bottom of the wire.
• Needle-nose pliers align components and tighten wraps.
• Wire cutters trim excess wire flush after wrapping.
• A fly vice holds the lure steady for clean, consistent builds.
Customization Tools
For pro-level finishes, use a heat gun to pre-warm metal parts before applying powder paint. Cure in a dedicated toaster oven at 350°F for 20 minutes. This creates a durable, chip-resistant coating in any color.
Step-by-Step Spinner Assembly
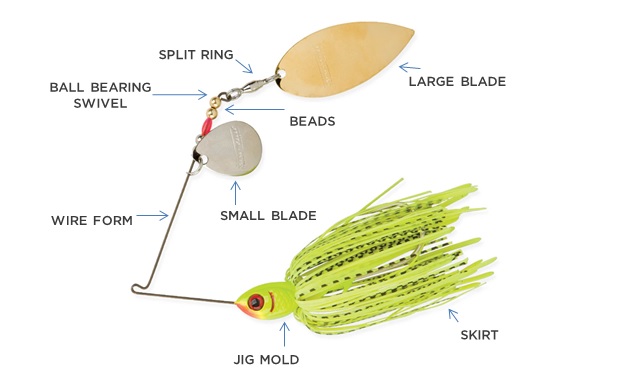
Follow this proven sequence to build a reliable, high-performing inline spinner every time.
Prepare the Wire Shaft
Start with a straight piece of 4 to 5 inch stainless wire. If not pre-looped, use round-nose pliers to form a small eyelet at the top. Bend about 5/8 inch of wire into a loop and wrap 2 to 3 times around the shaft. Trim excess.
Install Blade and Clevis
Slide the clevis into the spinner blade, ensuring the cupped side faces down. Then thread the clevis-blade combo onto the wire. This orientation creates lift and prevents the lure from diving nose-first.
Add Lower Bearing Bead
Slide a hollow metal bead onto the wire just above the clevis. This acts as a low-friction bearing. Without this bead, the blade will bind and spin poorly.
Attach the Weighted Body
Slide your chosen weight over the wire. Position it so the blade sits snugly against the bottom of the weight. This maximizes vibration transfer through the body and into the water.
Add Upper Spacer Bead
Place a second bead above the weight. This prevents the blade assembly from sliding up and maintains consistent spacing. It also protects the wire wrap area from abrasion.
Secure the Hook
Choose between permanent or replaceable attachment.
For permanent hook attachment, bend the wire 90° just below the top bead. Slide on a treble hook. Wrap the wire tightly around the main shaft 2 to 3 times. Trim excess flush with cutters.
For replaceable hook attachment, form a closed loop at the bottom. Attach a split ring. Connect the hook to the ring to allow quick changes when damaged.
Finalize Top Loop
If not already formed, create a 1/2 to 5/8 inch loop at the top. Wrap the end around the shaft 2 to 3 times, then trim flush. This loop connects to your line or swivel.
Optional Enhancements
• Internal prison tape adds color contrast without blocking reflection.
• Glow beads or blades boost visibility in low light.
• Vinyl hook tubing adds flash and protects hook points.
Custom Paint and Color Tuning

A custom paint job is not just cosmetic. It can make your spinner more effective in specific conditions.
Powder Painting Process
-
Pre-heat the brass body or nickel blade with a heat gun until warm.
-
Tap powder paint onto the surface. The heat makes it stick instantly.
-
Bake in a dedicated toaster oven at 350°F for 20 minutes.
-
Cool completely before use.
The result is a durable, professional finish that resists chipping and mimics natural prey like shad or minnows.
Match Spinner to Water and Species

Your spinner success depends on choosing the right size, color, and blade type for the conditions.
Color Selection by Water Clarity
Clear water calls for silver or black blades with natural body tones. Subtle flash avoids spooking wary fish. Murky water demands gold or chartreuse blades with bright colors for high visibility. Low light conditions benefit from reflective or glow blades with white or orange bodies.
Weight and Blade by Target Species
Trout respond well to 1/16 to 1/8 oz weights with French or Willow blades, fished slowly and steadily. Bass prefer 1/8 to 3/16 oz weights with Colorado or Willow blades using a stop-and-go retrieve. Panfish need 1/16 oz weights with small Willow blades and a light twitch. Pike and musky require 1/4 to 1/2 oz weights with Colorado blades and fast, erratic retrieves.
Best Suppliers for DIY Spinner Parts

Buy components in bulk to maximize savings and ensure compatibility.
Top Online Retailers
Jann’s Netcraft offers affordable bullet weights, blades, clevises, and beads. Mud Hole Custom Tackle provides complete spinner kits with all parts pre-matched. Barlow’s Tackle carries premium finishes and specialty blades. Lure Parts Online features detailed specs and bulk pricing. James Netcraft offers full tool and parts selection with phone support.
Beginners should start with a spinner building kit to eliminate guesswork and ensure all parts fit together.
Fishing Techniques for Homemade Spinners
Spinners are simple to use but mastering retrieval boosts catch rates.
Basic Retrieve
Cast and reel at a steady pace. Adjust speed based on fish activity. Faster for aggressive fish, slower for cold or lethargic ones.
Advanced Tactics
The stop-and-go retrieve works by reeling 3 to 5 turns, then pausing. This mimics injured prey. The jerk-and-pause involves lifting the rod tip slightly, then pausing to trigger reaction strikes. Drift fishing works for steelhead by casting upstream and letting the current swing the lure. Bottom bouncing uses heavier weights to tick rocks and structure.
The slowest effective retrieve often catches the most fish, especially in cold water.
Recommended Gear Setup
Use light spinning gear to maximize casting and sensitivity.
Ideal Rig
A 6’6″ medium-light spinning rod like the Berkeley Lightning works well. Pair it with a 1000-size spinning reel such as the Daiwa Regal LT 1000. Use 6 lb test monofilament or fluorocarbon. Spinning gear casts light lures more accurately than baitcasters, which struggle with weights under 1/4 oz.
Maintenance and Longevity
A well-built spinner lasts multiple trips with minimal upkeep.
Wire and Wraps
Inspect wire wraps regularly. If loose or frayed, re-wrap and trim flush. Use stainless steel wire to resist corrosion in salt or fresh water.
Blade Rotation
After each use, rinse the blade and beads. Dirt or algae cause binding. Clean bearing beads with a soft brush if needed.
Hook Care
Treble hooks dull quickly. Sharpen all three points with a hook file or replace when bent. Carry spares on the water.
Troubleshooting Common Problems
Fix issues fast with these quick diagnostics.
Blade Will Not Spin
The cause is missing or undersized beads. Add correct-sized hollow metal beads above and below the clevis.
Blade Wobbles
Bent wire or misaligned clevis causes this. Straighten the wire with pliers and ensure the clevis seats flat against the blade.
Hook Interferes with Blade
Insufficient spacing is the culprit. Add a spacer bead or use a shorter blade.
Lure Tangles Easily
Poor loop formation or unbalanced weight causes tangles. Re-form the top loop and check symmetry of components.
Poor Casting Distance
Underweight or bulky body reduces distance. Increase weight to 1/8 oz or more and streamline the body shape.
Frequently Asked Questions About Making Fishing Spinners
What is the cheapest way to build fishing spinners?
Use steel or lead bullet weights instead of pre-molded brass bodies. Source blades, clevises, and beads in bulk from Jann’s Netcraft. The average cost per homemade spinner is approximately $1.
How long does it take to build a fishing spinner?
Once you are familiar with the process, you can build a complete functional spinner in under five minutes. The first few spinners may take 10 to 15 minutes as you learn the technique.
What is the best blade for trout fishing?
French blades offer balanced flash and vibration, making them excellent for trout. Size 4 and A2 French blades are common starting points. Willow blades also work well in clear water.
Why does my spinner blade not spin properly?
Missing beads are the most common cause. Metal-on-metal contact creates friction that stops rotation. Add hollow bearing beads above and below the clevis to solve this problem.
Can I use homemade spinners in saltwater?
Yes, if you use stainless steel wire and components. Rinse thoroughly after each saltwater use and inspect wire wraps for corrosion or fatigue.
What is the best weight for panfish spinners?
1/16 oz weights work best for panfish. Small Willow blades in sizes #8 to #10 paired with light line create the delicate action panfish prefer.
Key Takeaways for Building Your Own Fishing Spinners
Building your own fishing spinners gives you a tactical advantage on the water. Fish in heavily fished areas become conditioned to commercial lures. Your custom spinner presents a unique profile that triggers curiosity strikes and outperforms mass-produced models. You control every detail: depth, vibration, profile, color, and presentation.
Start with a spinner building kit to eliminate compatibility issues. Focus first on mastering the basic assembly sequence before experimenting with custom paints and specialized blade combinations. Match your spinner weight and blade type to target species and water conditions, then refine your retrieve speed based on fish activity.
With practice, you will be able to build a high-performing spinner in under five minutes for about $1 each. That is 85% savings compared to store-bought lures, and your handcrafted creations will catch fish that ignore everything else on the water.





