
If you’ve ever wondered why your lure isn’t moving naturally in the water, the problem might not be your gear. It could be your knot. The fishing loop knot is one of the most effective terminal knots for maximizing lure action, allowing hooks and baits to swing freely and mimic injured prey. This guide covers the best loop knots, step-by-step tying methods, key adjustments, and pro tips to ensure every cast delivers peak performance.
Choose the Right Loop Knot
Not all loop knots serve the same purpose. Each variation works best with specific line types, lures, and fishing environments. Selecting the right one ensures strength, mobility, and fewer snags.
Match Knot to Application
Use the Cray Loop Knot when fishing in heavy cover. Its weedless design keeps the tag end flush against the hook shank, minimizing hang-ups in grass and brush. For maximum lure action on crankbaits or jigs, the Non-Slip Loop Knot is ideal because it allows the loop to slide slightly, enhancing mobility. If you’re using heavy fluorocarbon or monofilament leaders, especially in saltwater or for large species like muskie, the Duncan Loop offers superior strength and reliability. For quick changes and light tippets, the Perfection Loop works well on dropper rigs and flies. When speed matters during topwater action, the Two-Twist Loop Knot lets you tie fast, even with cold or gloved hands.
Know Your Line Compatibility
Monofilament is the most forgiving for learning loop knots. Fluorocarbon’s stiffness requires careful wrapping and seating. Braided line, being slick, demands extra wraps and thorough lubrication to prevent slippage. For lines 10 lb test and above, reduce wraps to 4 to avoid bulky knots that catch on rod guides.
Tie the Cray Loop Knot (Weedless Design)
This knot excels in thick grass, brush, and woody structure thanks to its streamlined profile. It’s a favorite among bass anglers targeting cover-heavy zones.
Prepare the Overhand Knot
Start by forming a loose overhand knot near the end of your line, leaving about 4 inches (10 cm) of tag end. Do not tighten it yet. Hold the knot vertically with the right side up and the left side down. The loop should angle slightly downward. This orientation is crucial for correct formation.
Thread and Position the Lure
Slide your hook or lure onto the main line before completing the knot. Pass the tag end up through the bottom of the overhand knot from underneath. Then, slide the entire knot down the line until it seats firmly against the lure’s eye. Hold it in place with your non-dominant hand.
Wrap and Secure the Knot
Wrap the tag end around the standing line 4 times. Use 5 wraps for heavy cover or large fish. Keep the wraps tight, parallel, and non-overlapping. After the final wrap, bring the tag end to the top side of the original overhand knot and pass it from top to bottom through the upward-facing loop. Moisten the knot with water or saliva, then pull both the standing line and tag end to tighten. Adjust loop size by pulling the main line to enlarge or the tag end to shrink. Trim excess close to the knot.
Pro Tip: The finished tag end should lie flat along the hook shank. This weedless feature prevents snags in vegetation.
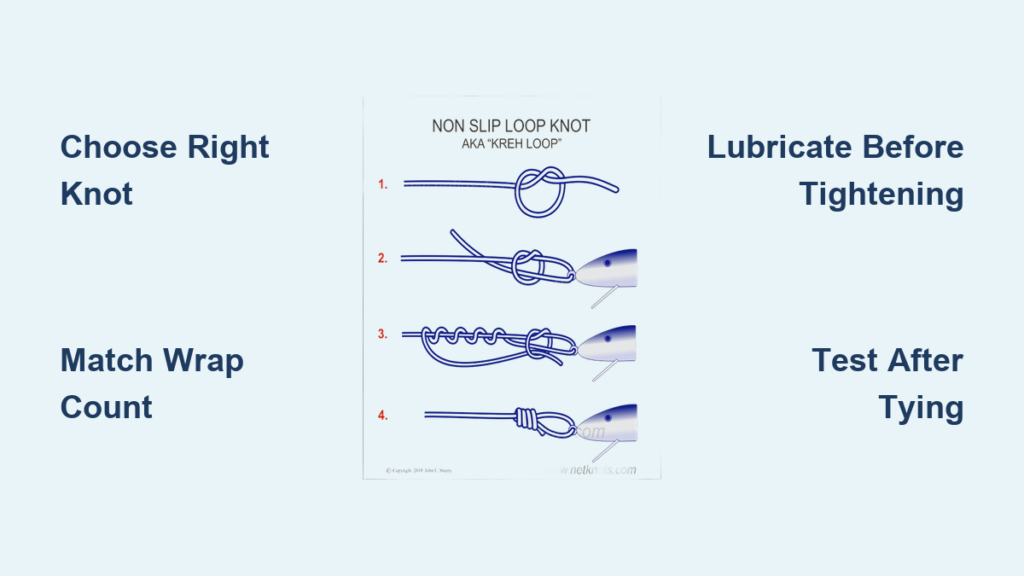
Use the Non-Slip Loop Knot for Maximum Action
When lure movement is critical, this knot delivers unmatched articulation. It’s perfect for crankbaits, soft plastics, and flies that need to swim naturally.
Form the Initial Slip Loop
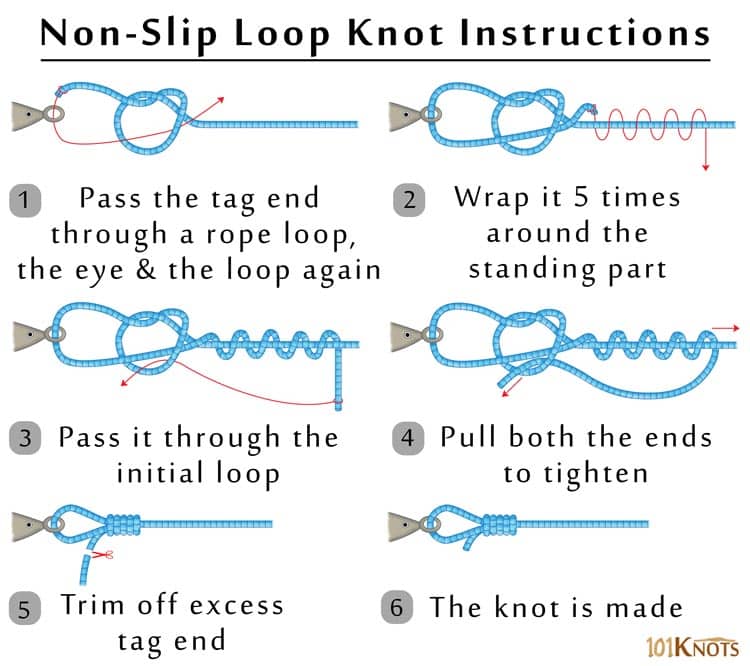
Create an overhand knot in the standing line, leaving 6 to 8 inches (15 to 20 cm) of tag end. Pass the tag end through the lure’s eye, then back through the loop of the overhand knot. This forms a slip knot around the standing line.
Wrap and Lock the Knot
Wrap the tag end around the standing line 4 to 5 times. Use 5 wraps for lines 8 lb test and under. Use 4 wraps for heavier lines to reduce bulk. After wrapping, pass the tag end back through the original overhand loop a second time to lock the coils in place. Moisten the knot thoroughly. Pull both ends slowly to tighten, ensuring the loop remains open and mobile. Trim the tag end.
Check Function: Wiggle the lure gently. Your knot should allow full side-to-side and up-down motion without resistance.
Fast-Tie the Two-Twist Loop Knot
Popularized by angler Jonathan Newton, this method is ideal for real-time adjustments, especially when switching lures mid-session or fishing in cold weather.
Create the Double Twist
Leave 12 to 14 inches (30 to 36 cm) of tag end. Pass it through the lure eye. Grip the tag end in the middle and make two full twists, forming a double-loop helix. These loops will act as the anchor point.
Finish and Adjust
Pass the tag end back through both loops. Position the loops over the lure eye and slide them down the line. Pull each loop individually to fine-tune symmetry and size. Then, pull the main line and tag end to fully tighten. Moisten before final cinching. Trim excess.
Why It Works: No pre-tied overhand knot means fewer steps and faster execution. This is perfect for topwater wake baits during fall feeding frenzies.
Optimize Loop Size and Wraps
Even the best knot fails if loop size or wrap count is wrong. These small details have a big impact on performance.
Set the Ideal Loop Size
Aim for a loop between 3/8 inch and 1/2 inch (9.5 to 12.7 mm). Smaller loops offer more control but less action. Larger loops increase wobble but risk tangling. For walking baits, go slightly larger (up to 1/2 inch) to enhance side-to-side motion. For finesse rigs like Ned jigs, keep it tight at 3/8 inch for subtle quiver.
Adjustment Trick: Pull the tag end to shrink the loop, or the main line to expand it. For perfect balance, tug each leg of the loop separately after tightening.
Choose the Correct Number of Wraps
• Standard mono or fluoro: 4 wraps
• Light lures and finesse: 3 wraps
• Heavy lures and big fish: 5 wraps
• Braided line: 5 wraps
• Thin line (8 lb test and under): 5 wraps
• Thick line (10 lb test and above): 4 wraps
Too few wraps reduce holding power. Too many create friction heat that weakens the line. Always match wraps to your setup.
Prevent Common Mistakes
Even experienced anglers make errors that compromise knot strength. Avoid these pitfalls to keep your lures secure and moving freely.
Never Skip Lubrication
Always wet the knot with water, saliva, or line conditioner before tightening. Dry friction can reduce line strength by up to 50%, especially with braid and fluorocarbon. Lubrication allows smooth seating and prevents micro-abrasions that lead to breakage.
Avoid Twisting or Crossing Lines
When forming loops or wrapping, keep the tag end and standing line parallel and untwisted. Crossed lines create weak points and uneven tension. This is especially critical in the Duncan Loop and Non-Slip Loop, where alignment affects strength.
Check Tag End Placement
In the Cray Loop, the tag must lie flush along the shank. Any upward protrusion increases snag risk. In the Perfection Loop, expect a 90-degree exit. While functional, it’s not ideal for weedy environments. Trim close, but always perform a final pull test after trimming.
Compare Top Loop Knots

Understanding the strengths and weaknesses of each knot helps you choose wisely in the field.
• Non-Slip Loop: High mobility, 90 to 95% strength, best for crankbaits and jigs
• Perfection Loop: Easy to tie, 85 to 90% strength, good for droppers and flies
• Duncan Loop: Great strength, best for heavy leaders and fluorocarbon
• Cray Loop: Highest strength (95%), very low snag risk, ideal for heavy cover
• Two-Twist: Very easy, fast to tie, great for quick lure changes
For general use, the Non-Slip Loop and Cray Loop offer the best balance of strength and action. The Two-Twist wins for speed, while the Duncan Loop dominates in heavy-duty applications.
Maintain and Test Your Knots
A strong knot today can weaken after just one hard fight. Regular inspection keeps you ready for the next bite.
Perform a Tug Test
After tying, give the knot a firm pull using both hands. Watch for slippage, deformation, or uneven tightening. If the loop collapses or the knot slips, re-tie immediately.
Re-Tie After Key Events
Replace your knot after a hard strike or missed hookset. Also re-tie after contact with rocks, wood, or abrasive cover. Re-tie after long-distance casts that stress the line. Re-tie if you notice any visible fraying or kinking. Even if it looks fine, re-tying every few hours in tough conditions ensures reliability.
Practice at Home
Use scrap line to build muscle memory. Try tying each knot blindfolded or with gloves on. This prepares you for real-world conditions like cold mornings or low light.
Frequently Asked Questions About Fishing Loop Knots
What is the strongest fishing loop knot?
The Cray Loop Knot retains approximately 95% of line strength, making it the strongest among common loop knots. The Non-Slip Loop follows closely at 90 to 95% strength retention.
Which loop knot is best for bass fishing?
The Cray Loop Knot is best for bass fishing in heavy cover because its weedless design prevents snagging in grass and woody structure. The Non-Slip Loop works well for open-water bass fishing where maximum lure action is desired.
Can I use a loop knot with braided line?
Yes. Braided line requires extra wraps (5 instead of 4) and thorough lubrication before tightening to prevent slippage. The Non-Slip Loop and Cray Loop both perform well with braided line.
How do I know if my loop knot is tied correctly?
After tightening, gently wiggle the lure. A properly tied loop knot allows full side-to-side and up-down motion without resistance. The loop should be between 3/8 inch and 1/2 inch in size.
Why does my loop knot slip?
Slippage usually results from insufficient wraps, dry friction during tightening, or using the wrong number of wraps for your line type. Always moisten the knot before final tightening and use the correct wrap count for your line.
Key Takeaways for Tying Fishing Loop Knots

Mastering how to tie a fishing loop knot isn’t just about technique. It’s about unlocking your lure’s full potential. Whether you’re using the weedless Cray Loop in thick grass, the high-mobility Non-Slip Loop for crankbaits, or the ultra-fast Two-Twist for topwater action, the right knot makes the difference between a reaction strike and a missed opportunity.
Focus on three critical factors for consistent success. First, ensure correct orientation when forming your initial overhand knot. Second, match your wrap count to your line type and fishing conditions. Third, always lubricate before tightening to preserve line strength. Test your knots after every hard strike or extended use, and re-tie proactively rather than waiting for failure.
Practice these knots at home with scrap line until the motions become automatic. When you’re on the water and that big fish strikes, muscle memory will kick in and deliver a properly tied knot every time. Tie it right, test it often, and watch your catch rate rise.





