
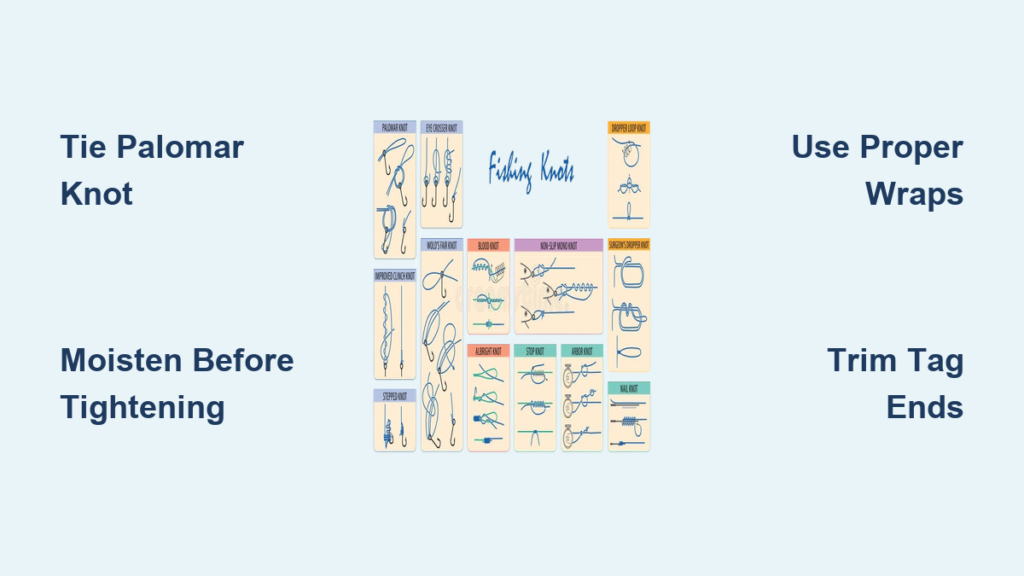
Losing a trophy fish because your knot failed is one of the most frustrating experiences in fishing. No matter how strong your line claims to be, a poorly tied knot can reduce its strength by up to 50%, and that is why knowing how to do a fishing knot correctly is non-negotiable. Whether you are using monofilament, fluorocarbon, or slick braided line, the right knot ensures your lure stays on, your hook sets deep, and your leader holds under pressure.
This guide breaks down every essential fishing knot with clear, step-by-step instructions, performance data, and expert tips so you can tie with confidence. From beginner-friendly knots like the Palomar to advanced connections like the Bimini Twist, you will learn which knot works best for each situation and how to tie it fast, even with cold, wet hands.
Best Knots for Attaching Hooks and Lures
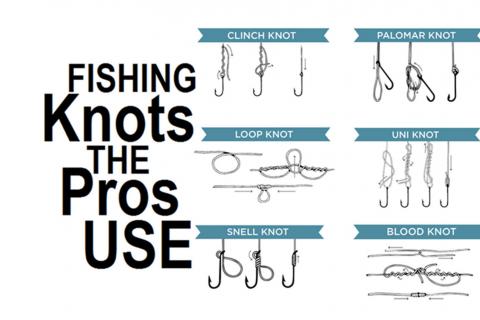
Attaching your hook, lure, or swivel securely is the foundation of any rig. The knot you choose matters significantly based on your line type and target species. Using the wrong knot can cut your line strength nearly in half, so matching the knot to your materials is critical for landing big fish.
Improved Clinch Knot for Monofilament
The improved clinch knot is one of the most widely trusted knots among recreational anglers. It works exceptionally well with monofilament and fluorocarbon lines under 30 lb test, delivering up to 95% strength retention when tied correctly.
Step-by-step instructions:
- Thread the tag end of the line through the eye of the hook, lure, or swivel
- Double the line back against the standing line and wrap the tag end around both lines using 5-7 turns for general use, 6-7 turns for heavy line, or 4-5 turns for light monofilament
- Pass the tag end through the small loop formed just above the hook eye
- Pass the tag end back through the large outer loop behind the wraps
- Moisten the knot with water or saliva to reduce friction and prevent heat damage
- Pull both the standing line and the tag end simultaneously to seat the knot tightly against the hook eye
- Trim the excess tag end to about 1/8 inch
Pro tip: Always moisten before tightening. Friction can weaken monofilament by up to 20% if the knot is pulled tight while dry. Avoid overlapping wraps, as they significantly reduce knot strength. This knot is not recommended for braided line due to slippage risk.
Palomar Knot: Best for Braided Line
The Palomar knot is the top choice for braided line, though it works equally well with monofilament and fluorocarbon. It retains 95-98% of line strength and requires only three simple steps, making it ideal for beginners and pros alike.
How to tie:
- Double approximately 6 inches of line to form a loop; pass this loop through the eye of the hook, lure, or swivel
- Tie an overhand knot with the doubled line, but do not tighten it yet
- Pass the hook or lure through the loop that hangs below the overhand knot
- Pull both ends of the line to tighten the knot securely against the hook eye
- Trim the tag end
Why it wins: This knot handles stiff braided line better than most alternatives and is easy to tie in low-light conditions. Use it for jigs, soft plastics, and topwater lures where maximum strength matters.
Uni Knot: The Ultimate Multi-Purpose Tie
The uni knot is remarkably versatile, working across all line types for attaching hooks, swivels, or leaders. It can even be adapted for line-to-line connections and retains 85-90% strength when properly seated.
Steps:
- Pull 8-10 inches of line through the hook eye
- Pinch the tag end and standing line together, forming a loop where the tag crosses over the standing line
- Wrap the tag end around both lines inside the loop using 4-5 turns for heavy line or 6-8 turns for light monofilament
- Hold the wraps in place and pull the tag end gently to snug the coils without fully tightening
- Release the tag end and pull the standing line to slide the knot down toward the hook eye
- Once seated, give a final pull on the tag end, then firmly tighten by pulling the standing line
- Trim the tag end
Expert note: The uni knot excels when connecting braid to a fluorocarbon leader. Simply tie it around the leader instead of the hook. This knot is a favorite among saltwater anglers targeting redfish, snook, and tarpon.
Snell Knot for Straight Line Alignment
The snell knot flattens the line along the hook shank, ensuring even force distribution when setting the hook. It eliminates the bend at the hook eye, making it ideal for circle hooks, live bait rigs, and catfishing applications.
How to tie:
- Pass the tag end through the hook eye from front to back, then bring it back through again so the line exits the front, creating a loop alongside the hook shank
- Hold the loop and tag end together, then wrap the tag end around both the loop and the hook shank 5-10 times
- Keep wraps tight and close together
- After completing wraps, hold them in place with one finger and pull the standing line upward to snug the knot under the coils
- Trim the tag end
This knot prevents leverage-induced breakage at the eye and is commonly used in commercial fishing and deep-water rigs.
Loop Knots for Natural Lure Action
Loop knots allow lures, flies, and soft plastics to move freely, boosting realism and catch rates. When lures can wiggle naturally, fish are far more likely to strike.
Non-Slip Loop Knot
The non-slip loop knot creates a fixed loop that does not collapse under tension. It preserves the natural swimming motion of lures and flies while maintaining a secure connection.
How to tie:
- Tie a loose overhand knot in the tag end, leaving a 3-4 inch tail
- Pass the tag end through the hook or fly eye
- Bring the tag end back through the overhand knot, retracing its exit path
- Wrap the tag end around the standing line using 7 wraps for lines under 8 lb, 5 wraps for 8-12 lb, or 4 wraps for 15-40 lb
- Pass the tag end back through the overhand knot again, following the same route
- Moisten the knot
- Pull the tag end to partially tighten the wraps
- Adjust the loop size as needed
- Finish tightening by pulling the standing line
- Trim the tag end
Field insight: This knot is essential for bonefish flies and twitchbaits where subtle movement makes all the difference.
Dropper Loop Knot for Multi-Hook Rigs
The dropper loop knot adds a second hook mid-line, perfect for nymph rigs, offshore spreads, and multi-fly setups. It creates a rigid, perpendicular loop that holds a nymph or teaser fly independently.
Steps:
- Create a large loop in the middle of the line where you want the dropper
- Hold the loop and make 5-7 twists in the doubled section to form a coil
- Pull the far end of the main line through the loop to create a fixed knot on one side
- Expand the loop and tighten the knot by pulling all three ends
- Trim excess if necessary
This knot is great for trout nymphing or trolling rigs with multiple lures.
Line-to-Line Connections: Braid to Leader
Joining two lines, like braid to leader, requires strong, smooth knots that handle different diameters and materials. The right connection prevents weak points that could fail under pressure.
Double Uni Knot for Braid-to-Leader
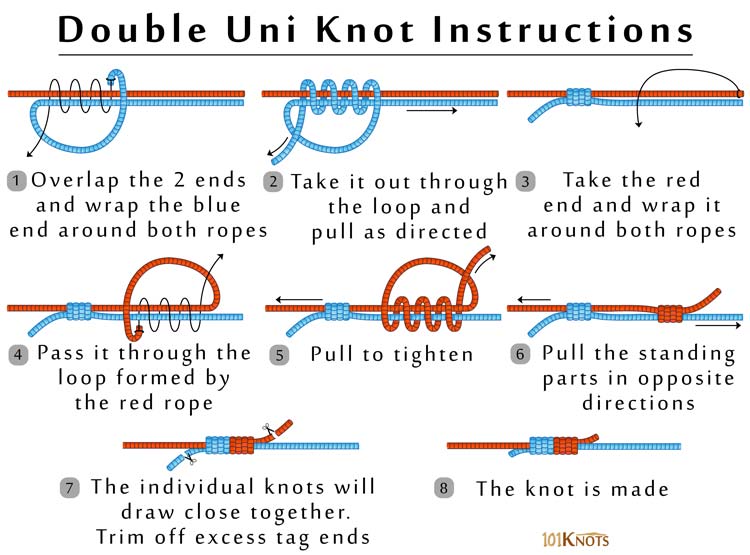
The double uni knot is the go-to for connecting braided mainline to fluorocarbon or monofilament leader. It retains approximately 90% strength when tied correctly and provides a smooth transition between lines.
How to tie:
- Overlap the two lines for 6-8 inches
- Tie a uni knot with the first line around the second line using 4-6 wraps, pass the tag through the loop, and pull to tighten leaving the knot loose
- Repeat the same process with the second line around the first
- Moisten both knots
- Pull both standing lines in opposite directions to bring the two uni knots together
- Seat them firmly and trim both tag ends
Critical tip: Do not let the knots touch before tightening. They must meet center-to-center for maximum strength.
Alberto Knot for Braid to Fluorocarbon
The Alberto knot is preferred by West Coast saltwater anglers for connecting braid to fluorocarbon leaders. It retains up to 95% strength and is more streamlined than the Albright knot, making it better for casting.
Steps:
- Overlap braid and leader by 10-12 inches
- With the braid, tie a uni knot around the leader using 6-8 wraps
- With the leader, tie another uni knot around the braid using 10-12 wraps
- Moisten both knots
- Pull both standing lines to draw the knots together
- Trim tag ends
Why it beats Albright: More streamlined, better for casting, and less prone to shock failure during aggressive strikes.
Blood Knot for Similar Diameter Lines
The blood knot is the standard for joining lines of similar diameter, particularly in fly fishing when connecting sections of tapered leader. It retains 85-90% strength when properly executed.
How to tie:
- Overlap the two lines for 6-8 inches
- Twist one line around the other in a spiral for at least 5 turns
- Bring the tag end back parallel to the opposite line
- Repeat with the second line in the opposite direction, wrapping around the first line for 5 or more turns
- Bring both tag ends toward the center between the two sets of wraps
- Moisten and pull both standing lines slowly to draw the wraps together
- Trim tag ends
Improved version: Add a half-hitch to each tag end before final tightening for added security. Avoid with braid, as it is too stiff and slippery.
Essential Fly Fishing Knots
Fly fishing demands precise knots with minimal visibility. These connections are designed for attaching flies, tippets, and leaders with strength and subtlety.
Davy Knot for Speed
The Davy knot can be tied in under 5 seconds, making it popular among competitive fly fishers. It retains approximately 80% strength, which is acceptable for small to medium trout but not for large fish or heavy currents.
Steps:
- Pass tag end through fly eye
- Tie a simple overhand knot around the standing line
- Before tightening, pass the tag end through the overhand knot a second time
- Pull to tighten
- Trim tag
Harvey Dry Fly Knot for Extra Strength
The Harvey dry fly knot is an upgrade to the Davy knot, adding an extra turn for increased strength. It retains up to 90% of tippet strength, superior to the Davy.
Procedure: Same as Davy, but make two passes of the tag end through the overhand knot instead of one.
Orvis Knot for Fluorocarbon Tippet
The Orvis knot combines features of the Palomar and improved clinch, delivering approximately 95% strength. It is slightly more complex but highly reliable with fluorocarbon tippets.
How to tie:
- Pass tag end through fly eye
- Double back and wrap the tag end around the standing line 5-6 times
- Pass the tag end through the loop at the base, then through the large outer loop
- Moisten and pull to tighten
- Trim tag
Specialized Knots for Big Game and Rigging
These knots serve specific purposes for backing, big game fishing, and utility applications.
Arbor Knot for Securing Backing
The arbor knot secures backing to your reel spool and is critical for preventing slippage when fighting large fish. Never skip this knot when spooling heavy line.
How to tie:
- Tie an overhand knot around the arbor of the reel spool
- Tie a second overhand knot in the tag end and snug it against the first
- Pull tight to secure
Bimini Twist for 100% Strength
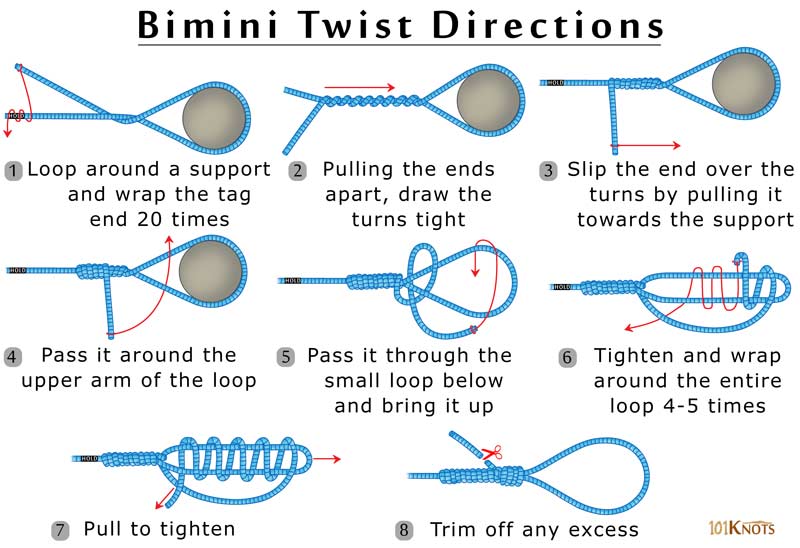
The Bimini twist creates a strong, double-line section for offshore leaders. When properly twisted, it retains up to 100% strength, making it essential for marlin, tuna, and shark fishing.
Procedure:
- Twist the line to form a double-line section with 20-30 twists
- Create a loop and wrap the doubled section around the main line for 10-15 turns
- Finish with a half-hitch to secure the loop
- Wet and stretch during tightening
This knot provides a strong, flexible loop for attaching swivels or rigs in extreme conditions.
Braided Line Tips and Techniques
Braided line is incredibly strong but extremely slick, requiring specialized knots and careful technique. Follow these rules to maximize performance.
Essential tips:
- Always moisten braid before tightening to prevent heat damage
- Use more wraps than you would with monofilament
- Avoid friction-dependent knots unless specifically designed for braid
- Test every knot with steady pull before casting
Top braid knots: Palomar, Berkley Braid, Alberto, and Double Uni. These knots grip the slick texture of braid and maintain high strength retention.
Wire to Mono Connection for Predators
When targeting pike, muskie, or barracuda, a wire leader prevents bite-offs. This wrapped connection is bulletproof against sharp teeth.
How to tie:
- Fold 4 inches of wire back on itself to form a U-bend
- Insert the monofilament tag end between the two legs of the bend
- Wrap the mono around both wire strands once near the base
- Make 7 tight, adjacent wraps up the wire
- Tuck the tag end under the last few wraps
- Pull to tighten and secure
Alternative: Use crimp sleeves for permanent, completely bite-proof connections.
Key Takeaways for Mastering Fishing Knots

Knot failure is the number one cause of lost fish. Even the strongest line is only as strong as its weakest point. Practice tying each knot until you can complete it in under 10 seconds, because field conditions like wind, rain, and cold hands make everything harder.
Always moisten before tightening. Friction weakens monofilament and fluorocarbon by up to 20% if dry. Trim tag ends to 1/8 inch, test every knot with steady pressure before casting, and carry a reference card until muscle memory takes over. Better to know a knot and not need it than to need a knot and not know it.
Frequently Asked Questions About Fishing Knots
What is the strongest knot for braided line?
The Palomar knot is the strongest and most reliable for braided line, retaining 95-98% strength. The Berkley Braid knot is also excellent, reaching up to 95% strength retention.
How many times should I wrap a fishing knot?
Wrap count depends on line type and weight. For the improved clinch knot, use 5-7 wraps for general use, 6-7 for heavy line, or 4-5 for light monofilament. Braided line typically requires more wraps than monofilament due to its slick texture.
Why does my fishing knot keep slipping?
Slippage usually occurs because the knot was not moistened before tightening, wraps are overlapping, or you are using the wrong knot for your line type. Friction-dependent knots like the improved clinch fail on braided line because braid is too slippery.
Should I wet fishing knots before tightening?
Always wet fishing knots before tightening. Friction from tightening generates heat, especially in monofilament and fluorocarbon, which can weaken the line by up to 20%. Use water, saliva, or knot lubricant.
What is the easiest fishing knot for beginners?
The Palomar knot is the easiest for beginners. It requires only three steps, works with all line types, and maintains high strength. The improved clinch knot is another beginner-friendly option for monofilament.





