

Creating your own fishing lure molds opens the door to custom designs, unique colors, and cost-effective production. Whether you’re crafting one-of-a-kind baits for personal use or scaling up for small-batch sales, the right techniques let you replicate professional-grade tooling at a fraction of the cost. This guide walks you through how to make fishing lure molds using proven methods, from beginner-friendly plaster setups to durable aluminum-filled epoxy injection molds.
You’ll learn exactly how to prepare masters, choose the right mold material, pour accurately, and avoid common pitfalls that frustrate first-time mold makers. Every section includes the specific temperatures, ratios, and timing that separate successful lures from wasted materials.
Choose the Right Mold Material for Your Project
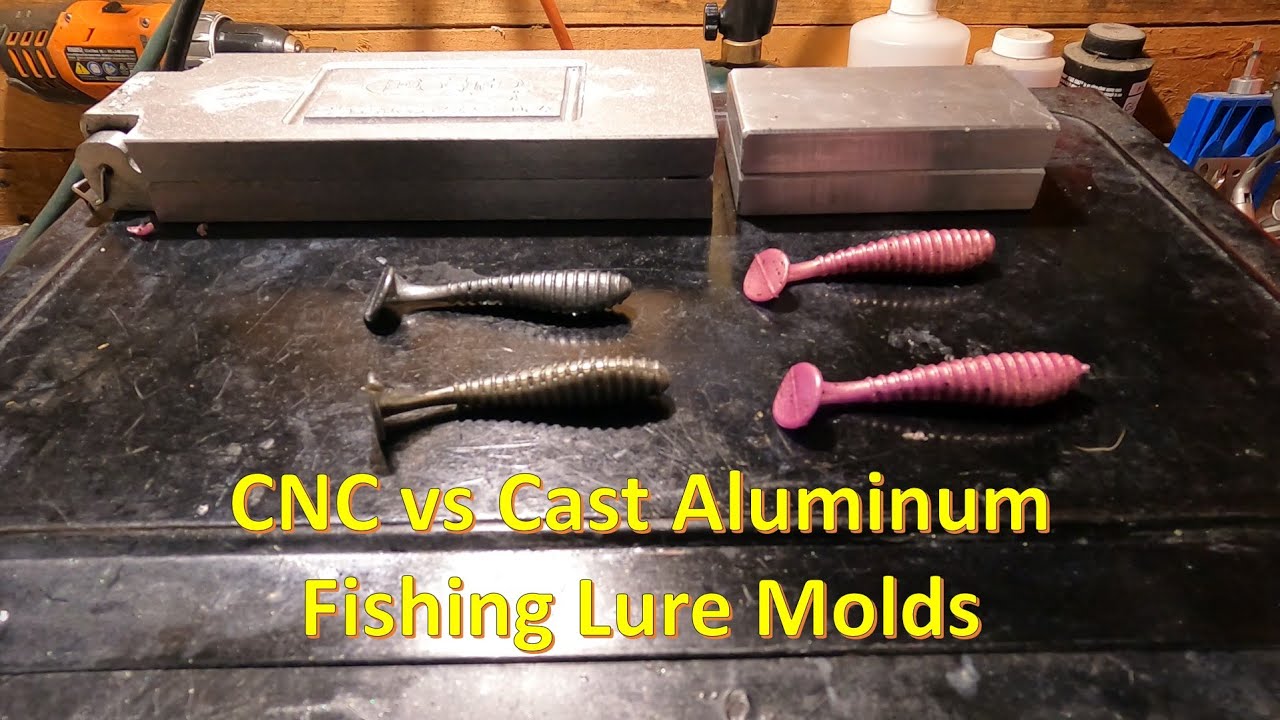
Your mold material directly impacts durability, detail fidelity, and how many lures you can produce. Each option has distinct trade-offs in cost, complexity, and lifespan.
Plaster of Paris for Beginners
Plaster is ideal for learning parting lines and open-pour techniques without significant investment. An 8-pound bag costs roughly $5 at craft stores.
Best applications include flat-back lures, single-sided pours, and DIY learning projects. The main limitations are fragility and porosity. Plaster breaks easily when dropped and absorbs moisture if not properly sealed.
Sealing is mandatory. Use high-heat epoxy, fiberglass resin, or a 50/50 mix of water and white glue to prevent steam explosions when exposed to hot plastisol around 350°F. Bake plaster molds at 200-220°F for 2-3 hours before first use to remove all moisture.
RTV Silicone for Complex Details
RTV silicone captures every scale, gill, and fin undercut without damaging your master during demolding. Professional-grade options like Smooth-On MoldMax 40 cost $20-80+ per gallon but yield hundreds of casts.
This material excels at complex swimbaits, multi-color pours, and baits with fins or legs. The flexible nature handles undercuts that would crack rigid molds.
A common myth is that hardware store caulk mixed with dish soap works for lure molds. This is false. It shrinks, warps, and fails under heat, especially in thicknesses over half an inch. Professional RTV silicone is required for reliable results.
Aluminum-Filled Epoxy for Production Runs
Resins like Back 50, Alumilite VAC 50, or Vac Master 50 create rigid, heat-resistant molds that mimic commercial aluminum tooling. These handle repeated high-temp cycles perfect for serious hobbyists or small businesses.
A typical mold costs approximately $12-15 using 2 pounds of material. Full cure takes 2-3 hours, with complete molds ready in under 8 hours. This is the go-to choice for soft plastic injection and multi-cavity production.
Durham’s Water Putty as a Mid-Tier Option
Durham’s holds fine detail better than standard plaster while remaining easier to work with than epoxy. It cures harder than plaster and works well for both open pour and two-piece molds.
This option suits project builders who want better performance than plaster without the precision mixing requirements of epoxy. Sealing is optional but recommended for glossy finishes.
Prepare a Flawless Master Lure
The master is the original model used to form your mold cavity. Its quality determines every detail that appears in your final lures.
Create or Source Your Master
You can use commercial soft plastics as masters. For round baits, insert 22-24 gauge steel wire through the body to provide rigidity during molding. Flat baits can be glued directly to the mold box bottom.
Wood carvings using poplar or basswood allow completely original designs. Shape with a pocket knife and refine with sandpaper.
Polymer clay like Scalp III or Sculpt III lets you sculpt custom designs from scratch. Bake according to manufacturer instructions to harden before molding.
Surface Refinement Protocol
Imperfections on your master replicate in every cast. Follow this proven protocol for professional results.
Sand the master thoroughly with 320-grit sandpaper to remove tool marks and rough spots. Apply high-build automotive primer to fill surface scratches or wood grain. Repeat sanding and priming until the surface is perfectly smooth. Seal with two thin coats of Kamar varnish to protect the primer and enhance smoothness.
Install hook slots, lip slots, or tail hooks before molding. Pre-drilling guide holes or adding a temporary tail hook for handling during the molding process improves results.
Build a Leak-Proof Mold Box
A stable container keeps your mold material contained and aligned. The box must be rigid enough to withstand pouring pressure without flexing.
Materials and Dimensions
Use foam board, plastic containers, scrap wood, or even Lego bricks glued to a base. The box should be approximately 1 inch larger than your master on all sides.
Line the bottom with aluminum foil or duct tape for smooth release. Secure the master with hot glue or double-sided tape to prevent floating when you pour the mold material.
For two-part molds, ensure at least one side is removable for easy disassembly after curing.
Make Plaster or Durham’s Molds
This method teaches core principles like parting lines and sealing while keeping costs minimal.
Mix and Pour Correctly
Mix 2 parts plaster or putty to 1 part water, following package specifics. Aim for thick pancake batter consistency pourable but not watery.
Pour technique matters significantly. Start in a corner and let the material flow around the master rather than pouring directly onto it. This reduces air bubbles trapped against the surface.
De-gas by tapping the box gently or using a vibrating table. Pass a torch briefly over the surface to pop remaining bubbles. Let cure for 24 hours minimum, even if the surface feels dry.
Create Two-Piece Molds for Round Baits
For fully round lures, create a two-part mold. Press the master halfway into cured first layer or a clay bed. Drill half-inch to 5/8-inch V-shaped locator holes around the edge for alignment.
Apply petroleum jelly to the cured half and exposed master. Pour the second half slowly, filling to about 1 inch depth. Cure for 2-3 hours before removing.
Dry and Seal Thoroughly
Moisture in plaster turns to steam when exposed to hot plastisol, causing cracks or violent “explosions.” Bake plaster molds at 200-220°F for 2-3 hours to achieve bone-dry hardness.
Seal the interior with thinned epoxy. Mix Devcon 2-Ton with rubbing alcohol until watery. Brush multiple coats inside the cavity and sprue holes for a glossy finish. Avoid getting sealant on the parting line it prevents tight closure and causes flash.
Make RTV Silicone Molds for Complex Shapes
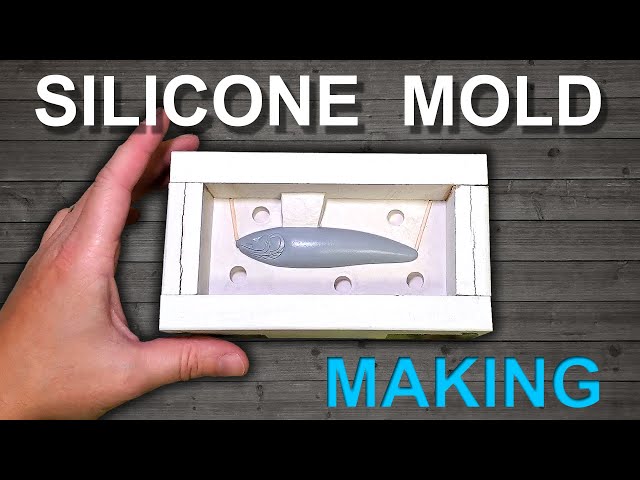
Silicone excels at capturing intricate details and handling undercuts that break rigid molds.
Set Up Clay Bed and Mold Box
Use non-hardening white modeling clay, warmed by hand for better workability. Press clay into the box to half the lure’s height. Place the master centered and push clay to the midpoint to form a sharp parting line.
Trace the outline with a fine tool to eliminate gaps where silicone could leak.
Add Gating and Venting
Model these features into the clay bed before pouring silicone. Create a sprue or funnel at the lure’s top arch to guide plastic flow. Insert toothpicks at both ends to create air escape vents. Drill 3/8-inch deep holes in the clay for alignment keys that ensure perfect registration.
Pour First Half of Silicone
Spray silicone release agent on the box and clay. Mix clear RTV silicone according to directions. Pour a thin initial layer first to let bubbles rise. Wait 15 minutes, then pour the remainder slowly around the lure.
Allow 18-24 hours for full cure before handling.
Pour Second Half
Flip the box and carefully remove the clay. Clean residue with a Q-tip. Apply petroleum jelly only to the cured silicone, not the master.
Spray the master and box with release agent. Mix the same volume of silicone as the first half. Pour slowly and wait 10-15 minutes for bubbles to rise from detailed areas. Cure 24 hours before demolding.
Post-Process Your Silicone Mold
Cut open the sprue with an Xacto knife. Test airflow by blowing through one vent air should exit the other. Wash off petroleum jelly with soap and water. Store in a Ziploc bag with the master and mixing notes for future reference.
Build Aluminum-Filled Epoxy Injection Molds
This method produces rigid molds suitable for injection molding, rivaling commercial aluminum tooling.
Prepare Rigid Masters
One master isn’t enough for production molds. Sculpt your original in Scalp III clay. Make a silicone mold of the original. Cast 3-5 copies using Alumalite Light resin, which cures in approximately 10 minutes. Use these rigid copies as cores for your final production mold.
Set Up Mold Box and Gating
Use scrap wood or plastic for your box. Hold masters halfway in modeling clay. Ensure a clean parting line to minimize flash.
Attach a sprue at the nose and a gate at the tail. Use 0.051-inch wire for tail gates or hot glue sticks for body gates. Apply Vaseline to belly slots for easy release. Eliminate negative drafts rigid molds cannot flex to accommodate them.
Mix and Pour VAC 50 or Back 50
Agitate the powder in the container before opening it settles fast. Mix Part A and Part B by equal weight, typically 1:1. Stir thoroughly for 2-3 minutes until creamy.
Brush a thin coat over the master first to prevent bubbles. Pour the remainder into the box. Cure for 2-3 hours before handling.
Align and Pour Second Half
Remove clay and clean all residue from the cavity and master. Drill quarter-inch deep locator indentations around the perimeter for alignment. Apply Alumilite UMR or Vaseline generously to both surfaces.
Repeat mixing and pouring for the second half. After cure, break the box carefully and separate halves. Tap gently to avoid damaging the cavity.
Finish the Mold
Remove the master, sprues, and gates. File sharp edges that could cut your lures. Open gates and sprues as needed. Drill an injection port sized to match your nozzle for a perfect seal.
Test closure the halves should align evenly. Enlarge locator holes slightly if they catch during alignment.
Cast or Inject Your Lures

Your mold is ready for production. Proper technique during casting determines the quality of your final lures.
Prep Before Pouring
Lubricate the cavity with worm oil or mold release spray. Pre-heat the mold in sunlight or near a warm area cold molds cause wrinkles and poor detail. Ensure plaster molds are completely dry from their oven baking.
Soft Plastic Injection
Melt plastisol or Elastomer in a dedicated melter. For two-tone lures, pour belly color first and let it cool slightly to prevent bleeding. Inject through the sprue with the mold clamped securely.
Wait a few minutes for cooling. Open carefully and demold your lure.
Open Pouring Methods
Pour hot plastisol directly into the cavity for plaster or silicone molds. For multi-cavity molds, use a trough system to feed all cavities simultaneously. Allow complete cooling before removal to prevent tearing.
Trim and Customize
Use the mold’s tail design or scissors to shape tails curly, paddle, or straight. Test different hooks to find the best action and balance for your specific lure design.
Fix Common Mold Problems
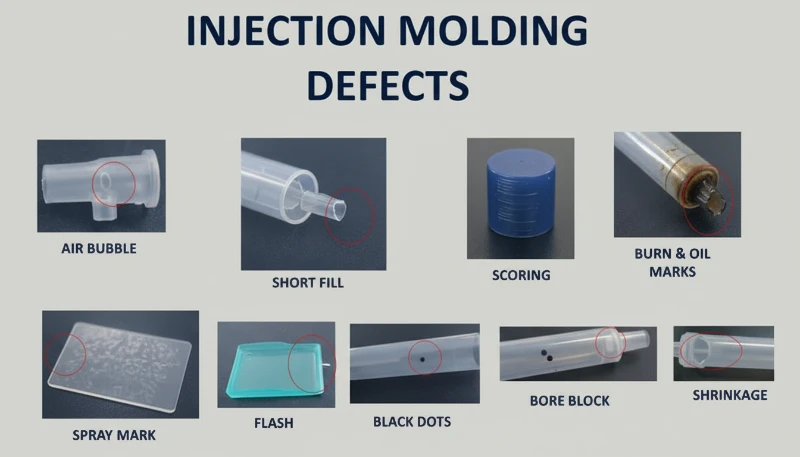
Address issues quickly to avoid wasting materials and frustation.
Air Bubbles in Lures
Fast pouring, lack of vibration, or wet plaster causes bubbles. Pour slowly in corners, vibrate the mold table, and ensure plaster is thoroughly baked before use. Add toothpick vents to improve airflow.
Mold Cracking or Exploding
Moisture remaining in plaster turns to steam under high heat. Always bake at 200-220°F for 2-3 hours before first use. Verify the mold is bone-dry before pouring hot plastisol.
Flash at the Seam
Dirty parting lines or epoxy on seal surfaces cause excess plastic at the seam. Clean the parting line meticulously. Never apply sealant to the mold face. Use alignment keys to ensure proper registration.
Lure Sticks or Tears
Cold molds, lack of release agent, or premature demolding causes sticking. Always pre-heat molds, apply worm oil or release spray, and wait for full cooling before removing lures.
Incomplete Fill
Cold molds, blocked vents, or cool plastic results in partial fills. Pre-heat molds, clear all sprues and vents, and maintain proper melt temperature throughout casting.
Stay Safe During Mold Making
Chemicals and heat demand proper precautions every time you work.
Wear Required PPE
A respirator with N95 or better rating filters harmful fumes from resins and plastisol. Goggles protect eyes from splashes. Heat-resistant gloves and long sleeves prevent burns molten plastisol sticks to skin like napalm and continues burning until cooled.
Set Up a Safe Workspace
Work outdoors or in a well-ventilated area with fume hood extraction. Keep measuring cups, stir sticks, heat sources, vibrating tools, and Xacto knives organized and accessible. Maintain proper ventilation throughout all processes.
Handle Chemicals Safely
Agitate resin containers before opening to suspend fillers evenly. Mix thoroughly to avoid uncured soft spots. Store materials in cool, dry places. Keep mixing notes with each mold for future reference and replication.
Maximize Mold Life and Value
Your DIY molds pay dividends over time with proper care.
Clean After Every Use
Wash silicone and epoxy molds with soap and water. Remove all petroleum jelly residue. Dry completely before storage to prevent mold growth or material degradation.
Store Correctly
Keep molds in Ziploc bags to block dust and UV exposure. Store the original master with the mold for future remakes. Label each mold with mixing ratios and date created.
Repair and Reuse
Patch plaster molds with fresh Durham’s putty. Repair silicone with more RTV applied to damaged areas. Sand and re-seal epoxy molds if minor scratches appear. Even worn molds can be remade from your original master no need to start from scratch.
Frequently Asked Questions About Making Fishing Lure Molds
What is the cheapest material for making lure molds?
Plaster of Paris is the most affordable option at approximately $5 per 8-pound bag. It works well for learning and simple flat-back lures but requires sealing and careful handling to prevent cracking.
How long do silicone molds last?
Properly made RTV silicone molds can produce hundreds of casts without significant degradation. Longevity depends on the specific silicone used, storage conditions, and the types of materials being cast.
Can I use hardware store silicone caulk for lure molds?
No. Hardware store silicone caulk shrinks, warps, and fails under the heat of molten plastisol. Dedicated RTV mold-making silicone is required for reliable results that capture fine detail.
Do I need to seal plaster molds?
Yes. Sealing is mandatory for plaster molds. Unsealed plaster contains moisture that turns to steam when exposed to hot plastisol, causing the mold to crack or explode. Bake and seal with epoxy before first use.
Can I make my own master lure from existing baits?
Yes. Commercial soft plastics work as masters. For round baits, insert steel wire through the body for rigidity. Flat-sided baits can be glued directly to the mold box bottom.
Key Takeaways for Making Fishing Lure Molds
Learning how to make fishing lure molds transforms you from a buyer into a creator with full control over design, color, buoyancy, and scent. Plaster molds get you started quickly and cheaply. Silicone captures intricate details that rival commercial lures. Epoxy resins enable injection-quality production for serious hobbyists or small businesses.
Always bake plaster molds at 200-220°F for 2-3 hours before first use to prevent steam explosions. Use professional RTV silicone rather than hardware store caulk for reliable results. Keep your original master safe it allows you to remake molds indefinitely when they eventually wear out.
Start with a simple plaster mold to learn the fundamentals. Progress to silicone for complex designs. Graduate to epoxy injection molds when you’re ready for production-scale output. The next great lure starts with your first mold.





