

Imagine spotting a school of bluegill near a quiet stream while on a hike. You reach into your backpack, pull out a compact tube, and within seconds, it extends into a full-length fishing rod. This is the power of a telescopic fishing rod, a game-changer for anglers who value portability without sacrificing performance. Whether you are a backpacker, urban angler, or survival enthusiast, knowing how to make a telescopic fishing rod unlocks the ability to fish anytime, anywhere.
Building one is not just about cutting rods and taping parts together. It requires precision, material knowledge, and practical design. From modifying store-bought models to crafting 3D-printed prototypes or converting one-piece blanks, each method comes with trade-offs in strength, sensitivity, and durability. This guide walks you through every proven method with step-by-step instructions, maintenance tips, and common mistakes to avoid.
Choose Your Build Method

There are three viable ways to create a functional telescopic fishing rod, each suited to different skill levels and goals.
Build from a One-Piece Blank
This method involves slicing a standard fishing rod blank into nested sections that slide into one another. It is ideal for DIYers with basic tools and access to rod blanks.
Best for: Short, sturdy rods for panfish or survival kits
Difficulty: Moderate
Time required: 1 to 2 hours
Start with a 7-foot light-power rod blank, preferably graphite for better flexibility. Glass works but results in a stiffer final product due to thicker walls at joints.
Modify an Existing Telescopic Rod
Instead of building from scratch, shorten and rebalance a commercial telescopic rod. This is perfect for kayak anglers or those needing a custom fit.
Best for: Tailoring rod length and balance
Difficulty: Easy to moderate
Time required: 30 to 60 minutes
Preserve internal sliding mechanics while improving ergonomics. The key is cutting above the telescoping zone and resealing the end with a custom cap.
Construct a 3D-Printed Prototype
For tech-savvy builders, 3D printing offers a fully customizable approach using ABS or PLA plastic.
Best for: Experimental builds and hobbyists
Difficulty: High (requires 3D printer and design knowledge)
Time required: 6 plus hours (printing and assembly)
Use ABS plastic for flexibility and durability. Print rod bodies horizontally to maximize strength along the length. The reel seat remains a weak point, so expect future redesigns.
Convert a One-Piece Blank into a Telescopic Rod
Turning a solid rod into a collapsible tool requires careful planning and precise cuts.
Cut and Fit Nested Sections
Begin by removing 12 inches from the tip of the blank using a fine-tooth saw. Make clean, perpendicular cuts to prevent binding when sections slide.
Next, cut a second 12-inch segment from the remaining blank. Slide it over the first section, overlapping by 2 inches. Trim until the fit is snug but allows smooth movement.
Repeat this process, ensuring each new section has a slightly larger inner diameter to accept the previous one. Most DIY builds end up with 4 to 5 sections, tapering down to the butt.
Warning: Overlapping more than 2 inches increases stiffness. Too little overlap risks separation under load.
Assemble from Tip to Butt
Slide sections together starting with the smallest tip. Work downward, seating each section firmly but gently.
Avoid whipping the rod open, a common mistake that stresses guide attachments and can crack the blank.
Some builders try butt-to-tip assembly, but this often results in reduced sensitivity and a less natural bend.
Install Reel Seat and Handle
If your donor blank lacks a handle, attach a spinning reel seat near the base. Shorten the grip if needed to balance the rod after modification.
Use epoxy to secure components, but avoid getting adhesive inside moving joints.
Pro Tip: Test balance by resting the rod on your finger. Adjust handle length or add weight to the butt if it feels front-heavy.
Modify a Commercial Telescopic Rod
Enhance an off-the-shelf rod for specific uses like kayak fishing or urban carry.
Shorten Without Losing Collapsibility
Fully extend the rod and locate where the final internal section begins to slide into the handle.
Mark your cut point just above this transition, typically 6 to 8 inches from the base.
Use a hacksaw to make a straight, clean cut. Never cut into the inner sliding tube, or the rod will not collapse.
Critical: A severed inner section means permanent extension, essentially turning it into a one-piece rod.
Create and Attach a Bottom Cap
Save the bottom portion of the removed section. It becomes your custom cap.
Grind the inside of this piece with a Dremel tool until it slides smoothly over the newly cut end.
Sand edges with 220 to 320 grit paper to remove burrs. Test fit frequently to avoid over-sanding.
Once fitted, seal the joint with epoxy or reinforce with heat-shrink tubing for durability.
Expert Note: Match the paint color using model or craft enamel for a seamless look.
Rebalance the Rod
Removing material shifts the center of gravity forward, making the rod feel nose-heavy.
To correct this, find the balance point with the rod extended. Tape a small egg sinker to the butt end. Adjust weight until the rod tilts slightly rearward. Flatten the sinker with a hammer and bond it permanently with epoxy. Cover with water-weld putty, sand smooth, and paint.
Result: A compact, well-balanced rod that fits neatly in tight spaces and casts comfortably.
Build a 3D-Printed Telescopic Rod
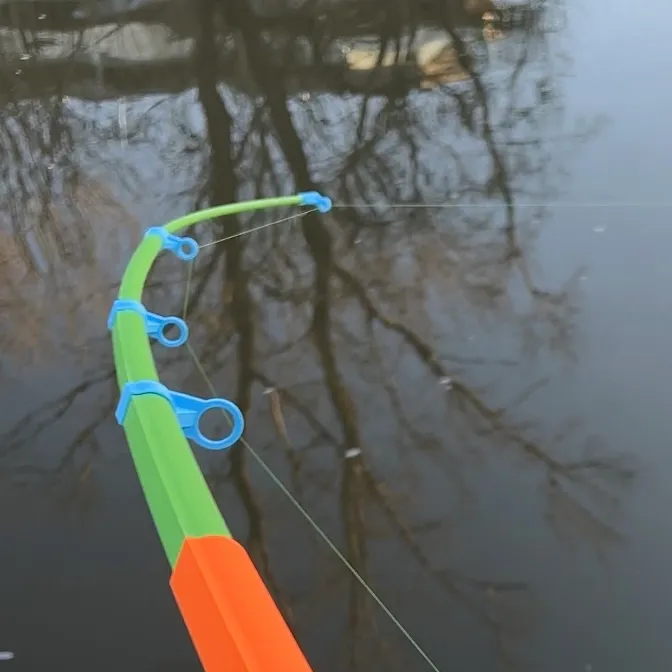
For makers and innovators, 3D printing opens new possibilities, even if performance lags behind commercial rods.
Print Rod Sections Horizontally
Use ABS plastic for bodies 2 through 6. Its flexibility and impact resistance outperform PLA.
Print orientation is critical. Horizontal or diagonal printing ensures strong layer adhesion along the rod length.
Vertical printing creates weak points along the seam, increasing break risk under stress.
Printer Tip: Diagonal printing may be needed to fit larger sections on smaller build plates.
Assemble with Moving Joints
Insert Body 3 into Body 2, glue the line guide, then continue nesting. Body 4 goes into the previous assembly, then Body 5 into 4, and Body 6 into 5.
Glue Body 7 into Body 2, but ensure no adhesive touches the inner moving sections (3 through 6), or they will seize up.
Attach Body 10 to Body 7, then Body 19 to Body 10 to complete the structure.
Design Flaw: The reel seat is the weakest part. Reinforce or redesign for long-term use.
Test and Evaluate
One prototype survived a full day of fishing and handled snag recovery using rocking motions.
However, thermoplastics cannot match the fatigue resistance of carbon fiber or graphite.
Reality Check: This method is best for experimental builds, not heavy-duty fishing.
Understand Core Rod Components
Every telescopic rod relies on six essential parts. Know them to build, repair, or modify effectively.
Rod Blank Sections
These nested tubes form the backbone. Typically 4 to 7 sections, made from graphite, carbon fiber, fiberglass, or 3D-printed plastic.
Smaller sections telescope inside larger ones, collapsing to 12 to 18 inches.
Guides (Eyelets)
Metal rings with ceramic inserts guide the line and distribute stress during casts.
Stainless steel or titanium guides resist corrosion, especially important for saltwater use.
Tip Top Guide
The smallest, most fragile guide sits at the very tip. It is often replaceable if broken.
Reel Seat
Holds the spinning reel in place. Made from plastic, aluminum, or composite materials.
Ensure it allows smooth locking nut movement with no binding.
Handle/Grip
Provides comfort and leverage. Common materials include EVA foam (lightweight and durable), cork (classic feel, moisture-wicking), and rubber (grippy, even when wet).
Internal Lillian Cord
A braided nylon or dacron cord runs through the center, connecting all sections.
Prevents complete separation if the rod comes apart mid-cast.
Key Insight: Never tie knots in the lillian cord. It prevents full disassembly for cleaning and drying.
Deploy the Rod Correctly
Improper extension is the number one cause of damage.
Pull Sections Slowly
Start with the thinnest top section. Remove the protective cap and pull it straight out with no flicking or whipping.
Work your way down, extending one section at a time.
High-Altitude Brands Method: Grip near the guide base (not the eyelet), apply a gentle twist while pulling. This helps overcome static friction.
Align All Guides
As each section extends, rotate it slightly so the guides line up in a straight path.
Misaligned guides increase line friction and reduce casting distance.
Pro Tip: Hold the rod at eye level and sight down its length to check straightness.
Attach Reel and Spool Line
Use a spinning reel for best results.
Secure the Reel Properly
Loosen the locking nut by turning counterclockwise. Slide the reel foot into the stationary hood. Pull the moving hood over the other end. Hand-tighten the nut, never using pliers.
Ensure the reel sits straight and does not wobble.
Choose the Right Line
Monofilament (6 to 10 lb) works well for general use. It stretches to absorb shock but degrades in UV light.
Fluorocarbon (6 to 10 lb) excels in clear water. It is nearly invisible and abrasion-resistant.
Braided (10 to 20 lb) suits heavy cover. It is thin and strong but visible and can cut skin.
Thread line from the bottom guide up, passing through all eyelets. Leave 3 to 4 feet beyond the tip for tying knots.
Collapse Without Damage
Always collapse from the top down.
Use the Twist-Push Technique
Open the bail to release line tension. Start at the tip, gripping the blank (not the guide). Apply a gentle twist while pushing inward. Work down section by section. Pinch the final tip near the base and push carefully.
Never push from the handle end. This jams sections and can snap the tip.
Check that the line is not pinched between sections before capping.
Maintain for Longevity
Telescopic rods need more care than traditional rods due to internal friction points.
Rinse After Saltwater Use
Always flush with freshwater after fishing in salt. Residual salt causes corrosion and binding.
Wipe each section dry as you collapse it.
Dry Before Storing
Leave the rod extended indoors overnight after use. Storing it wet can ruin finishes and weaken adhesives.
User Warning: If you put away a wet rod, it can ruin the finish. I have seen one and heard of several others.
Store in a Protective Sleeve
Use a neoprene or mesh rod sleeve to prevent scratches and accidental extension in your pack.
Avoid leaving the rod in a hot car. Heat warps sections and softens adhesives.
Fix Stuck Sections
Binding is common but fixable.
Try the Tip Grip Method
Press the rod butt against your waist. Stabilize with your left hand. Use a Tip Grip tool in your right hand to pull the stuck section straight back. Keep hands aligned to avoid bending.
Use the Rubber Band Snap Trick
For disassembled rods, remove free-moving sections. Tie a thin rubber band with an overhand knot around the stuck tip (less than 1 inch from base). Hold one loop against the collapsed sections. Pull the stuck section up and release. The rubber band snaps it down. Repeat until freed.
Why it works: The sharp jolt loosens the joint without lateral stress.
Avoid Common Mistakes
Even experienced users damage rods through simple errors.
Never Whip the Rod Open
Flicking the wrist to extend causes guide failure and cracked blanks.
Fact: More telescopic rods are broken during setup than while fighting fish.
Do Not Grab Guides When Extending
Eyelets are not designed to handle pulling force. Always grip the blank.
Avoid Sandy Surfaces
Laying the rod on sand introduces grit into joints, causing abrasion and binding.
Do Not Fish in Thunderstorms
Graphite conducts electricity. A telescopic rod acts like a lightning rod.
Rule: At first sign of lightning, collapse the rod and leave the water immediately.
Optimize for Survival and EDC
A compact rod is a powerful addition to any emergency or everyday carry kit.
Build a Just in Case Fishing Kit
Include a collapsed telescopic rod, a pre-spooled small spinning reel, and a compact tackle box with hooks (sizes 4 to 8), split shot weights, bobbers, and livers (rooster tails, jigs). Add a multi-tool with line cutter and a flashlight for night knot-tying.
Popular Pick: Exotac xREEL Roundabout Kit is ultra-compact and reliable.
Final Checklist for Success
Inspect guides and tip for damage. Extend slowly from tip downward. Align all guides in a straight line. Attach reel by hand with no tools. Thread line through every guide. Use appropriate line and tackle. Collapse from top with twist-push motion. Rinse and dry after saltwater use. Store in protective sleeve. Never whip, force, or grab guides.
Frequently Asked Questions About Making a Telescopic Fishing Rod
What materials work best for building a telescopic rod from scratch?
Graphite offers the best balance of sensitivity and flexibility. Glass is cheaper but heavier and stiffer when sectioned. Carbon fiber provides high strength-to-weight ratio but costs more. For 3D-printed builds, ABS plastic outperforms PLA due to better flexibility and impact resistance.
How do I prevent sections from sticking together?
Keep sections clean and free of debris. Rinse thoroughly after saltwater use. Apply ice to contract the inner tube or use penetrating oil to lubricate stuck joints. Never store the rod wet, and avoid whipping it open during extension.
Can I use a telescopic rod in saltwater?
Yes, with strict maintenance. Rinse thoroughly with freshwater after each use. Dry completely before collapsing. Inspect joints regularly for corrosion. Use stainless steel or titanium guides to resist salt damage.
Are telescopic rods as strong as regular one-piece rods?
Modern telescopic rods handle most freshwater species including trout, bass, and panfish. They are slightly less sensitive than one-piece rods due to internal friction points. For light saltwater use, choose models rated for that environment.
How do I rebalance a modified telescopic rod?
Find the balance point with the rod extended. Attach temporary weight (like an egg sinker) to the butt end with tape. Adjust until the rod balances slightly rearward. Flatten the weight, bond with epoxy, and cover with water-weld putty. Sand smooth and paint to match.
Key Takeaways for Making Your Own Telescopic Fishing Rod
Building a telescopic fishing rod requires balancing precision, materials, and patience. Whether you convert a one-piece blank, modify a commercial rod, or experiment with 3D printing, the core principle remains the same: each section must slide smoothly while maintaining structural strength. The one-piece blank method works best for short, sturdy rods ideal for panfish. Modifying existing telescopic rods offers the quickest path to a customized, balanced tool. 3D printing remains experimental but opens doors for innovation.
Maintenance is critical. Rinse after saltwater, dry completely, and store in a protective sleeve. Never whip the rod open or grab guides during extension. Following these practices ensures your creation lasts for years of opportunity fishing.
Start with a simple project like modifying an existing rod. Graduate to blank conversion as you refine your skills. The reward is a fishing tool that fits in your backpack and ready whenever adventure strikes.





