

If you have ever struggled with inconsistent casting, reduced sensitivity, or a rod that just feels off during a fight, the issue might be hiding in plain sight. The spine of a fishing rod is a subtle but critical feature that determines how the blank flexes, transfers energy, and responds under load. Most anglers never think about it, but custom rod builders consider spine alignment essential for achieving peak performance. Understanding how to find the spine of a fishing rod transforms an ordinary build into a precision tool tailored to your fishing style.
This guide covers every proven method for locating the spine, explains why it matters for your fishing success, and shows you how to apply this knowledge based on your rod type and intended use. Whether you are building your first custom rod or optimizing an existing setup, these techniques from expert craftsmen will help you get the most from your gear.
Locate the Rod’s Natural Bending Plane

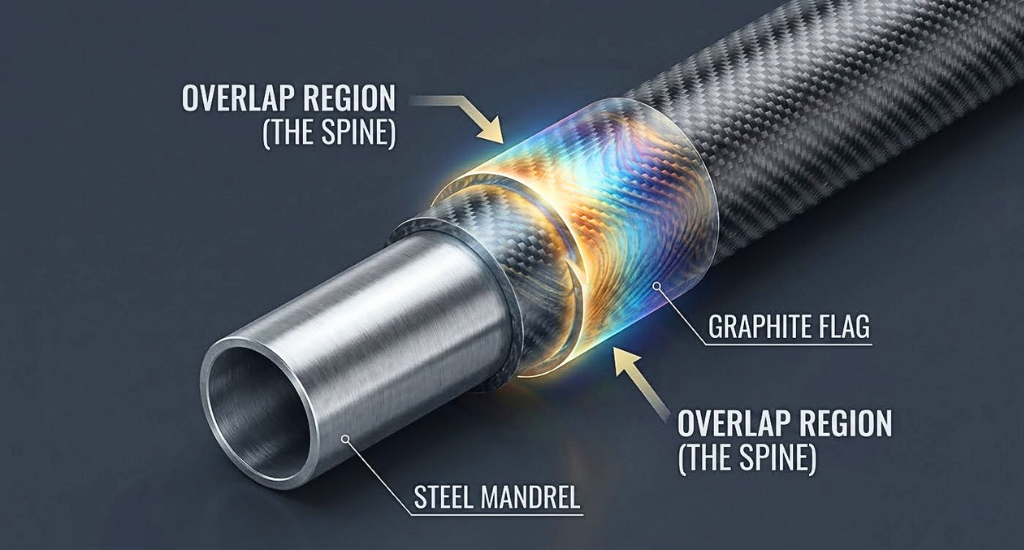
The spine exists because of how modern rod blanks are manufactured. During production, sheets of graphite, fiberglass, or composite materials get wrapped around a steel mandrel and cured into a hollow tube. Due to slight variations in material thickness, fiber alignment, and the seam where material overlaps, one side becomes marginally stiffer than the others. This stiffer side is the spine, and it defines the rod is preferred bending direction.
When pressure is applied, the blank naturally snaps into a consistent curve. The outside of the bend represents the stiffest side (spine), while the inside represents the most flexible side (power wall or flex side). Even blanks that appear perfectly symmetrical typically have a spine, though some helically wound or high-modulus blanks may show only subtle differences that require careful testing to detect.
Manual Flexing Method
This technique requires no special tools and works well for most blanks.
- Wrap a strip of masking tape around the midsection of the blank to create a clean marking surface.
- Support the butt end on a flat surface or hold the tip end in your open palm at a 30 to 45 degree angle.
- Apply gentle downward pressure about one-third up the blank while slowly rolling or twisting the rod along its length.
- Continue until you feel a distinct pop or lock into position. The outside of the resulting curve is the spine.
- Mark the spine with a china marker while holding the rod in position.
- Repeat the entire process 3 to 5 times to confirm consistent results.
Attach a small tape flag near the tip if you have difficulty tracking rotation on dark or glossy blanks.
Using a Spine Finder Tool
Spine finder tools provide more precise results, especially on high-modulus blanks with subtle spines.
Popular options include the CRB Spine Finder with ball bearings for self-alignment, the U Build Rods Spine Finder with a U-shaped cradle, or a DIY version using a foam block with a vertical pointer.
- Apply masking tape where the tool contacts the blank to prevent scratches.
- Insert the blank into the tool and apply gentle downward pressure.
- Slowly rotate the blank within the device until it locks into its natural bending plane.
- Mark the outside of the curve as the spine.
- Repeat multiple times to verify accuracy.
Flat Surface Rolling Technique
This visual method works well for beginners and provides easy confirmation.
- Lay the blank horizontally on a smooth, flat surface.
- Attach a small tape flag near the tip for visual tracking.
- Apply light downward pressure to the upper third of the blank.
- Slowly spin or roll the blank between your fingers.
- Watch the flag rotate freely, then suddenly lock into position when the spine aligns with the force.
- Mark the resisting side as the spine.
Why Spine Alignment Improves Performance
Building your rod on spine translates into tangible advantages that affect every cast and fish fight.
A rod built on spine bends in a smooth, predictable arc, meaning energy transfers cleanly from handle to tip with reduced wobble and lateral kick. For spinning rods, placing guides on the soft side (opposite the spine) allows deeper flex, improving vibration transmission from lure to hand for better bite detection. For baitcasting rods, aligning guides with the spine adds structural resistance during hard hooksets, giving you more lifting power and backbone to drive hooks home and control strong fish.
Misaligned guides cause the rod to twist under load, leading to inefficient power transfer and premature stress on wraps and the blank itself. By promoting even stress distribution, spine alignment extends the life of your rod and maintains consistent performance over years of use.
Guide Placement Based on Rod Type

Once you mark the spine, guide placement depends on your reel type and fishing goals.
| Rod Type | Reel Mount | Guide Placement | Reason |
|---|---|---|---|
| Spinning | Under rod | Opposite spine (soft side) | Improves sensitivity, reduces twist, enhances casting distance |
| Casting | On top | On spine (stiff side) | Increases backbone, lifting power, and hookset strength |
| Fly Rods | Under rod | Opposite spine | Promotes straight tracking, better line control, improved accuracy |
For fly rods, the goal is having the rod bend away from the casting direction for optimal energy transfer during both backcast and forward cast.
Some builders follow Don Green’s 90-degree method, placing the spine on the side of the rod (neither top nor bottom) with guides perpendicular to it. This approach balances response during both casting phases and works well for precision fly rods and competition casting setups.
Handle Multi-Piece Rods Correctly
Each section of a multi-piece rod must be tested independently since spine orientation can differ between sections.
Test the butt, mid, and tip sections separately using your chosen spine-finding method. Mark the spine on each section with a china marker or tape. When assembling, align all spine marks in the same plane, either all facing up, down, or to the same side depending on your build plan.
While full alignment is ideal, the tip section has the greatest influence on casting performance. If conflicts arise between sections, prioritize the tip section for spinning or fly rods, or consider prioritizing the butt section for heavy-duty casting rods where backbone matters most.
After assembly, gently flex the rod to verify it bends in a straight, continuous curve without kinks or directional shifts.
Special Cases and Exceptions
Certain blanks require adjusted approaches.
Some heavy-duty or ultra-light rods have a permanent factory-induced curve, a visible bow even when unweighted. In these cases, align components with the existing bend rather than the flex-derived spine, as this pre-bend often indicates the manufacturer is intended spine.
A few blanks show two or more potential bending planes, typically 180 degrees apart. Choose the most dominant, repeatable curve as your primary spine.
Helically wound blanks use spiral-wound material strips for more uniform strength. These often have weak or negligible spines, making precise alignment less critical. In these cases, prioritize aesthetics or intended use.
Align All Components Consistently
The spine mark serves as your primary reference line for every part of the rod.
Install the reel seat so the reel foot sits in the same plane as the spine to prevent twisting during casting or fighting. Position cork or EVA grips so your hand naturally supports spine-aligned casting mechanics. Mount hook keepers and tip tops in line with the spine mark to maintain symmetry.
All thread wraps and epoxy coatings should follow the longitudinal line established from the spine to maintain both structural integrity and visual consistency. Use a spine alignment jig or V-block stand during wrapping to keep the blank perfectly oriented.
Final Spine-Finding Workflow

Follow this sequence for reliable, repeatable results.
- Clean and inspect the blank, then apply masking tape mid-section for marking.
- Choose your preferred method: manual flexing, spine finder tool, or rolling technique.
- Deflect and rotate until the blank locks into its natural bend.
- Mark the outside of the curve as the spine with a china marker.
- Repeat 3 to 5 times to confirm consistency.
- Test each section of multi-piece rods individually.
- Align all spine marks in the same plane during assembly.
- Determine guide placement based on rod type.
- Align all components, including the reel seat, grips, and wraps, along the reference line.
- Perform a final flex test to verify smooth, straight action.
Safety and Best Practices
Protect yourself and your gear during the spine-finding process.
Always wear eye protection since a snapped blank can whip unpredictably. Work in a clear area away from people and obstacles. Use soft contact surfaces to avoid damaging the blank. Double-check your results by repeating the test multiple times.
If the pop is clear, trust it. If the spine seems weak or subtle, prioritize function or aesthetics based on your intended use.
Frequently Asked Questions About Finding the Spine of a Fishing Rod
What happens if I build a rod without finding the spine?
Without spine alignment, your rod may cast less efficiently, feel less responsive, and wear unevenly over time. The rod will still function, but you are accepting minor performance trade-offs in sensitivity, casting distance, and durability.
Can I find the spine on a completed rod with guides already installed?
Yes, though it is more difficult. You can gently flex the rod to feel for the natural bending plane, or remove guides temporarily to test the blank directly. The spine is easier to locate on bare blanks before components are attached.
Do all fishing rods have a spine?
Nearly all modern rod blanks have a spine, though its pronouncedness varies. Blanks made with helical winding techniques tend to have weaker or negligible spines. High-modulus and ultra-light blanks may show subtle spines that require careful testing to detect.
Does spine alignment matter for cheap or beginner rods?
For basic rods used casually, spine alignment makes less noticeable difference. However, any rod benefits from proper alignment, and the practice becomes especially valuable as rod quality and performance demands increase.
How do I know if my spine finding results are accurate?
Repeat the process at least three times. If the blank consistently returns to the same orientation, your spine mark is accurate. If multiple planes emerge, choose the one that locks in most firmly and requires the most force to rotate out of.
Key Takeaways for Finding Your Fishing Rod Spine
Finding the spine of a fishing rod is a fundamental skill that separates custom builds from mass-produced gear. The spine exists in nearly all blanks due to manufacturing processes, and locating it requires only simple techniques like manual flexing, rolling on a flat surface, or using a dedicated spine finder tool. Once identified, aligning guides, reel seats, and grips with the spine optimizes casting efficiency, sensitivity, lifting power, and overall durability.
Remember that spinning rods benefit from guides on the soft side, casting rods perform best with guides on the spine, and fly rods often work well with guides opposite the spine or at 90 degrees to it. Multi-piece rods require testing each section independently, and helically wound blanks may show minimal spine characteristics.
Take the time to find the spine on your next rod build, and you will notice the difference in performance that comes from working with your rod is natural bending plane rather than against it.





