
Fishing beads are among the most effective and ethical ways to catch trout, steelhead, and other salmonid species during spawning season. Designed to mimic drifting fish eggs, these durable alternatives to natural roe can transform slow days into consistent action on rivers from the Kenai to your local stream. Whether you’re targeting aggressive rainbows behind spawning sockeye or trophy steelhead in clear autumn water, beads offer a repeatable, reliable approach that matches nature’s most abundant seasonal food source.
This guide covers everything you need to know about using fishing beads successfully. You’ll learn how to select the right bead size and color for different conditions, master five proven rigging techniques, and perfect your drift presentation. By the end, you’ll have the knowledge to match the hatch, avoid deep hooking, and land more fish ethically and efficiently.
Choose the Right Bead Size for Your Target Species
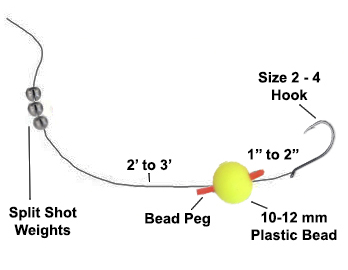
Bead diameter directly impacts how realistic your presentation appears and how effectively fish hook up. Matching bead size to the target species and spawning activity is critical for mimicking natural eggs and achieving solid hook sets.
Match Bead Size to Species and Season
Smaller beads imitate trout or juvenile salmon eggs, while larger ones mimic king or chum salmon eggs. Water depth and current speed also influence your choice.
• 4–6 mm: Best for early season, small trout, or clear, shallow runs
• 6–8 mm: Ideal during peak sockeye spawn; targets rainbow trout and Dolly Varden
• 8–10 mm: General-purpose size for steelhead and cutthroat
• 10–12 mm: Use behind king salmon redds for trophy fish
• 12–14 mm+: For deep, fast rivers with large predators
On the Kenai River, guides often switch from 6–8 mm during sockeye runs to 10–12 mm when kings move in. This simple adjustment matches the dominant egg size in the system and consistently produces more bites.
Pair Bead Size with Correct Hook Size
Using oversized beads on small hooks reduces hookset success and increases snagging risk. Match your hook size to prevent this problem.
• 6–8 mm beads → Size 6–8 hook
• 8–10 mm beads → Size 4–6 hook
• 10–12 mm beads → Size 2–1/0 hook
This pairing ensures the hook seats properly in the corner of the mouth rather than sliding past the jaw.
Select the Best Bead Color for Different Conditions
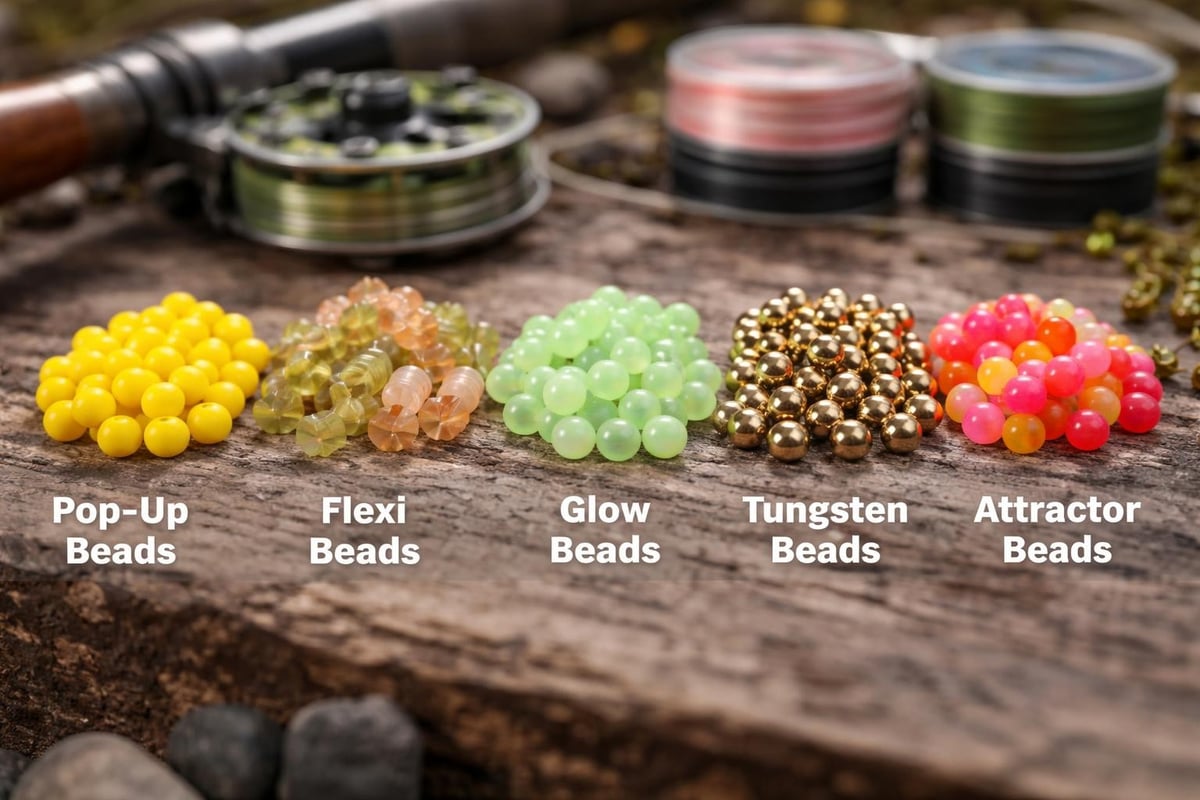
Color choice should reflect egg freshness, water clarity, and light conditions. What looks perfect above water may disappear entirely below the surface, so testing beads underwater before casting is essential.
Match Color to Egg Freshness
As eggs age in the gravel, their color changes dramatically. Matching your bead to the spawn stage increases strikes.
• Bright orange, ruby red: Fresh eggs from early to mid-spawn
• Orange pearl, reddish orange: Healthy, viable eggs
• Yellow-brown, milky white, pearl: Spent or “milked-out” eggs in late season
By mid-September, a milky-white bead often outperforms bright orange because natural eggs have degraded in the gravel. Observing actual spawning activity helps you dial in the right color.
Adjust for Water Clarity
Light refraction underwater alters how colors appear to fish. Choose accordingly for maximum visibility.
• Clear water: Light, natural tones like pearl and pale orange
• Murky or stained water: High-visibility colors like chartreuse and hot orange
• Tannin-stained (tea-colored) water: Darker shades like ruby red and deep orange
• Low light or night fishing: Glow-in-the-dark beads
Test your bead underwater before casting. What looks bright on shore may vanish beneath the surface.
Pick the Right Bead Material for Maximum Effectiveness
The material affects durability, how the bead moves in the current, and how fish react when they bite. Understanding these differences helps you choose the right bead for each situation.
Compare Bead Types
• Hard plastic: Best for durability and long trips; holds shape and resists wear
• Soft or squishy: Provides natural feel and compresses like real eggs; better bite retention but may tear
• Lured Beads: Feature soft outer layer over hard core; combines realism with strength and improved hook retention
• Painted beads: Offer subtle light reflection that mimics translucent roe; popular with picky fish
• Homemade: Allow custom patterns using nail polish for unique finishes
Many anglers report higher catch rates with soft beads, but they require careful rigging to prevent tearing. Lured Beads are often preferred in high-pressure fisheries because they feel natural when chewed and improve hook retention.
Rig Fishing Beads Properly: 5 Proven Methods
How you attach the bead determines how it drifts, where fish hook, and whether you comply with local regulations. Master these five techniques to handle any fishing situation.
Peg the Bead Above the Hook
Pegging is the most common method and holds the bead 1.5 to 2 inches above the hook. This distance ensures fish inhale both bead and hook together, promoting corner-of-the-mouth hookups and preventing deep hooking.
Use these tools to peg beads:
• Rubber bead pegs (TroutBeads brand)
• Toothpicks (break flush after insertion)
• Bobber stop (adjustable positioning)
• TB-Peggz (reusable, precise tool)
• 80–100 lb mono cut into short pegs
To peg properly, slide the bead onto the leader, position it 1.5–2 inches above the hook eye, insert the toothpick or peg through the line just above the bead, push fully into the bead and trim flush, then tie the hook using an improved clinch knot. Both toothpicks and rubber pegs work equally well.
Warning: Over-pegging increases gut-hooking risk. Never exceed 2 inches unless local rules explicitly allow it.
Tie the Bead Knot for Invisible Rigging
The TroutBeads knot secures the bead without external pegs, creating a clean, invisible rig ideal for clear water.
To tie this knot:
- Slide bead onto leader
- Pass tag end back through bead hole, forming a loop
- Wrap standing line around loop 5–7 times
- Pull tight so knot seats inside the bead
- Attach hook below with clinch knot
This method keeps the bead fixed at perfect distance with no visible peg material. The main challenges are learning to tie it correctly and potentially weakening light fluorocarbon if over-tightened.
Use a Stopper Knot for Ultimate Stealth
A stopper knot allows the bead to slide freely until stopped by a pre-tied knot, mimicking a naturally tumbling egg. This is the most natural drift motion available.
To set it up:
- Slide bead onto main leader
- Tie hook to end
- Use 15–20 lb Maxima to tie a 5–6 turn nail knot onto main line
- Position stopper knot 1.5–2 inches above hook
- Tighten and trim
This method is preferred in ultra-clear or heavily fished waters. The downside is that it takes longer to rig and requires extra materials.
Fix the Bead Directly to the Hook
This method prevents the bead from pivoting during the strike, improving hook penetration.
Steps:
- Tie a small fixed bead directly to hook eye with clinch knot
- Thread a second (larger) lured bead over the line
- Slide down until it rests against fixed bead
- Secure with peg or bobber stop
The bead stays locked in place, reducing slippage and increasing solid hook sets.
Add a Bead Dropper to Your Fly
Running a bead as a dropper adds egg imitation to nymph or jig rigs for layered presentation.
Two setup options:
• Tie a heavy fly (stonefly nymph or jig) to the end; use the tag end to attach a bead dropper 6–8 inches above
• Attach leader to bend of main fly; tie bead to dropper
A sneaky play is to run a bead dropper off a marabou jig, mimicking a baitfish chasing eggs and triggering reaction strikes.
Master the Drift: Presentation Techniques That Work
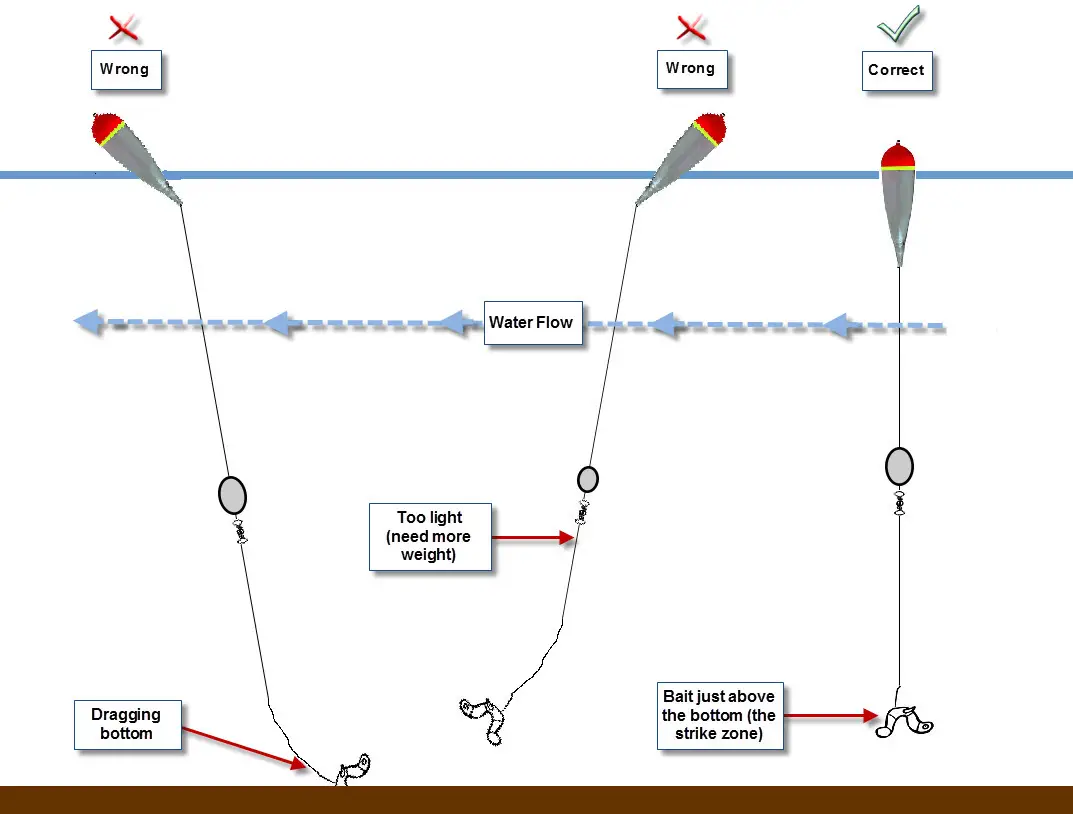
Even the best rig fails without proper presentation. Success comes from natural drift, depth control, and understanding where fish hold.
Drift Just Above the Bottom
Fish feed on eggs near the riverbed. Your bead must tick the bottom every 2–3 seconds to stay in the strike zone.
Adjust weight accordingly:
• Use split shot, pencil lead, or slinky weights
• Place weight 14–18 inches above the bead
• Add more weight in fast water; reduce in slow pools
Set your strike indicator depth at 1.5 times the water depth to keep the bead in the feeding zone.
Cast Upstream and Mend Line
For a true dead drift:
- Cast slightly upstream of target zone
- Let current carry rig downstream
- Keep line off water to reduce drag
- Use upstream mends to eliminate tension
The goal is achieving a classic drift moving at the speed of a fast walk. Avoid jerky movements—fish reject unnatural motion.
Focus on Prime Holding Positions
When wading or fishing from shore, target these high-probability areas:
• Tailouts (end of pools)
• Riffles with moderate depth
• Deep pockets below spawning salmon
• Downstream of redds
Locate the spawning salmon and find the trout right behind them. Move frequently if no bites within 5–10 casts.
Detect Bites and Set the Hook Correctly
Steelhead and trout often take beads subtly. Recognizing the bite and setting properly is half the battle.
Read the Indicator
Watch for these signals:
• Slight dip or pause (like a dry fly sip)
• Soft bounce that doesn’t recover
• Float vanishes completely (aggressive take)
Two common bite signals are a slight dip or a soft hesitation. Don’t react instantly to every twitch—many are false alarms.
Set the Hook Smoothly
Never yank hard—you’ll pull the bead away from the fish. Instead:
- Point rod at the float
- Reel quickly until line tightens
- Then set firmly
This loads the rod and drives the hook into the jaw corner. Using barbless hooks makes release easier and reduces injury.
Use the Right Gear for Bead Fishing
Your setup affects casting, sensitivity, and control. Here are the two most effective configurations.
Fly Fishing Setup
• Rod: 10-foot, 7-weight
• Line: Floating line with 10-foot tapered leader
• Leader: 5–9 feet, 6–10 lb fluorocarbon
• Indicator: Thingamabobber, yarn, or foam
• Weight: Split shot, pencil lead, or slinky
• Hook: Size 4–6 egg hook (Mustang, Octopus style)
Roll casts work best with bulky bead rigs.
Spinning Gear Setup
• Rod: 9-foot medium-light spinning rod
• Reel: Holds 160+ yards of 8–12 lb test
• Line: Hi-vis mono (for spotting bites from boat)
• Leader: 48 inches of 6–10 lb fluorocarbon
• Hook: Size 4 single hook (step down to #6 in clear water)
This setup works well for anglers who want quick, repeatable casts with good distance.
Adapt Your Approach to Season and Water Conditions
Timing and environment dictate your strategy. Matching your approach to conditions dramatically increases success.
Best Months and Spawning Activity
• July–August: Sockeye and early steelhead running; use 6–8 mm beads in ruby red or orange pearl
• September: Kings, sockeye, and silvers spawning together; switch to 10–12 mm beads with mixed fresh and spent colors
• October: Late steelhead and chum; use 8–10 mm beads in milky white or pearl
It really turns on in September when kings and sockeye spawn simultaneously.
Adjust for Water Conditions
• Clear water: Small beads, light colors, fluorocarbon leader
• Stained or murky: Large beads, bright colors like chartreuse and orange
• Tannin-stained: Ruby red or deep orange beads
• Fast current: Heavier weight, larger beads
• Slow pools: Lighter presentation, subtle colors
Follow Ethical Best Practices for Responsible Angling
Bead fishing is not only effective but can be sustainable and responsible when done correctly.
Key Rules to Follow
• Pinch barbs on all hooks to reduce injury and comply with regulations
• Inspect knots and tippet before each cast
• Dispose of waste properly—bring toothpicks, tags, and line ashore
• Obey local laws like the Kenai 2-inch peg rule
• Practice catch-and-release with care
Bead fishing reduces deep hooking compared to real eggs, making it a more ethical choice. Keep the tag end and bring it ashore—don’t discard in water.
Quick Comparison: Which Rigging Method Should You Use
| Method | Best Use | Advantages | Disadvantages |
|---|---|---|---|
| Pegging | General use | Fast, reliable, widely effective | Visible peg may spook fish |
| Bead Knot | Clear water | Invisible, accurate hook placement | Requires skill to tie |
| Stopper Knot | Trophy fisheries | Most natural drift motion | Time-consuming to rig |
| Fixed Bead | Hook efficiency | Prevents pivot, secure | Less natural movement |
Pegging works in 90% of situations. The stopper knot wins in clear, pressured water where stealth is critical.
Frequently Asked Questions About Fishing Beads
What size fishing beads should I use for trout?
For trout, 6–8 mm beads work well during most of the season. Use smaller 4–6 mm beads in early season or when fishing clear, shallow water. Match the bead size to your hook: 6–8 mm beads pair with size 6–8 hooks.
How far should a bead be pegged above the hook?
Peg the bead 1.5 to 2 inches above the hook. This distance ensures fish take both bead and hook together, promoting corner-of-mouth hookups and preventing deep hooking. Never exceed 2 inches unless local regulations allow it.
What color fishing beads work best in clear water?
In clear water, use light natural colors like pearl, pale orange, or milky white. These colors mimic realistic egg appearance underwater. Test your bead underwater before casting since above-water appearance differs significantly below the surface.
Can I use fishing beads with a fly fishing setup?
Yes, fishing beads work excellently with fly fishing. Use a 10-foot 7-weight rod with a strike indicator. Position your indicator at 1.5 times the water depth so the bead drifts just above the bottom. Roll casts work best with bulky bead rigs.
Are fishing beads more ethical than using real eggs?
Yes, fishing beads are considered more ethical than natural egg baits. They reduce deep hooking rates because the hard exterior prevents fish from swallowing the bait too deeply. Beads are also reusable and don’t create waste from discarded natural eggs.
Key Takeaways for Using Fishing Beads Successfully
Start with a 10 mm natural salmon-egg bead, pegged 1.5–2 inches above a size 4 hook, and use a strike indicator with enough weight to tick the bottom every 2–3 seconds. Match your bead color to the spawn stage (bright orange for fresh eggs, milky white for spent eggs) and adjust for water clarity. The pegging method works in 90% of situations, but switch to a stopper knot in ultra-clear or heavily pressured water.
Experiment with different colors, bead textures, and rigging styles to find what works best in your local waters. Watch fish behavior—if no bites occur within 5–10 casts, change depth, speed, or location. Most importantly, respect the resource by following local regulations, using barbless hooks, and practicing proper catch-and-release.
Now tie one on, drift it just above the bottom, and be ready when the float dips. With the right knowledge, fishing beads becomes a reliable, repeatable way to connect with nature’s rhythms and land more fish.





