
You cast your line, settle in, and watch the bobber float gently on the surface. Then suddenly, it darts sideways and vanishes. That heart-pounding moment is why millions use a fishing bobber: it turns subtle underwater bites into unmistakable visual signals. Whether you’re targeting panfish in a quiet pond or walleye in deep lake structure, knowing how to use a fishing bobber properly can make the difference between a full stringer and a wasted afternoon.
A fishing bobber, also called a float, is more than just a beginner’s tool. It suspends bait at precise depths, prevents snags, aids in casting light rigs, and detects even the lightest nibbles. Used correctly, it’s one of the most effective ways to catch fish across lakes, rivers, and ponds. This guide breaks down everything you need to know, from choosing the right type and rigging it correctly to reading bites and avoiding common mistakes.
Choose the Right Bobber Type for Your Fishing Situation
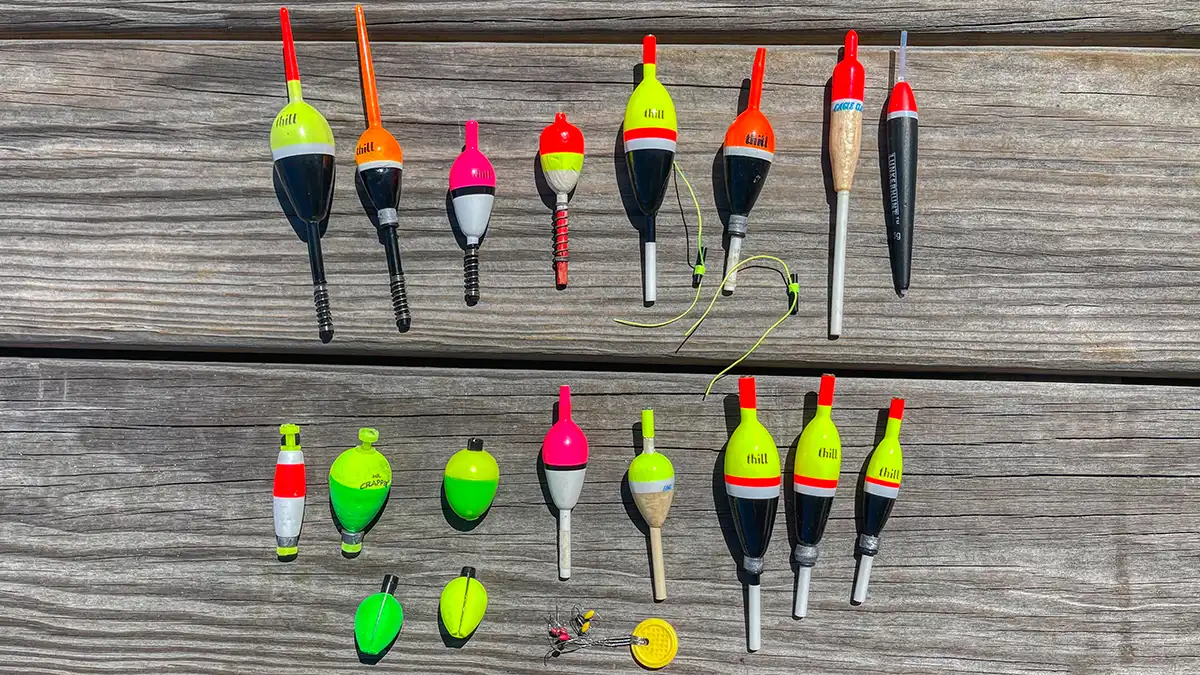
Selecting the correct bobber depends on water depth, target species, and fishing conditions. Not all bobbers work the same, and using the wrong one can cost you bites.
Fixed Bobbers for Shallow Water
Fixed or clip-on bobbers attach directly to your line and stay in place. They’re ideal for shallow water, calm conditions, and beginner anglers.
• Round bobbers: Small plastic spheres with dual clips. Best for 1 to 3 feet of depth.
• Spring bobbers: Tall, slender floats with a spring stem. More visible in choppy water.
• Ease of use: Simply clip onto the line with no knots or stops needed.
These are perfect for kids, casual fishing, or when targeting bluegill near docks. However, they limit casting distance and aren’t suitable for deep water.
Slip Bobbers for Deep Water Precision
When fishing deeper than your rod length, a slip bobber is essential. It slides freely along the line until stopped by a knot or rubber stopper.
• How it works: Line runs through the center while a stop above sets the depth.
• Advantage: Casts cleanly without excess line and can reach 10 feet or deeper.
• Best for: Crappie, walleye, and suspended bass around drop-offs or brush piles.
This setup requires a stop and bead but gives unmatched depth control for serious anglers.
Strike Indicators for Fly Fishing
Ultra-lightweight and sensitive, strike indicators are used in fly fishing to detect delicate takes.
• Types: Foam dots, yarn, or tiny plastic floats.
• Attachment: Pinch-on, looped, or adhesive-backed options available.
• Use case: Stillwater trout, nymph rigs, and situations with subtle bites.
They add minimal resistance, letting fish take the bait naturally before you set the hook.
Set Up a Fixed Bobber Correctly
Rigging a fixed bobber is simple, but doing it right ensures reliability and sensitivity on the water.
Attach the Bobber to Your Line
- Expose the first clip: Press the button or push the stem to open the first hook.
- Thread the line: Slide the fishing line under the exposed clip.
- Lock it in place: Release the button to secure the line.
- Flip and repeat: Turn the bobber, expose the second clip, thread the line, and lock.
Pro tip: Wrap the line once around the clip before securing to prevent slippage during casting.
Position for Maximum Sensitivity
Place the spring stem pointing toward the water. This reduces noise and drag for a more natural presentation. In clear water, show the bright side (red and white) for better visibility. In frothy or choppy water, flip the bobber so the darker side faces up to stand out against whitecaps.
Keep the distance from bobber to hook between 12 and 24 inches for most shallow fishing scenarios.
Rig a Slip Bobber for Deep Water
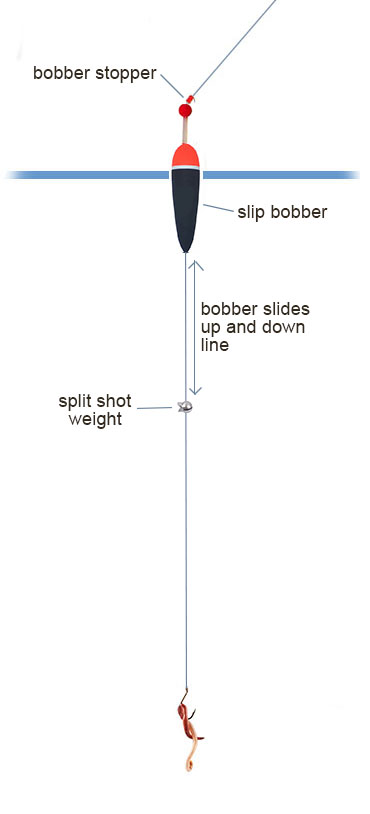
For fishing beyond 3 feet, a slip bobber rig is the gold standard. It allows deep presentations without casting tangles.
Add the Bobber Stop First
-
Slide on the stop: Use a rubber stop or thread knot. This determines maximum depth.
• Rubber stops: Slide over knots and grip tightly.
• Thread stops: Must be tied in place with a clinch knot. -
Tie the stop (if using thread): Make a small knot below the stop to keep it from sliding.
Install the Bead and Bobber
- Slide on a plastic bead: This protects the stop from the bobber’s weight during casting.
- Thread the slip bobber: Pass the line through the top and out the bottom.
- Add split shot: Pinch on 1 to 2 small sinkers 6 to 12 inches above the hook.
- Tie the hook: Attach your jig, worm, or minnow to complete the rig.
When cast, the weight pulls line through the bobber until it hits the bead and stop, setting your bait at the exact depth you want.
Match Depth, Weight, and Bait for Success

Balancing your rig is critical. A poorly weighted setup hides bites or spooks fish entirely.
Start Shallow, Then Go Deeper
Fish often feed near the surface, especially in early morning or late evening hours.
• Begin at 12 inches: Set your bobber just over a foot above the hook.
• No bites? Move deeper in 6-inch increments until you find active fish.
• Target suspended fish: Use a slip bobber to test mid-water zones systematically.
If fish are on the bottom, let the bait rest just above them using a slip bobber with minimal weight.
Balance Buoyancy and Weight
Your bobber should float upright with only the tip showing above the surface. Too much weight sinks it, while too little makes it hard to detect bites.
• Test the rig: Drop it in water. The bobber should sit vertically with 1/4 to 1/2 of it above the surface.
• Adjust with split shot: Add or remove sinkers until the balance feels right.
• Sensitive bites: Use a balsa wood bobber because it responds to the slightest tug.
Avoid placing sinkers too close to the bait. Keep them 6 or more inches up the line to allow a natural, slow fall that won’t alarm cautious fish.
Pick the Best Bait for Bobber Fishing
Natural, slow-moving baits work best under a bobber. Fast or heavy lures defeat the purpose of using a float.
Top Baits That Trigger Bites
• Worms: Cut into 1 to 2 inch pieces. Thread onto the hook so the tail wiggles freely.
• Minnows: Live or dead, hooked through the lips or back. Great for bass and pike.
• Crickets and grasshoppers: Excellent for panfish during summer months.
• Small jigs or plastics: Fished slowly under a bobber for bass action.
Avoid large, heavy baits because they’ll sink the bobber or make casting difficult.
Hook the Bait Naturally
- Threaded worm: Insert hook near the head, run it through, and leave the tail free to wiggle.
- Ribbon style: Push hook through the side, out the other, and repeat lower down. This creates a wiggling effect.
- Minnow: Hook through the lips for live bait or through the tail for dead bait.
The goal is to let the bait move naturally while staying secure on the hook.
Detect Bites and Set the Hook Fast
Your eyes should be on the bobber, not the rod tip. Most bites happen silently below the surface.
Watch for These Bite Signs
• Bobber down: Vanishes completely underwater. Set immediately.
• Twitching or jerking: Fish is nibbling. Wait 1 to 2 seconds, then set the hook.
• Drifting sideways: Moving against wind or current. Could be a fish carrying the bait.
• Slow sink: Deliberate pull. Don’t rush. Let the fish take the bait fully.
In windy conditions, distinguish between wave action and real bites. Real bites often have direction or hesitation that wave movement doesn’t show.
Set the Hook with Control
- React fast: At the first sign of a solid bite, lift the rod sharply.
- Use the bobber’s resistance: Its buoyancy helps drive the hook home.
- Reel quickly: Lower the rod tip and reel to maintain tension.
- Fight smart: Let the fish run if needed. Don’t horse it. Use the rod’s flex to tire the fish.
For small fish, a quick lift is enough. For larger species like bass or walleye, apply steady pressure.
Avoid Common Bobber Mistakes
Even experienced anglers make errors that cost them fish. Here’s how to fix them.
Using a Bobber That’s Too Big
Oversized bobbers create resistance, making it easy for fish to spit the bait before you can set the hook.
• Fix: Downsize to the smallest bobber that keeps your bait afloat.
• Best for sensitivity: Small balsa or foam floats.
Fishing Too Deep Too Soon
Starting at 6 feet when fish are near the surface means zero action.
• Fix: Begin shallow at 12 to 24 inches, then go deeper if needed.
• Pro tip: In spring and fall, fish often suspend mid-water. Test different zones.
Watching the Rod Instead of the Bobber
If you’re staring at the rod tip, you’ll miss bites.
• Fix: Focus entirely on the bobber. Use polarized sunglasses to reduce glare.
• Bonus: In low light, choose orange or glow-in-the-dark floats.
Leaving Too Much Bait on the Hook
A long worm tail attracts nibblers who eat the bait without getting hooked.
• Fix: Cut bait short. Only 1/2 to 1 inch of tail should wiggle.
• Result: More solid hookups and fewer missed fish.
Optimize for Different Fishing Conditions
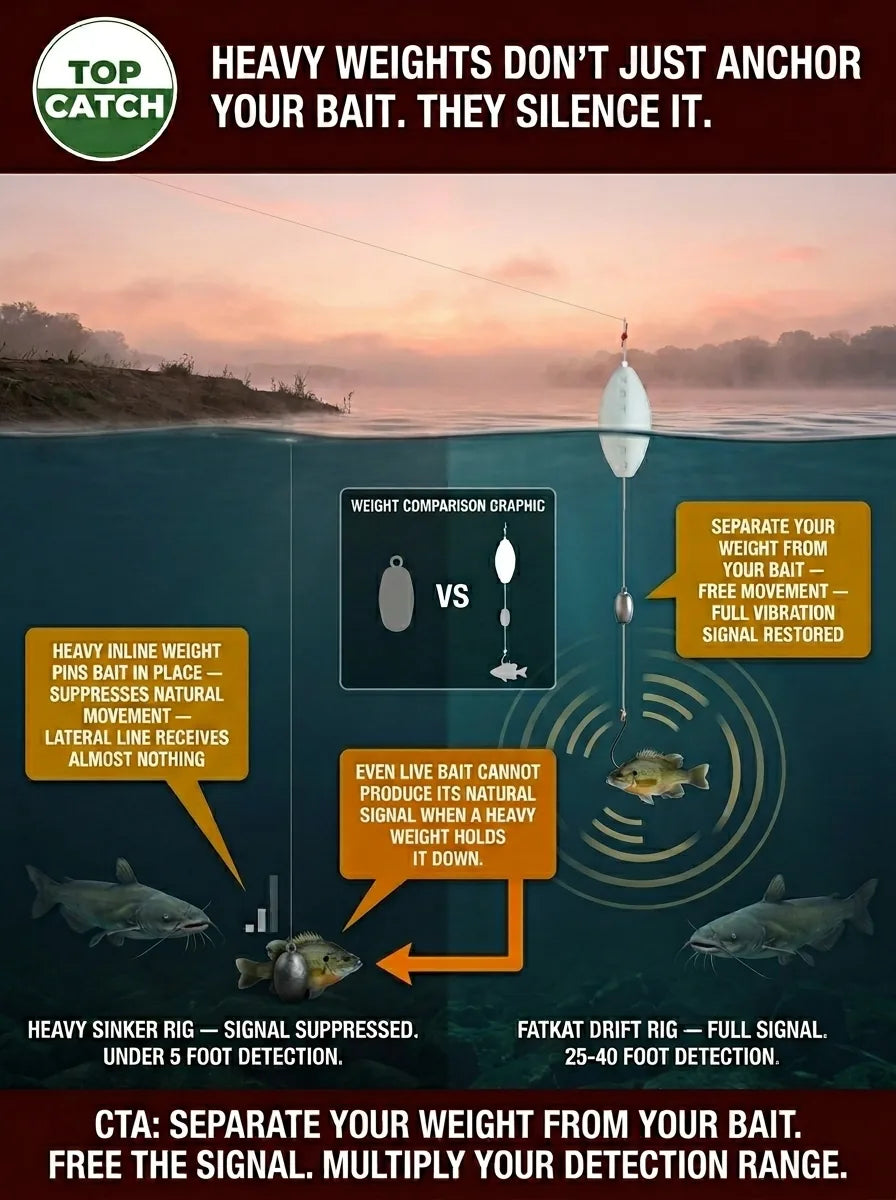
Tailor your bobber setup to water type, weather, and target species for best results.
Calm Water: Use Small, Sensitive Floats
In still ponds or lakes, fish are cautious about unusual presentations.
• Best bobber: Small round or bubble float.
• Bait: Tiny worms or insects.
• Depth: 6 to 18 inches.
• Goal: Detect light bites from bluegill or crappie.
Windy or Choppy Water: Go Tall and Bright
Waves can hide small bobbers and mask bite signals.
• Use: Spring or tall slip bobbers.
• Color: High-contrast red and white or orange and green.
• Position: Flip so the dark side faces up in froth for visibility.
• Weight: Add a split shot to keep the rig stable despite waves.
Rivers and Currents: Drift with a Slip Bobber
In slow-moving rivers, let the current carry your bait naturally.
• Setup: Slip bobber with bead, stop, and light weight.
• Technique: Cast upstream and let it drift naturally through eddies.
• Target: Trout, smallmouth bass, or walleye holding in current breaks.
Avoid fast water because bobbers can’t control drift in strong currents.
Maintain and Store Bobbers Properly
A damaged or waterlogged bobber won’t perform when it matters most. Keep your gear in top shape.
Check for Leaks Regularly
Plastic bobbers can crack or leak over time, reducing buoyancy.
• Test: Float it in a bowl. If it sinks or tilts, replace it.
• Better choice: Solid balsa wood bobbers never leak and last longer.
Prevent Clip Damage
Forcing the spring mechanism wears it out quickly.
• Fix: Seat the line properly. Don’t yank the bobber off the line.
• Storage: Keep in a tackle box compartment. Don’t toss loosely where they can get crushed.
Seasonal Care
• After use: Rinse with fresh water, especially after saltwater fishing.
• Long-term: Store in a cool, dry place. Protect painted finishes from chipping.
Frequently Asked Questions About Using a Fishing Bobber
What is the best depth to set a bobber?
Start with the bobber 12 to 24 inches above the hook. If fish aren’t biting, move deeper in 6-inch increments until you find the active depth. Many fish hold near the surface in early morning and late afternoon.
Can I use a bobber for deep water fishing?
Yes, but you need a slip bobber setup. Slip bobbers slide along the line and are stopped by a knot or rubber stopper, allowing you to fish at depths exceeding your rod length, sometimes 10 feet or more.
Why does my bobber keep sinking?
The bobber may be too small for your bait weight, or it could be cracked and taking on water. Test it in a bucket of water. If it sits low or tilts, replace it with a new one.
What bobber is best for beginners?
A fixed round bobber or spring bobber is best for beginners. They clip directly onto the line without requiring knots or stops, making setup quick and easy.
How do I know if a fish is biting?
Watch for the bobber going completely underwater, twitching, jerking, drifting sideways, or slowly sinking. Any of these movements usually indicate a fish has taken the bait.
Should I use a bobber in windy conditions?
Yes, but use a larger spring bobber or tall float for better visibility. Add a split shot to keep the rig stable, and flip the bobber so the dark side faces up to stand out against choppy water.
Key Takeaways for Using a Fishing Bobber Effectively
Knowing how to use a fishing bobber transforms passive fishing into an active, precise method for catching more fish. Choosing the right type of bobber for your situation matters enormously. Fixed bobbers work best in shallow water, while slip bobbers are essential for deep water precision. The setup process is straightforward: attach the bobber, add your stop and bead if using a slip rig, and balance the weight so the float sits upright with just the tip showing.
Reading bites correctly is perhaps the most critical skill. Keep your eyes on the bobber, not the rod tip. The main bite signals are submersion, twitching, sideways drift, and slow sinking. When you see these, set the hook immediately. Avoid common mistakes like using a bobber that’s too big, fishing too deep too soon, leaving too much bait on the hook, or watching the wrong thing.
Whether you’re chasing bluegill in a backyard pond or crappie in deep reservoirs, a well-set bobber gives you control, visibility, and confidence. Start shallow, match your setup to the conditions, and keep your eyes on the float because the next bite could come at any second.





