

Fishing is not just about casting a line and waiting. How to make rigs for fishing can mean the difference between a full cooler and going home empty-handed. A well-constructed rig ensures your bait moves naturally, stays in the strike zone, and sets the hook when a fish bites. Whether you are targeting snook in shallow surf or carp in still lakes, the right rig boosts sensitivity, reduces tangles, and increases your hook-up rate.
This guide covers everything you need to know, from essential knots and terminal tackle to species-specific setups and pro-level modular designs. You will learn how to build rigs that match water depth, current, bottom type, and fish behavior so you are ready for any fishing situation.
Essential Components for Building Fishing Rigs
Every fishing rig starts with the right parts. Knowing what each component does and when to use it lets you build smarter, not harder.
Choose the Right Hook Type
Hooks are not one-size-fits-all. Match the shape and size to your target species and bait.
• J-Hook: Best for live or cut bait and general-purpose use in bottom and float rigs.
• Circle Hook: Self-setting design ideal for catch-and-release and live bait fishing.
• Octopus Hook: Short shank construction perfect for small bait and finesse presentations.
• Wide-Gape Hook: Holds large baits like carp boilies or mullet chunks.
Use smaller hooks in the #6 to #2 range for panfish and trout. Use medium hooks from 1/0 to 3/0 for redfish and snook. Use large hooks from 5/0 to 8/0 for sharks or big catfish.
Pick the Correct Sinker Style
Weight keeps your bait where fish feed. Choose based on current, depth, and bottom type.
| Sinker Type | Best For |
|---|---|
| Split Shot | Light weighting and shallow water finesse |
| Egg Sinker | Sliding rigs like Carolina and Fish Finder setups |
| Bullet Sinker | Weedless casting and soft plastics |
| Pyramid Sinker | Surf fishing or strong current situations |
| Bank Sinker | Heavy river drift and resists rolling |
For snag-prone areas, try a paper clip substitute, which is a bent wire that breaks under pressure and saves your main rig from being lost.
Use Swivels to Prevent Line Twist
Swivels connect sections of line while allowing rotation. This prevents coiling caused by spinning lures or tumbling sinkers.
• Barrel Swivel: Connects mainline to leader and is standard in most rigs.
• Snap Swivel: Lets you swap weights quickly and is common in knocker rigs.
• Three-Way Swivel: Powers multi-directional rigs like three-way flounder rigs.
• Quick-Chain Swivel: Used in carp rigs with lead clips.
Always tie swivels with strong knots like the improved clinch or Palomar knot, and wet them before tightening.
Select Leaders for Stealth and Strength
A leader is the final section between your main line and hook. It improves abrasion resistance and reduces visibility.
• Monofilament: Stretch absorbs shock and works well for beginners.
• Fluorocarbon: Nearly invisible underwater and ideal for clear water.
• Wire Leader: Essential for toothy predators like pike or barracuda.
Leader length varies from 12 to 24 inches for most species, up to 36 inches in heavy cover. Test strength should match your target fish, with 15 to 30 pounds for redfish and 50 pounds or more for sharks.
Add Beads, Blades, and Floats for Extra Effect
Small additions boost your rig performance significantly.
• Beads: Protect knots from egg sinkers and add subtle sound.
• Spinner Blades: Flash attracts flounder, trout, and redfish.
• Floats and Bobbers: Signal bites and suspend bait at desired depth.
For night fishing, use glow-in-the-dark floats for clear bite detection. An anti-tangle sleeve on popping cork rigs reduces line twist during casting.
Master These Key Fishing Knots
Your rig is only as strong as its weakest knot. Learn these essential knots to ensure every connection holds when a fish bites.
Tie the Improved Clinch Knot for Hooks and Sinkers
The improved clinch knot is the go-to knot for attaching hooks, swivels, and sinkers to monofilament or fluorocarbon line.
Steps:
1. Thread the line through the hook eye.
2. Wrap the line 5 to 7 times around the standing line.
3. Pass the tag end through the first loop above the eye, then through the large loop.
4. Wet the knot and pull tight, then trim the tag end.
This knot retains 90 to 95 percent of line strength and works best for hooks, swivels, and split shot.
Pro Tip: Always wet the knot with saliva or water before tightening to prevent heat damage and ensure proper seating.
Use the Palomar Knot for Braided Line
The Palomar knot is the strongest knot for braided line and ideal for heavy-duty applications.
Steps:
1. Double 6 inches of line and pass through the hook eye.
2. Tie an overhand knot but do not tighten it.
3. Pass the hook through the loop.
4. Pull both ends to tighten.
This knot retains 95 to 100 percent of line strength and works best for connecting braided main line to hooks or swivels.
Snell Knot for Circle Hooks
The Snell knot creates a straight pull alignment, which is critical for circle hook performance.
Steps:
1. Pass line through the hook eye from point to shank.
2. Wrap the line 5 to 7 times around the shank.
3. Thread the tag end back through the eye.
4. Pull slowly to seat the knot against the eye.
This knot provides up to 100 percent strength and works best for circle hooks and surf rigs.
Non-Slip Mono Loop for Popping Corks
This knot allows free movement of lure or bait and is perfect for action rigs.
Steps:
1. Form a loop in the line.
2. Wrap the tag end around the standing line 5 to 6 times.
3. Pass the tag end through the loop at the base.
4. Pull to form the knot and leave the loop open.
This knot provides about 90 percent strength and works best for popping corks and soft plastics.
FG Knot for Braid-to-Leader Connection
The FG knot is a low-profile, high-strength knot for joining braided line to a fluorocarbon leader.
Steps:
1. Lay the braid and leader parallel to each other.
2. Wrap the braid tightly around both lines 8 to 10 times.
3. Pass the braid through a small loop near the leader.
4. Pull slowly to tighten.
This knot provides 98 percent strength and works best for connecting mainline to leader when transitioning from braid to fluorocarbon.
Warning: This knot takes practice to master. Test it thoroughly before using it on the water.
Build These 5 Essential Fishing Rigs
Now that you know the parts and knots, it is time to build real rigs. Start simple, then advance to high-performance systems.
High-Low Rig: Beginner to Expert
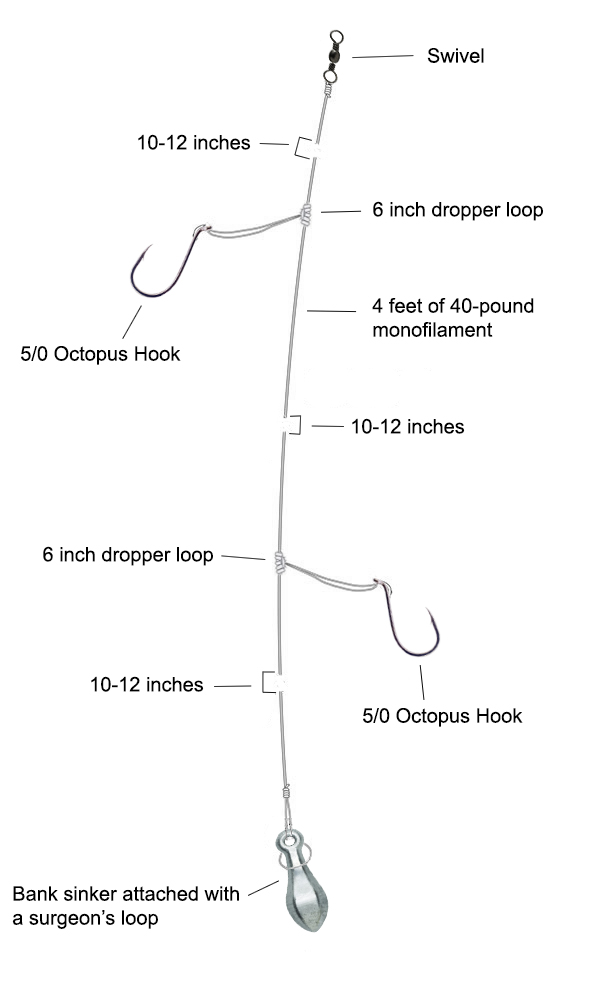
The High-Low rig is ideal for catching multiple species at once and is commonly used in surf and pier fishing.
Level 1: Simple Overhand Knot Version
Steps:
1. Tie a snap swivel to the main line using two overhand knots. This locks the swivel in place.
2. Create dropper loops 12 to 18 inches apart by bending the line, twisting twice to form train tracks, and pulling the tag end through the loop.
3. Attach a barrel swivel to the end using the improved clinch knot.
4. Add a float by sliding it on, folding it over, and pushing it through the loop.
5. Tie hooks to each dropper loop.
This level works best for beginners and allows quick rig changes.
Level 2: Intermediate Dropper Loop
Steps:
1. Wrap the tag end 5 times around the standing line before pulling through.
2. This creates straighter, cleaner loops.
3. Use a bright pink float for visibility.
This level works better for multi-species targeting and improved current performance.
Level 3: Expert T-Knot Rig
Steps:
1. Tie a 5-wrap overhand knot but do not fully tighten it.
2. Create a 15-wrap dropper loop.
3. Pull the overhand knot through the dropper loop.
4. Tighten slowly to form a T shape.
The T-Knot provides a tangle-free design, stronger connection, and professional finish. This level works best for heavy surf and experienced anglers.
Knocker Rig: Sliding Sinker Setup
The knocker rig is a sensitive, snag-resistant rig perfect for bottom feeders like snook, flounder, and redfish.
Steps:
1. Slide an egg or bullet sinker onto the main line without using a stopper.
2. Tie the hook directly to the end with the improved clinch knot.
3. Optionally add a bead ahead of the sinker to protect the knot.
This rig works because the weight slides freely, so fish feel no resistance when taking the bait. Jerk the line to dislodge snags. It provides excellent bite detection and works best in strong current and rocky bottoms.
Fish Finder Rig: Bottom Fishing Pro
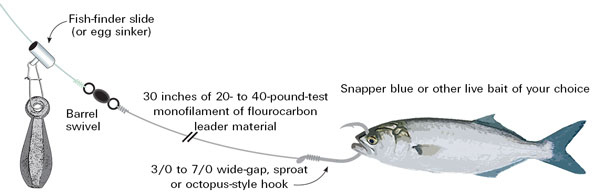
The Fish Finder rig is the upgraded knocker rig, ideal for deep water and long drifts.
Steps:
1. Slide a sliding sinker onto the main line.
2. Add a bead to protect the knot.
3. Tie a barrel swivel to the end.
4. Attach a 12 to 36 inch fluorocarbon leader to the swivel.
5. Tie the hook with the improved clinch knot.
This rig provides natural bait drift, high sensitivity, and easy snag recovery. It works best for striped bass, catfish, and drum. Use open bail for free spool feeding in surf fishing.
Dropper Rig: Chicken Rig for Bottom Species
The dropper rig features multiple hooks above a single weight and is great for bottom-dwelling species.
Steps:
1. Attach a pyramid sinker to the bottom of the leader.
2. Tie 2 to 3 dropper loops 12 to 18 inches above the sinker.
3. Insert a hook into each loop.
4. Connect the top of the leader to the main line via swivel.
This rig targets sheepshead, whiting, and pompano. It works best in heavy surf and strong currents. Many states limit rigs to two hooks, so check local regulations.
Ultimate Surf Fishing Rig: Modular Design
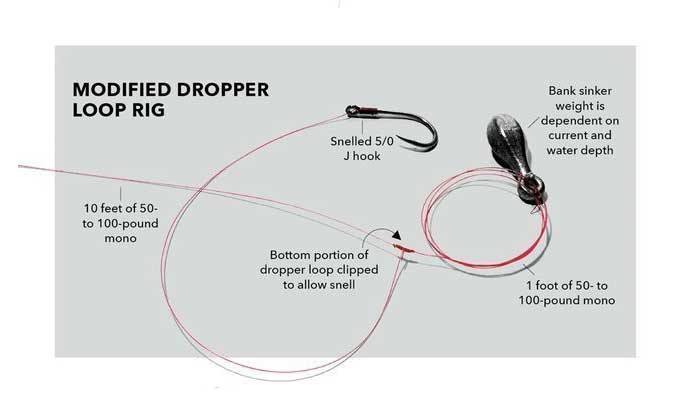
This modular rig is built for durability and fast repair in tough surf conditions. If something breaks, only a small part fails while the core stays intact.
Core Assembly:
1. Cut 30 pound leader and tie a double overhand knot at the bottom to form the core loop.
2. Add two dropper loops 10 to 20 inches apart.
3. Leave 10 to 15 inches above the top loop to connect to the main line using the FG knot.
Offshoot Assembly:
1. Cut 20 pound leader to 7 to 8 inches.
2. Tie a perfection loop at one end.
3. Connect to the core loop via loop-to-loop connection.
4. Tie the hook with the Orvis knot.
Weight Connection:
1. Attach 20 pound leader to the bottom core loop.
2. Tie a large perfection loop to connect to the weight.
This rig saves time because only the 20 pound section breaks when bitten by sharks or mackerel. It works best in beach surf and predator-heavy waters.
Match Your Rig to Target Species
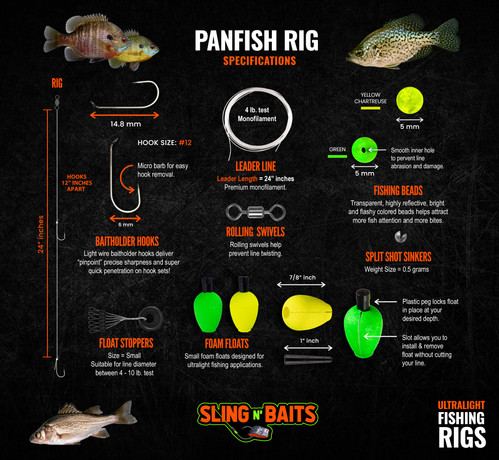
Different fish require different rigs. Here is what works best for common species.
Snook: Free Line or Fish Finder Rig
Snook feed near structure and need a sensitive presentation. Use a free line rig with no weight around bridges for surface-feeding snook. Use a Fish Finder rig with shrimp for bottom-feeding snook. Best baits include shrimp, pinfish, and greenbacks.
Carp: Hair Rig with Lead Clip
Carp require a hair rig to prevent deep hooking and allow natural bait movement.
Steps:
1. Strip the coating from coated braid to expose the supple core.
2. Thread the bait onto the hair using a baiting needle.
3. Tie a knotless knot around the hook shank.
4. Connect to the lead clip system with a quick-chain swivel.
Popular carp rigs include the Slip D Rig, Hinge Stiff Rig, and Ronnie Rig.
Redfish: Popping Cork or Fish Finder
Use a popping cork at dawn and dusk for surface action. Switch to a Fish Finder rig with shrimp for bottom feeding. Redfish respond well to noise and flash, so add spinner blades to your setup.
Flounder: Three-Way Rig with Spinner Blade
Setup:
1. Connect main line to a three-way swivel.
2. Attach a short leg to a pyramid sinker.
3. Attach a long leg to a hook with a spinner blade.
The flash attracts flatfish in current. This rig works best in sandy bottoms with moderate to strong current.
Panfish and Trout: Basic Bobber Rig
Simple Build:
1. Tie a size 6 to 10 hook with the improved clinch knot.
2. Pinch 1 to 2 split shots 6 to 12 inches above the hook.
3. Clip a slip bobber 3 to 4 feet up the line.
This rig works best in still water and light current. It is perfect for beginners learning how to make rigs for fishing.
Adapt Rigs to Environmental Conditions

Water conditions dictate your rig choice. Use this quick reference to match your setup.
| Condition | Recommended Rig | Reason |
|---|---|---|
| Shallow, calm water | Free line or split shot | Minimal weight and natural bait drift |
| Strong current | Fish Finder or dropper rig | Keeps bait near bottom |
| Rocky bottom | Knocker rig | Sliding weight aids snag recovery |
| Deep water | Fish Finder or Carolina | Better sensitivity and bottom contact |
| Night fishing | Glow-in-the-dark float rig | Clear bite detection |
| Weedy bottom | Pop-up bait rig for carp | Keeps bait off the muck |
Pro Tip: Carry pre-tied rigs in labeled tubes so you can swap them in seconds when conditions change.
Pro Tips for Rig Success
Follow these expert-backed strategies to maximize your results on the water.
Match Bait to Rig Movement
Use weightless rigs for swimming bait like mullet. Add split shot to slow the sink rate in deeper water. For carp, balance a pop-up bait with tiny split shot so it hovers just above the bottom.
Prioritize Natural Presentation
Avoid bulky knots that hinder bait motion. Use fluorocarbon leaders in clear water. Keep hooks sharp because dull points miss strikes.
Inspect and Maintain Your Rigs
After each use, check knots for fraying. Replace rusty hooks or kinked leaders. Rinse saltwater rigs with fresh water. Store pre-tied rigs in rig tubes or tackle boxes to prevent tangles.
Learn From Other Anglers
Watch successful anglers and note their rig style and depth. Join local fishing forums or YouTube channels. Keep a log of what worked, what did not, and why.
Frequently Asked Questions About Making Fishing Rigs
What is the easiest fishing rig for beginners to build?
The basic bobber rig is the easiest for beginners. It involves tying a hook, adding split shot weights, and attaching a bobber. The improved clinch knot is the primary knot needed, and it is simple to learn.
How do I prevent my fishing rig from tangling?
Use dropper loops instead of tying hooks directly to the main line. Keep your knots simple and avoid excess line between connection points. Wet knots before tightening to ensure they seat properly. Store pre-tied rigs in tubes to prevent tangling during transport.
What is the strongest knot for connecting braid to a fluorocarbon leader?
The FG knot is the strongest for connecting braid to fluorocarbon. It provides 98 percent knot strength and has a low profile that passes through rod guides easily. This knot requires practice but is worth mastering for braid-to-leader connections.
How do I choose the right sinker weight for my rig?
Match sinker weight to current strength and water depth. Use lighter weights in calm, shallow water. Use heavier weights in deep water or strong current. The general rule is to use just enough weight to hold your bait in place.
Can I use the same rig for saltwater and freshwater fishing?
Many rigs work in both environments, but you should rinse freshwater from saltwater rigs after each use. Use corrosion-resistant hardware like stainless steel swivels and hooks. Adjust leader strength based on target species rather than water type.
How often should I replace my fishing rigs?
Inspect rigs after every use. Replace hooks if they show rust, dull points, or bending. Replace leaders if you see fraying, abrasion, or kinks. Pre-tied rigs can last for multiple trips if stored properly and inspected regularly.
Key Takeaways for Building Effective Fishing Rigs
Understanding how to make rigs for fishing transforms your fishing from passive waiting to active strategy. Start with quality components including sharp hooks, reliable swivels, and appropriate sinkers. Master the essential knots like the improved clinch, Palomar, and FG knot because your rig is only as strong as its weakest connection.
Match your rig to target species and environmental conditions. Use the High-Low rig for multi-species targeting, the Fish Finder for deep bottom fishing, and popping corks for active surface feeders. Carry pre-tied backup rigs so you can adapt quickly when conditions change.
Practice these techniques on the water, keep learning from experienced anglers, and remember that the best anglers are not the ones with the fanciest gear but the ones who understand how to make rigs for fishing that match the moment. Build smart, fish often, and let every cast teach you something new.





