
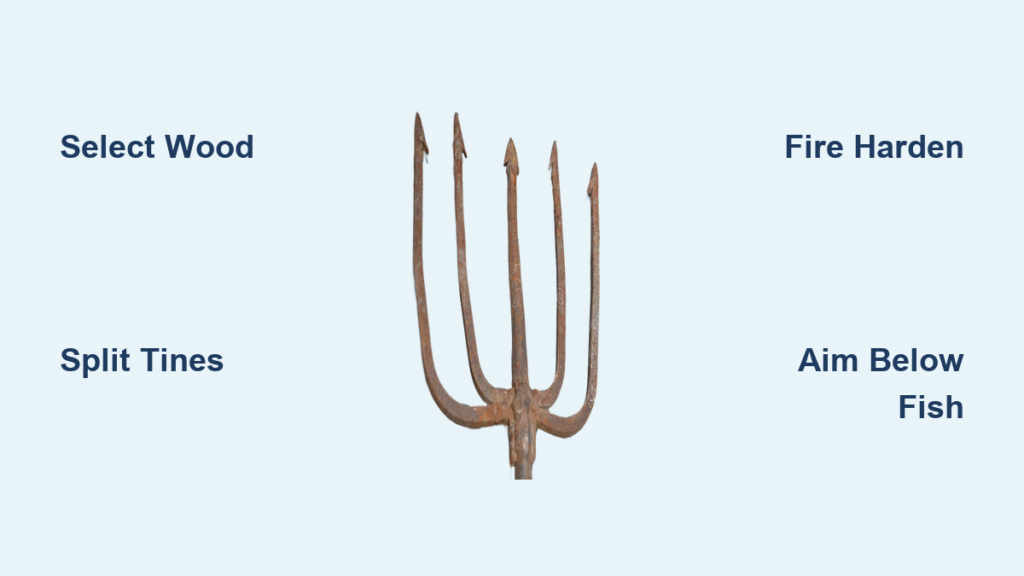
If you’re stranded near a stream or wading through shallow waters with an empty stomach, knowing how to make a fishing spear could mean the difference between hunger and a meal. Unlike traditional fishing, spearing puts you in control. No bait, no line, just precision and timing. Whether you’re a bushcrafter, survivalist, or outdoor enthusiast, a well-made fishing spear is one of the most effective tools for harvesting fish in clear, shallow environments.
This guide walks you through every step. You’ll learn how to select the right wood, split and shape tines, fire-harden tips, and master the strike. You’ll build a four-pronged Leister, a metal-tipped thrusting spear, and even an improvised field version with minimal tools. We cover the science of underwater aiming, stealth techniques, and legal considerations so you can fish safely, ethically, and successfully.
Why Build Your Own Fishing Spear
A fishing spear is more than a bushcraft project. It is a lifeline in survival situations. When you know how to make a fishing spear, you transform from a passive fisherman waiting for bites into an active hunter controlling your own food source.
The advantages are clear. You need no bait, hooks, or synthetic lines. You can harvest fish repeatedly without depleting resources. A spear also serves multiple purposes. Use it as a balance pole for stream crossings. Employ it as a defensive tool. Or use it to probe murky waters for hidden hazards.
Most importantly, a fishing spear requires minimal gear. With just a knife and a straight stick, you can build an effective tool in under 30 minutes. This makes it ideal for survival scenarios where every piece of equipment counts.
Choose the Right Spear Design for Your Needs
Different spear designs excel in different conditions. Selecting the right one increases your success rate dramatically.
The Four-Pronged Leister for High Success Rate
The Leister is the gold standard for survival spears. Its four tines create a basket effect that traps fish even when your aim is slightly off-center. This design works best when fish are small to medium-sized, water is weedy or visibility is limited, and you are using only a knife and natural materials.
The Leister is forgiving by design. Beginners land more catches with this configuration than with any other style.
Single-Point Spear for Deep Penetration
A single-point or metal-tipped spear delivers maximum force to a small area. This makes it ideal for larger, tougher fish like carp or catfish. Use this design when targeting big, slow-moving fish in clear water where accuracy is high.
Be warned. Single-point spears are harder to hit with. They require significant practice to master.
Multi-Pronged Gig for Murky Water
A three- or four-tine gig covers more surface area. This compensates for poor visibility when water is murky or turbid. Use it when fish are schooling in shallow edges or when you need a quick, reliable catch with minimal aiming.
This design also excels for night gigging. With a flashlight, the wider spread catches fish that dart away from narrower spears.
Select the Perfect Spear Shaft Material
The shaft is the backbone of your spear. Choosing the right wood makes or breaks your tool.
Ideal Length and Diameter
For wading in streams or shallow banks, use a 6 to 8 foot shaft. For shore-based fishing or deeper reach, extend to 8 to 10 feet. If you are fishing from elevated positions like rocks or docks, use 10 to 12 feet.
Diameter matters. A half-inch to 1.5-inch thickness works for most situations. Thinner shafts create less drag in water. Thicker shafts offer more durability and can withstand harder impacts.
Best Woods for Spear Shafts
Several hardwoods excel for spear construction. Ash provides strong, straight-grained wood that resists shock. Hickory is extremely tough and ideal for heavy use. Oak is dense and durable, resisting splitting and rot. Maple is a good alternative that is easy to work with. Bamboo is hollow, lightweight, and naturally strong if the nodes remain intact.
Avoid softwoods like pine. They splinter easily and waterlog quickly. Your spear will snap at the worst possible moment.
What to Look For in a Raw Shaft
Select wood with straight grain and no bends or warps. Check for knots or cracks near the tip. These weak points cause breakage under pressure. Smooth bark or a debarked section provides better grip. A slight taper is acceptable, but avoid drastic narrowing.
Gather Essential Tools for Spear Building
You do not need a workshop. A few key items suffice.
A fixed-blade knife with a full-tang blade works best for batoning and carving. A saw speeds up prep but is optional. Cordage like paracord, rawhide, or plant fiber secures joints and creates lashings. A splitting wedge or heavy stick helps drive the knife through wood. A fire source is essential for fire hardening. A sharpening stone or file maintains metal tips.
What if you have no tools? Use a sharp rock to carve and a heavy stone for batoning. Improvisation is the heart of survival skills.
Build a Four-Pronged Leister Spear Step by Step

The Leister is the most reliable design for survival situations. Here is how to build one from scratch.
Harvest and Prepare the Shaft
Find a straight sapling 6 to 8 feet long and about 1 inch thick. Cut it cleanly with a knife or saw. Strip the bark from the top 12 inches to prevent interference when splitting.
This step takes 5 to 10 minutes with basic tools.
Split the Tip into Four Tines
Place your knife blade across the center of the shaft tip. Use a heavy stick to baton the knife down 10 to 12 inches. Rotate the shaft 90 degrees and repeat, creating an X-shaped split.
Stop 2 to 3 inches short of splitting all the way through. This keeps the base strong and prevents the spear from falling apart.
Insert Wooden Spreaders
Cut two small sticks about pencil-thick and 3 to 4 inches long. Jam one deep into the first split. Insert the second into the cross-split, resting it on the first. This forms a cross that pushes the tines outward, creating a fish-trapping basket.
Sharpen the Tines
Focus on the inside edges. These do the piercing. Shape each tip to a sharp point, but keep them thick enough to resist breaking. Avoid needle-thin tines. They snap on rocks and debris.
Slightly curve the inside edge for better bite into fish flesh.
Lash the Base to Prevent Splitting
Wrap paracord or rawhide tightly 2 to 3 inches below the split end. Use a clove hitch or whipping knot for security. Melt paracord ends or chew rawhide to seal fraying.
Optional. Coat the lashing with pine resin for waterproofing and added strength.
Add Barbs for Better Retention
Lash sharpened thorns, bone shards, or metal pieces to the inside of tines. Angle them backward so fish cannot slide off. Secure with tight cordage or wire.
Be aware. Barbs increase effectiveness but also increase snag risk in weeds.
Fire Harden the Tip
Build a fire and let it burn to hot coals. Hold the tines above the flames, not in them. Rotate constantly until the wood turns light golden brown. This takes 10 to 15 minutes.
Test by tapping the wood. It should make a clinky sound when hardened. Never blacken the wood. Charred wood is brittle and weak.
Create a Metal-Tipped Spear for Durability

Metal tips last longer and maintain sharpness better than wood. They are ideal for repeated use.
Prepare the Shaft
Use a straight hardwood shaft 6 to 12 feet long. Debark the last 6 inches where the tip attaches.
Create a Socket or Split
Two methods exist for attaching the spearhead. The socket method involves carving a shallow recess to fit the spearhead base. The split method involves splitting the last 4 to 6 inches to insert the tang.
The socket method is stronger. Splitting weakens the shaft, so reinforce heavily with lashing.
Attach the Spearhead
Insert the metal point or sharpened bone into the socket or split. Lock it in place with a wooden wedge driven into the split. Wrap the joint tightly with paracord or rawhide. Seal with pine resin or glue if available.
Emergency alternative. Lash a knife or screwdriver to the end if no spearhead is available.
Improvise a Field Spear with Minimal Gear
Sometimes you have nothing. That is fine. A functional spear now beats a perfect one tomorrow.
No Knife? No Problem
Use a straight branch, tent pole, or PVC pipe as the shaft. Sharpen one end with a rock or break it into a point. Carve backward notches with a sharp stone for barbs. Hold over coals to fire-harden.
DIY hack. Use a broken bottle. Sharpen the edge and lash it securely. Handle with gloves to avoid cuts.
Emergency Materials List
Shoelaces work for lashing. Dental floss secures small tips. A bicycle spoke makes an excellent metal tine substitute. A fishing rod serves as a pre-made shaft. Inner bark strips provide natural cordage.
Master the Underwater Aiming Technique
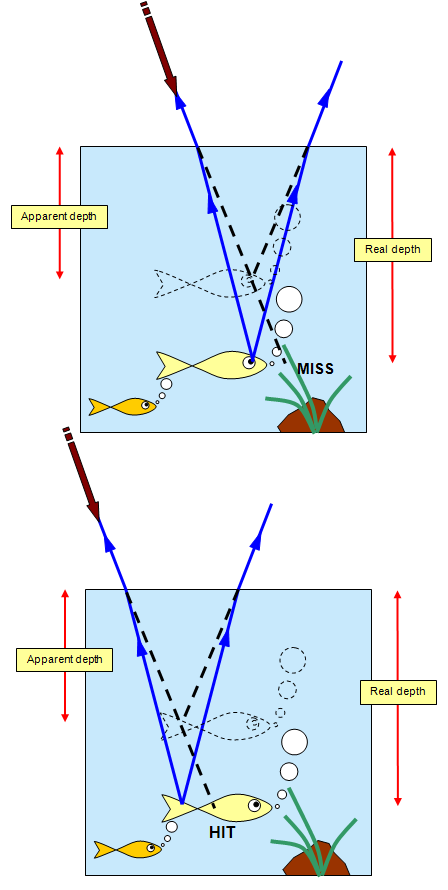
Light plays tricks on your eyes underwater. Understanding refraction is the difference between a catch and a miss.
Why You Miss Even When You Are Close
Water bends light. This makes fish appear shallower and farther away than they actually are. If you aim at the fish, you strike above it every time.
How to Compensate
Aim 4 to 6 inches below the fish’s belly as a general rule. The deeper the fish, the lower you must aim. The shallower the fish, the less adjustment is needed.
Adjust for Your Position
When viewing from above water, aim below the fish. When underwater while freediving, aim directly at the fish because no refraction occurs. When viewing from a high bank or rocks, aim even lower because the increased angle amplifies refraction.
Pro tip. Wear polarized sunglasses to cut glare and see true depth.
Perfect Your Spearfishing Technique
Building the spear is only half the battle. How you use it determines success.
Move Like a Predator
Lift your feet when walking. Do not drag them and create vibrations. Stay low to avoid casting a shadow on the water. Pause every 10 steps to let fish relax. Approach from downwind so fish smell you before they see you.
Position for the Strike
Get within arm’s reach of your target. Use rocks or reeds for cover. Keep your escape route clear behind you.
Execute the Thrust
Lower the spear slowly. Avoid splashing. Align with your aim point, compensating for refraction. Explode forward using both hands, shoulders, and core. Drive through the fish or pin it to the bottom. Hold for 1 to 2 seconds. Do not pull back immediately.
Never throw the spear unless you are experienced. Loss and breakage are likely.
Recover the Catch
Keep the spear pinned down. Grab the fish by the gills or mouth. Lift straight up without jerking. If fishing from a boat, use a retrieval line with a float to prevent losing your spear.
Never pull backward. The fish will slip off.
Avoid Common Spearfishing Mistakes
Most beginners miss due to refraction, not poor aim. Here is what to avoid.
Aiming directly at the fish guarantees a miss. Move too fast and fish flee. Casting a shadow spooks them. Using crooked wood throws off your aim. Throwing the spear risks losing it. Skipping fire hardening leaves tips soft and splinter-prone.
Practice makes perfect. The first fish may escape. Do not give up.
Stay Safe and Legal
Safety and legality matter.
Safety First
Wear water shoes. Rocks are slippery. Carry the spear tip down when walking. Never swing near others. Use a diver’s flag if in open water.
Know the Laws
Spearfishing is regulated. Rules vary by state, country, water type, and species. Shore-based spearing is often legal. Boat or snorkel spearing may not be. Some areas prohibit catching trout.
Always check local fish and wildlife regulations before you go.
Ethical Harvesting
Take clean, humane shots. Do not waste fish. Take only what you need. Avoid protected or spawning species.
Maintain Your Spear
Proper care extends the life of your tool.
Rinse after saltwater use. Dry and oil metal parts. Resharpen tines after a few strikes. Check lashings because wet cordage loosens. Dry the shaft overnight to prevent rot. Store the tip covered with a cloth sheath or leather cap. Inspect for cracks and replace if compromised.
Build a Compact Survival Spear Kit
Prepare now so you are ready later.
Your kit should include a sturdy hardwood shaft 6 to 12 feet long, a removable gig head with 3 to 4 prongs, a metal spear tip for large fish, 10 feet of paracord for lashing and repair, small spreader sticks for tine separation, fire-hardening capability, a retrieval line with float, a fixed-blade knife, gloves, and polarized sunglasses.
Budget version. Carved shaft, bone tip, rawhide lashings, and a plastic bottle float.
Practice Like a Pro
Success comes from repetition.
Train on submerged sticks first. Build aim and timing. Practice refraction adjustment in clear water. Test different designs to find what works best for your body and environment. Try night spearing with a flashlight. It is surprisingly effective. Build multiple spears and compare performance.
The best spear is not the fanciest. It is the one you can make when you need it. Practice now. Build one today. Be ready.
Frequently Asked Questions About Making a Fishing Spear
What is the best wood for a fishing spear?
Ash, hickory, and oak are ideal. They are strong, straight-grained, and durable. Maple and willow are acceptable alternatives.
How do I aim underwater?
Aim 4 to 6 inches below the fish’s belly to compensate for light refraction. The deeper the fish, the lower you aim.
Should I throw or thrust the spear?
Thrust while holding the shaft. It is more accurate, more powerful, and safer. Throwing is advanced and risky.
Is spearfishing legal?
It depends on your location. Check local laws for species, method, and water type.
Can I make a spear with no tools?
Yes. Use a straight branch, sharpen with a rock, and fire-harden over coals.
What is the easiest way to catch fish without gear?
A multi-pronged fishing spear in shallow, clear water is one of the simplest and most effective methods.
When should I use a spear instead of a line?
Use a spear when fish are visible in shallow water, you need food quickly, bait is unavailable, or you are in a survival situation.
Does spearfishing work at night?
Yes. Light attracts fish and reduces their alertness. Move slowly and maintain control.
How hard is it to catch fish with a spear?
Moderate difficulty for beginners. Success improves rapidly with practice, especially in clear, shallow water.
What are the best conditions for spearfishing?
Clear, calm, shallow water with good sunlight and fish visible near the surface.
Key Takeaways for Making and Using a Fishing Spear

Knowing how to make a fishing spear transforms passive waiting into active hunting. With a straight stick, a knife, and a few minutes, you can build a tool that feeds you for days. Select the right design for your environment. A four-pronged Leister works best for beginners and survival situations. Fire-harden your tips for durability. Master refraction compensation to land strikes consistently.
Combine spear-making with fire, shelter, and navigation skills, and you have a complete survival system. The best spear is not the fanciest. It is the one you can make when you need it. Start practicing today.





