
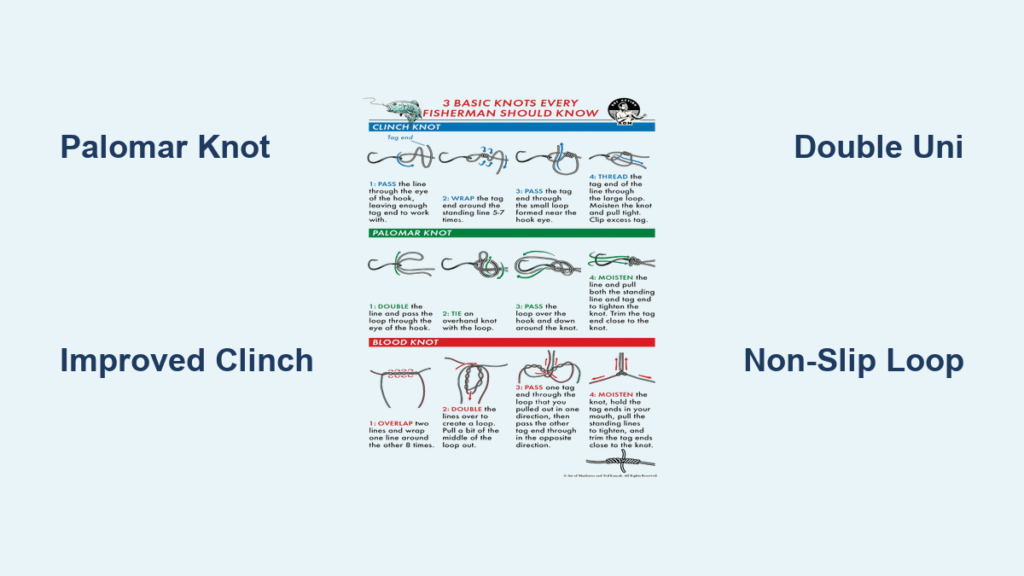
Nothing ruins a fishing trip faster than a lost catch due to a failed knot. Knowing how to tie fishing knots properly isn’t just a skill, it is the backbone of every successful angler’s arsenal. Whether you are targeting bass in a quiet lake or battling tuna offshore, the right knot ensures your lure stays on, your line holds strong, and your hard-earned fish does not slip away. A poorly tied knot can mean the difference between landing a trophy and watching it swim away.
This guide cuts through the clutter and delivers only what works. You will learn the top-performing knots, how to match them to your line type, and avoid the most common mistakes that silently weaken your setup. No fluff. No guesswork. Just proven techniques used by pros and seasoned anglers worldwide.
Choose the Right Knot for Your Line Type

Not all knots work with all lines. Using the wrong one can cut your line strength in half or cause immediate failure. Matching your knot to your line type is the first step toward reliable fishing.
Monofilament Line Requirements
Monofilament is stretchy and forgiving, making it ideal for beginners. It works best with the Improved Clinch, Palomar, or Trilene Knot. These knots grip well and maintain strong retention rates when properly tied on mono.
Fluorocarbon Line Requirements
Fluorocarbon is stiff and dense, requiring knots that can handle its lack of stretch. Use the Palomar or Double Uni for reliable connections. The stiffness of fluorocarbon can cause some knots to slip if they are not properly seated.
Braided Line Requirements
Braided line is slippery and strong, demanding knots designed to grip without cutting into the line. The Palomar, Uni Knot, or Alberto are top choices for braid. Never use a Blood Knot to join braid to mono because it will slip.
Attach Hooks and Lures with Confidence
Improved Clinch Knot for Monofilament
The Improved Clinch Knot is one of the most trusted knots for attaching hooks, especially with monofilament. When tied correctly, it retains 85 to 95 percent of your line is strength.
Steps:
1. Thread the line through the hook eye
2. Wrap the tag end around the standing line 5 to 7 times
3. Pass the tag end through the small loop at the eye
4. Pass it through the large outer loop
5. Moisten with water or saliva
6. Pull both ends slowly to tighten
7. Trim the tag end close but not flush
Pro Tip: Double the line through the eye first for extra grip on slippery baits. Avoid too few wraps or dry tightening because both cause slippage.
Palomar Knot for Braided Line
The Palomar Knot is the go-to knot for braided line. With near-maximum strength and easy tying, it is ideal for low-light conditions or thick lines.
Steps:
1. Double 6 inches of line to form a loop
2. Pass the loop through the hook eye
3. Tie an overhand knot with the doubled line without tightening yet
4. Pull the hook through the loose loop
5. Pull both ends to cinch down
6. Trim the tag end
Why it wins: Works flawlessly with braid, requires no fine motor control, and rarely fails. Bonus: It can be tied with gloves on, perfect for cold-weather fishing.
Uni Knot for All-Purpose Use
Use the Uni Knot for hooks, swivels, or even spool attachment. It is versatile across line types and holds up under shock loads.
Steps:
1. Thread 8 to 10 inches through the hook eye
2. Pinch the tag end and standing line together
3. Wrap the tag end around both lines 6 to 8 times
4. Feed the tag end back through the loop near the hook
5. Moisten and pull the tag end to snug up
6. Slide the knot down with the standing line
7. Final tighten and trim
Best for: Lures on braid without a leader. The same method creates the Double Uni Knot when joining two lines.
Rapala Knot to Boost Lure Action
This loop knot lets your lure swim more naturally, making it deadly for jerkbaits, minnows, and saltwater plugs.
Steps:
1. Run line through the hook eye
2. Tie an overhand knot, leaving a 6-inch loop
3. Pass the tag end back through the hook eye
4. Feed the tag end through the overhand knot
5. Wrap the tag end around the standing line 4 to 5 times
6. Pass the tag end back through the overhand knot
7. Moisten and pull tight
8. Trim
Ideal for: Trophy bass, pike, and offshore trolling. The result is a semi-free-swinging loop that increases wobble and flash.
Non-Slip Loop Knot for Maximum Movement
This knot gives flies and soft plastics full freedom of motion, critical for imitating live prey.
Steps:
1. Tie a loose overhand knot, leaving a 3 to 4 inch tag
2. Pass the tag end through the hook eye
3. Feed the tag end back through the overhand knot
4. Wrap the tag end around the standing line based on line weight
5. Light line under 8 pounds needs 7 wraps
6. Medium line 8 to 12 pounds needs 5 wraps
7. Heavy line 15 pounds or more needs 4 wraps
8. Pass the tag end back through the overhand knot
9. Pull the tag to partially tighten
10. Adjust the loop size
11. Pull the standing line to fully set
12. Trim
Secret weapon: Makes streamers dart and dance like real baitfish. Top pick for fly fishing, drop shot rigs, and finesse bass tactics.
Join Lines Like a Pro
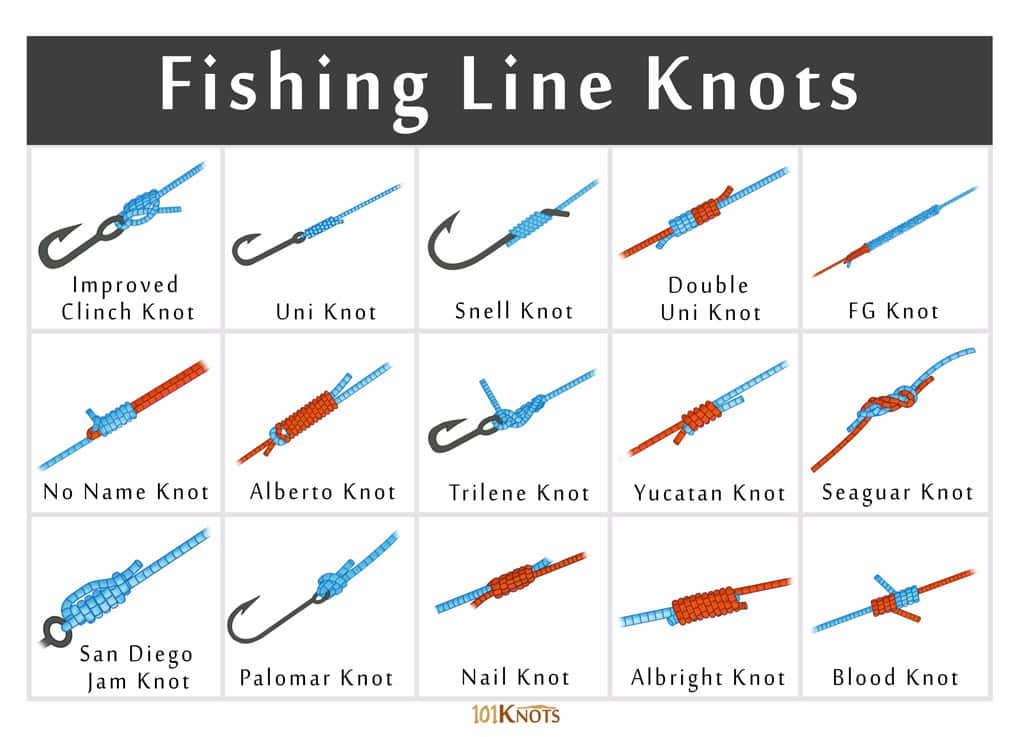
Double Uni Knot for Braid to Leader
The Double Uni Knot is the safest, simplest way to connect dissimilar lines like braid to fluorocarbon leader.
Steps:
1. Overlap braid and leader by 6 to 8 inches
2. Tie a Uni Knot with the braid around the leader using 6 to 8 wraps
3. Tie a second Uni Knot with the leader around the braid using 5 to 6 wraps
4. Moisten both knots
5. Pull standing lines to bring knots together
6. Trim tag ends
Why it works: Each knot slides independently until they meet, preventing jamming. Add a drop of knot glue on the braid side for extra security.
Albright Knot for Heavy-Duty Connections
The Albright Knot is standard for offshore trolling and surf fishing where braid meets heavy mono or wire leader.
Steps:
1. Form a 6-inch loop in the braid
2. Insert the leader into the loop
3. Wrap the leader around both braid strands 8 to 10 times
4. Feed the tag end back through the loop
5. Moisten and pull the braid end to tighten
6. Trim
Use when: You need a strong, compact joint that runs smoothly through guides. Warning: It is bulky and may hang up on small rod eyes.
Slim Beauty Knot for Less Bulk
The Slim Beauty Knot is a refined Albright alternative with a smaller profile and better guide clearance.
Steps:
1. Create a loop in the braid
2. Pass the leader through
3. Wrap the leader around the braid and itself 5 to 6 times
4. Feed the tag end back through the loop
5. Moisten and pull tight
6. Trim
Best for: Light braid to heavy tippet in clear water. It holds as strong as Albright but slips through guides easier.
Create Strong Loops for Your Rig
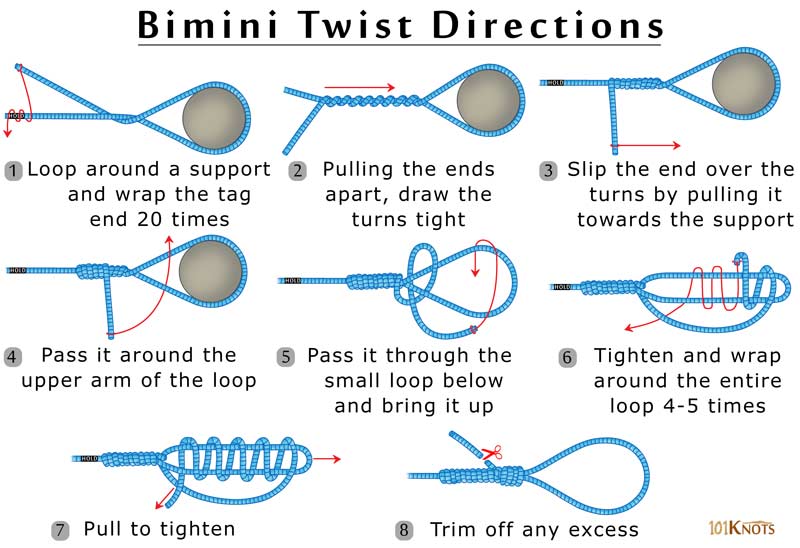
Bimini Twist for Ultimate Strength
The Bimini Twist is used in big-game fishing and preserves up to 90 to 100 percent of line strength.
Steps:
1. Twist 10 to 20 feet of line into a double strand
2. Wrap one leg around the doubled section 20 to 30 times
3. Form a loop and pass the twisted section through it
4. Wet and pull to set
5. Trim
Pair it: Attach a leader with a Double Surgeon is Loop for a bulletproof connection. Go-to for marlin, sailfish, and shark fishing.
Dropper Loop for Adding Second Hooks
The Dropper Loop is perfect for nymph rigs, hi-lo bait setups, or drop shot systems.
Steps:
1. Form a large loop in the main line
2. Wrap the line around both sides of the loop 3 to 5 times
3. Pull the wraps open to form a new loop
4. Tighten by pulling all four ends
5. Trim
No tools needed: It is entirely self-contained and durable. Ideal for trout, panfish, and bottom fishing.
Spool Your Reel Correctly
Arbor Knot to Lock Line to Spool
The Arbor Knot is essential for attaching backing or main line to the reel arbor.
Steps:
1. Tie an overhand knot around the spool hub
2. Tie a second overhand knot in the tag end
3. Moisten and pull so the first knot jams against the second
4. Trim
Critical: Leave 1/8 inch of space below the spool rim for backing. Never skip this step because line can spin loose under pressure.
Spider Hitch to Prevent Slippage
The Spider Hitch is used before the Arbor Knot to anchor backing on smooth spools.
Steps:
1. Wrap the line across the spool hub
2. Make crisscross turns for grip
3. Secure with half hitches
4. Cover with tape or epoxy
Silent hero: Keeps backing from slipping during long casts.
Avoid These Common Knot-Tying Mistakes
Dry Tying Weakens Your Line
Friction heat from dry tightening can reduce strength by 20 percent on monofilament and fluorocarbon. Always moisten with water, saliva, or vegetable oil before pulling tight.
Too Few Wraps Cause Slippage
Light line needs more wraps while heavy line needs fewer. If it slips, add a wrap.
| Line Weight | Minimum Wraps |
|---|---|
| 4 to 6 pounds | 6 to 7 |
| 8 to 12 pounds | 5 to 6 |
| 15 pounds or more | 4 to 5 |
Tag End Length Matters
Less than 1/8 inch risks pull-through while too long snags. The goldilocks length is 1/4 inch, long enough to hold and short enough to stay clean.
Wrong Knot for Line Type
The Clinch Knot on braid will slip. Blood Knot with braid has no grip. The Palomar on thin tippet is too bulky. Always match your knot to your line.
Quick Knot Selection Guide

| Purpose | Best Knot | Why |
|---|---|---|
| Hook to Braid | Palomar | Strong, easy, reliable |
| Hook to Mono | Improved Clinch | High strength, simple |
| Loop for Lure | Non-Slip Loop | Maximizes action |
| Braid to Leader | Double Uni | Safe, smooth, strong |
| Join Mono to Mono | Blood Knot | Strongest for same diameter |
| Fly to Tippet | Davy Knot | Fast, minimal waste |
| Leader to Fly Line | Nail Knot | Permanent, clean |
| Spool Attachment | Arbor Knot | Prevents slippage |
| Middle-of-Line Hook | Dropper Loop | No tools, secure |
| Heavy Game | Bimini Twist | Near 100 percent strength |
Practice Until Knots Become Automatic
You will not tie perfect knots under pressure unless you have done it hundreds of times. Training plan: Tie each knot 20 times in daylight, practice blindfolded to simulate night fishing, use colored lines to track standing versus tag ends, and carry a knot card or app for quick reference.
Goal: Tie any essential knot in under 10 seconds on the water.
Always Verify Before Casting
Even perfect knots fail if the line is damaged. Before every cast, inspect for frays, kinks, or abrasion. Re-tie after every snag or break. Test new knots with a spring scale or firm pull.
Always moisten, always check, always trust, but verify.
Final Thoughts on How to Tie Fishing Knots
Mastering fishing knots is not optional, it is essential. The right knot can mean the difference between landing a trophy bass and watching it swim away with your lure. Focus on the four core knots that cover 90 percent of fishing scenarios: Palomar for braid, Improved Clinch for mono, Double Uni for joining lines, and Dropper Loop for multi-hook rigs.
Practice these knots until they become muscle memory. Always moisten before tightening, check your line for damage, and verify your knots hold before making that important cast. A 300-dollar rod is only as good as the 10-cent knot holding your hook. Invest time in learning these techniques, practice relentlessly, and fish with confidence. The next big catch starts with a knot you can count on.
Frequently Asked Questions About How to Tie Fishing Knots
What is the strongest knot for braided line?
The Palomar Knot is the strongest and most reliable knot for braided line. It retains up to 95 percent of line strength and is easy to tie even in low-light conditions. The Uni Knot and Alberto Knot are also excellent choices for braid.
How many times should I wrap a clinch knot?
For monofilament line under 6 pounds, use 5 to 6 wraps. For 6 to 12 pound line, use 4 to 5 wraps. For heavy line over 12 pounds, use 6 to 7 wraps. More wraps are needed for lighter line because it has less grip.
Why does my knot keep slipping?
The most common causes are too few wraps, dry tightening without moisture, wrong knot for your line type, or the tag end being too short. Add more wraps, always moisten before tightening, and ensure you are using a knot designed for your specific line material.
What knot should I use to connect braid to fluorocarbon leader?
The Double Uni Knot is the best choice for connecting braid to fluorocarbon leader. It is simple to tie, creates a smooth connection, and holds reliably. The Albright Knot and Alberto Knot are also good alternatives for this purpose.
How do I know if my knot is tied correctly?
A properly tied knot should have even, tight wraps with no crossing or loose sections. The knot should sit flush against the hook eye or connector. Pull firmly on both the standing line and tag end to test security before casting.
What is the easiest knot for beginners to learn?
The Palomar Knot is the easiest for beginners because it requires only a few simple steps and works reliably on all line types. The Improved Clinch Knot is also beginner-friendly and is one of the most widely used knots in fishing.





