

There’s a quiet thrill in watching a fish explode on a lure you designed, carved, and painted with your own hands. Making fishing lures isn’t just about saving money. It’s about crafting the perfect match for local forage, solving a fishing puzzle, and bringing creativity into your angling. Whether you’re tying a jig, pouring soft plastics, or carving a balsa crankbait, DIY lure making blends science, art, and instinct. The best part? You don’t need a factory. Just a few tools, some materials, and the drive to build something that works.
This guide breaks down everything you need to know to start making effective, custom fishing lures at home. From beginner-friendly jigs to advanced swimbaits, we’ll cover materials, tools, step-by-step builds, and pro tips that ensure your lures not only look good but catch fish. If you’ve ever wondered how to turn raw materials into a lure that mimics a shad, crawfish, or panfish, you’re about to find out.
Choose Your Lure Type First
Before buying tools or materials, decide what kind of lure you want to make. Each type has different requirements, complexity levels, and rewards. Starting with the right lure type prevents wasted money and frustration.
Start with Simple Jigs
Jigs are the easiest entry point into lure making. All you need is a jig head, thread, pliers, a vise, and some skirt material. You can tie a bass jig in under 10 minutes once you get the hang of it. Use rubber skirts, bucktail, or flashabou to mimic crawfish or baitfish. Add a trailer for extra action.
Pro Tip: Match the jig color to local forage. Green pumpkin works well for stained water, brown for rocky bottoms, and white for clear lakes.
Try Soft Plastics Next
Pouring soft plastics like worms, grubs, or creature baits takes more setup but opens up endless customization. You’ll need molds available online, Plastisol, a microwave, mixing bowls, and dyes. Heat the plastic, add scent or glitter, pour into molds, and cool. You control the color, texture, and buoyancy. Add garlic oil or glow powder for night fishing.
Build Wooden Crankbaits for Challenge
Carving balsa or basswood crankbaits sits at intermediate to advanced difficulty. You’ll shape the body, install a wire harness, add weight, paint, and tune the dive action. But there’s no better feeling than seeing your hand-carved lure wobble perfectly through the water. Balance is everything. Weight one-third back from the nose for neutral buoyancy and smooth swimming.
Gather Essential Tools for Lure Making
You don’t need everything at once, but certain tools are universal across most lure types. Building a basic tool collection opens the door to multiple lure styles.
Basic Must-Have Tools
A good vise holds hooks or blanks steady and lasts decades. You’ll also need a bobbin and thread, typically 6/0 or 8/0 for wrapping skirts and tying materials. Pliers and scissors handle cutting wire, twisting eyes, and trimming thread. Super glue bonds thread, feathers, and components fast. A whip finisher secures thread ends on jigs and flies without knots.
For Soft Plastic and Resin Work
Never use your kitchen microwave for Plastisol. Fumes are toxic, so dedicate a separate unit for lure making. Use glass mixing bowls and metal spoons. Plastic can melt or absorb dyes. Protective gear is essential. A respirator, gloves, and a heavy-duty jacket like Carhartt protect you when handling hot plastic. Buy commercial molds from Do-It Molds or Barlow’s Tackle, or make your own with silicone.
For Wooden Lures
Precision matters when making wooden crankbaits. Calipers and rulers measure thickness, length, and eye placement. A Forstner bit used in reverse drills clean eye sockets without splintering wood. A Dremel tool carves fins, gills, and contours. Sandpaper from 60 to 400 grit shapes rough cuts and smooths for finish. UV resin and a curing chamber seal wood, glue harnesses, and apply clear coats evenly.
Select the Right Materials

Your lure’s performance starts with the materials. Pick wisely based on buoyancy, durability, and realism. The right materials mean the difference between a lure that sinks like a rock and one that swims perfectly.
Body Materials by Type
Balsa wood is ultra-light and great for topwater poppers and shallow crankbaits. But it’s fragile and requires careful handling. Basswood is denser than balsa and sinks better. It’s ideal for deeper-diving lures. Plastisol is the go-to for soft plastics. Heat it to 350°F, pour into molds, and it cures flexible. Foam is buoyant and easy to shape, perfect for topwater frogs or walkers. Casting resins like Alumilite create hard-bodied lures and encapsulate electronics.
Weighting for Balance
Lead is cheap and effective. Use nail weights, sheet lead, or pour your own. Tungsten is denser than lead, so smaller weights achieve the same effect. This is ideal for compact lures. Placement matters. Center of gravity should be about one-third back from the nose for balanced action.
Hooks, Eyes, and Hardware
Treble hooks are standard on crankbaits. Use size 6 to 8 for 3-inch lures. Single hooks work better in weedy water. Use them on jigs and soft plastics. Split rings allow free movement. Size 1 or 2 works for most lures. Dive bibs or lips are plastic or metal. A 30° angle dives 6 to 7 feet. Steeper angles mean deeper diving.
Customize Colors and Finishes
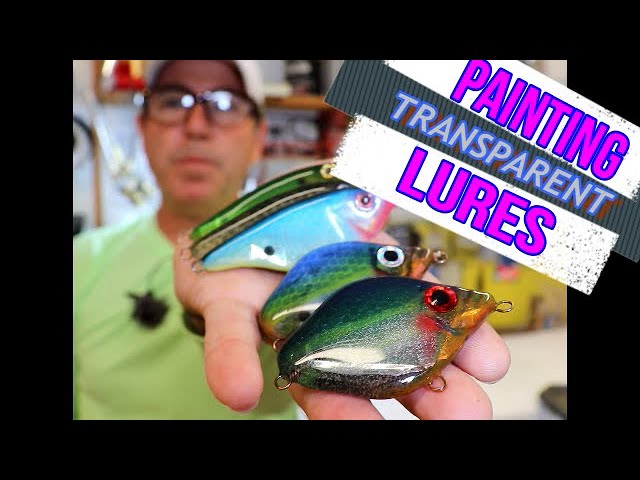
Fish react to color, flash, and contrast. A well-painted lure mimics real prey and triggers strikes. Understanding how fish see helps you choose the right color combinations.
Paint Strategy for Realism
Apply 3 coats of white micro-filler primer. Sand lightly between coats. Spray Wicked Aluminum for a metallic sheen that mimics fish scales. Add transparent layers of blue, violet, or bright green for depth and life. Use transparent charcoal black for shading. Apply thick on top and fade downward for 3D effect. Add accents like fuchsia gill plates, dark green vertical bars, and ghost-tint orange belly. Apply light silver to the top fin using a fine comb for detail.
Clear Coating for Durability
Use Minwax polyacrylic gloss, diluted 15% with water. Apply 3 or more coats and let dry fully between layers. A DIY rotating chamber like a motorized rod spinner prevents pooling and ensures even finish.
Build a Balsa Crankbait Step by Step

Let’s walk through making a 2¾-inch panfish crankbait perfect for crappie, perch, or smallmouth. This build teaches essential skills that transfer to other lure types.
Layout and Rough Shape the Blank
Mark centerline using calipers set to half the wood thickness. Score side guidelines about one-third down from the top. Cut a shallow groove along the belly for the wire harness. Use 60-grit sandpaper to round corners and shape the body. Cut slots for tail and dorsal fins with a Dremel. Drill eye sockets with a Forstner bit in reverse to avoid splintering.
Install Wire Harness and Weight
Use 131-lb test stainless steel wire at 0.024 inches. Twist the front eye, form the belly hook eye with conical pliers, and bend the tail eye into a gentle arc. Lay the harness in the groove and secure with 10-second UV resin. Add lead nail weights totaling about 14 grams to reach near-neutral buoyancy. Final pre-finish weight should be around 12.24 grams including the harness.
Seal, Prime, and Paint
Seal the bottom with a thin UV-resin coat and sand lightly. Apply a full UV-resin grain seal, cure 20 minutes, and sand. Spray 3 primer coats, sanding between each. Paint using your chosen color scheme. Finish with 3 or more polyacrylic topcoats in a rotating chamber.
Attach Bib and Tune Action
Glue on the dive bib and tail with UV resin. Test in a bucket or pool. If it veers left, gently bend the bib right. If it dives too deep, reduce weight or shorten the lip. The goal is straight swimming, smooth wobble, good casting, and 6 to 7 feet depth.
Make Soft Plastics from Molds
Pouring your own worms, grubs, or creature baits gives total control over look and feel. This technique opens endless possibilities for custom baits.
Heat and Mix Plastisol Safely
Use a microwave-safe glass bowl. Heat Plastisol to 350°F. Don’t overheat or it degrades. Stir in dyes, glitter, glow powder, or scent like garlic or anise. Pour into the mold and tap to remove bubbles.
Cure and Demold
Let cool for 5 to 10 minutes. Flex the mold to release the lure. Trim flash with a sharp blade. Pro Tip: Add a drop of mineral oil to keep soft plastics supple longer.
Tie Jigs Like a Pro
Jigs are fast, effective, and perfect for beginners. Mastering jig tying builds skills that transfer to other lure types.
Basic Hair Jig Build
Secure the jig head in the vise. Tie thread base at the hook bend. Wrap the rubber skirt over the thread and secure with a whip finish. Add bucktail or deer hair for the head and shape with scissors. Add a trailer hook if needed. Color tip: Brown and black work best for muddy water. White and chartreuse excel in stained water.
Add Advanced Features
Once you’ve mastered basics, try these upgrades. Advanced features separate good lures from great ones.
Glow and Scent Infusions
Mix phosphorescent powder into Plastisol for night fishing. Add liquid scent like fish oil or anise to soft plastics before pouring. Soak finished lures in scent solution for extra attraction.
Vibration and Electronics
Embed tiny battery-powered motors in resin bodies like vibrating cicadas. Build solar poppers with solar cells that power micro-vibrators. Use internal rattles in crankbaits for noise-sensitive species like pike.
Test and Tune Every Lure

No lure swims perfectly on the first try. Testing is critical to getting the action right. Skipping this step means missing fish.
Check Buoyancy and Balance
Float test in a bucket. The lure should suspend or rise slowly. If it sinks too fast, reduce weight or use lighter materials. If it floats nose-up, add weight toward the tail.
Fix Tracking Issues
If it pulls left, bend the dive bib slightly right. If it wobbles too much, shorten or flatten the lip. If it rolls over, adjust weight or body symmetry.
Evaluate Action
Retrieve speed affects wobble. Test slow, medium, and fast. Watch how light reflects off the paint. Does it flash like real bait? Does it cast well? A balanced lure flies true.
Avoid Common Mistakes
Even experienced builders make errors. Learn from them now instead of through失败.
Don’t skip sealing wood. Unsealed balsa soaks water and sinks. Always apply UV resin or epoxy before painting. Don’t overload with glitter. Too much flash looks unnatural. Use sparingly on back and sides only. Don’t ignore hook sharpness. Dull hooks mean missed fish. Always use fresh, sharp hooks. Don’t rush the finish. Rushing coats leads to bubbles, runs, or peeling. Let each layer dry fully.
Find Inspiration and Share Builds
The lure-making community is active and supportive. Connecting with other builders accelerates learning.
Join Online Forums
MakeLure.com features brag boards, tutorials, and gear reviews. Reddit r/Fishing lets you share builds and get feedback. YouTube channels like Jan’s Netcraft, Mud Hole, and Barlow’s Tackle offer real-time guidance.
Watch Build Videos
Search for DIY balsa crankbait or pour soft plastics at home for visual tutorials. Watching experienced builders helps you avoid mistakes.
Give Lures as Gifts
Handmade lures make meaningful presents. Name them after a lake, person, or memory for extra sentiment.
Frequently Asked Questions About Making Fishing Lures
What is the easiest lure to make at home?
Jigs are the easiest lure to make. You need only a jig head, thread, a vise, and skirt material. A basic hair jig takes under 10 minutes once you learn the technique.
How much does it cost to start making fishing lures?
Initial investment ranges from $50 to $200 depending on lure type. Jig tying requires the least investment. Soft plastics and wooden crankbaits cost more due to molds, materials, and tools.
Do homemade lures catch fish?
Yes, homemade lures catch fish consistently. Fish respond to size, color, action, and vibration rather than brand name. A well-made DIY lure often outperforms expensive commercial options.
What wood is best for making crankbaits?
Balsa wood is best for topwater and shallow crankbaits due to its light weight. Basswood works better for deeper-diving lures because it sinks more easily.
Is lure making profitable?
Lure making is rarely profitable as a business. Material costs and time investment typically exceed what lures can be sold for. Approach it as a rewarding hobby rather than a money-making venture.
Key Takeaways for Making Fishing Lures
Start simple with jigs or soft plastics before tackling advanced builds like wooden crankbaits. Focus on function first. Get the size, profile, and action right before worrying about fancy paint jobs. Invest in quality tools like a good vise and bobbin. They last decades and make every build easier.
Test and tune every lure. No lure swims perfectly on the first try. Adjust bibs, balance weight, and refine action until it performs. Join the community. Online forums and YouTube tutorials accelerate learning and provide inspiration.
Making fishing lures is more than a hobby. It’s a craft that deepens your connection to the water. Every lure you build carries a piece of your passion. And when a fish hits it? That’s the ultimate reward.